This curriculum was created with funding from a Children Youth and Families at Risk federal grant and implemented through in-school and after-school 4-H programming as part of Oregon State University in Linn and Benton counties.
Our goal was to engage youth with fun, physical activity lessons, while infusing exercise science knowledge to increase the confidence and competence of our participants.
The program was developed for middle school youth, but the lessons may be used with a variety of age groups. You may use the lessons individually or as a series. Use creativity as it pertains to your group’s interests, space and time frame. We had about 45 minutes per class to complete our mini-lesson and activity, but would recommend at least one hour if possible. The class size averaged 35 students. Most activities would work best with 12 or more.
Lesson 1
Mini-Lesson: What is physical fitness?
Learning goal
To explore the meaning of physical fitness.
What you need
- A piece of paper that says YES
- A piece of paper that says NO
- Tape
Mini-lesson how-to
- Share the definition of physical fitness with youth: Physical fitness refers to the ability of your body systems to work together efficiently to allow you to be healthy and perform activities of daily living.
- Ask the youth a question about physical fitness. Then ask the youth to place themselves in between the two papers according to what they think. This allows the youth to demonstrate their views in a visual way. Questions may include:
- Do you enjoy practicing physical fitness?
- Does the average person need to exercise four hours a day to stay physically fit?
- Should physical fitness be fun?
- Ask for volunteers to share their answers for each question, if time allows.
Activity: Human-sized Hungry Hungry Hippos
What you need
- 6 baskets
- 6 scooters
- 6 cones (optional)
- Whistle
- 200 soft colored play balls
- Hard surface court
Activity how-to
- Set up your space similar to the diagram.
- You may use cones to indicate where each team should set up their basket.
- Depending on the number of youth, split class into groups of four to six.
- Assign each group to a scooter/basket.
- Instruct the youth to select one individual to sit on the scooter.
- At the same time, ask two volunteers to release the colorful balls toward the center of the court.
- When the whistle is blown, the youth on the scooter may go collect one ball, propelling only with their legs.
- Once they collect one ball, they should return to their basket as soon as possible and place the ball in the basket. They then hand off the scooter to the next person in line. Repeat until all of the balls have been collected.
- When all scooters have returned to their baskets, have the teams count their collected balls. The team with the most balls wins that round! You may continue with the same rules or adjust for a different version. (One option: Allow each youth to take two balls per scooter trip).
Round it out
Reflect on what strategies made the activity successful for the youth. Why should physical fitness be fun?
Additional resources
Corbin, C., G. Le Masurier, Fitness for Life, 6th ed. 2014.
Lesson 2
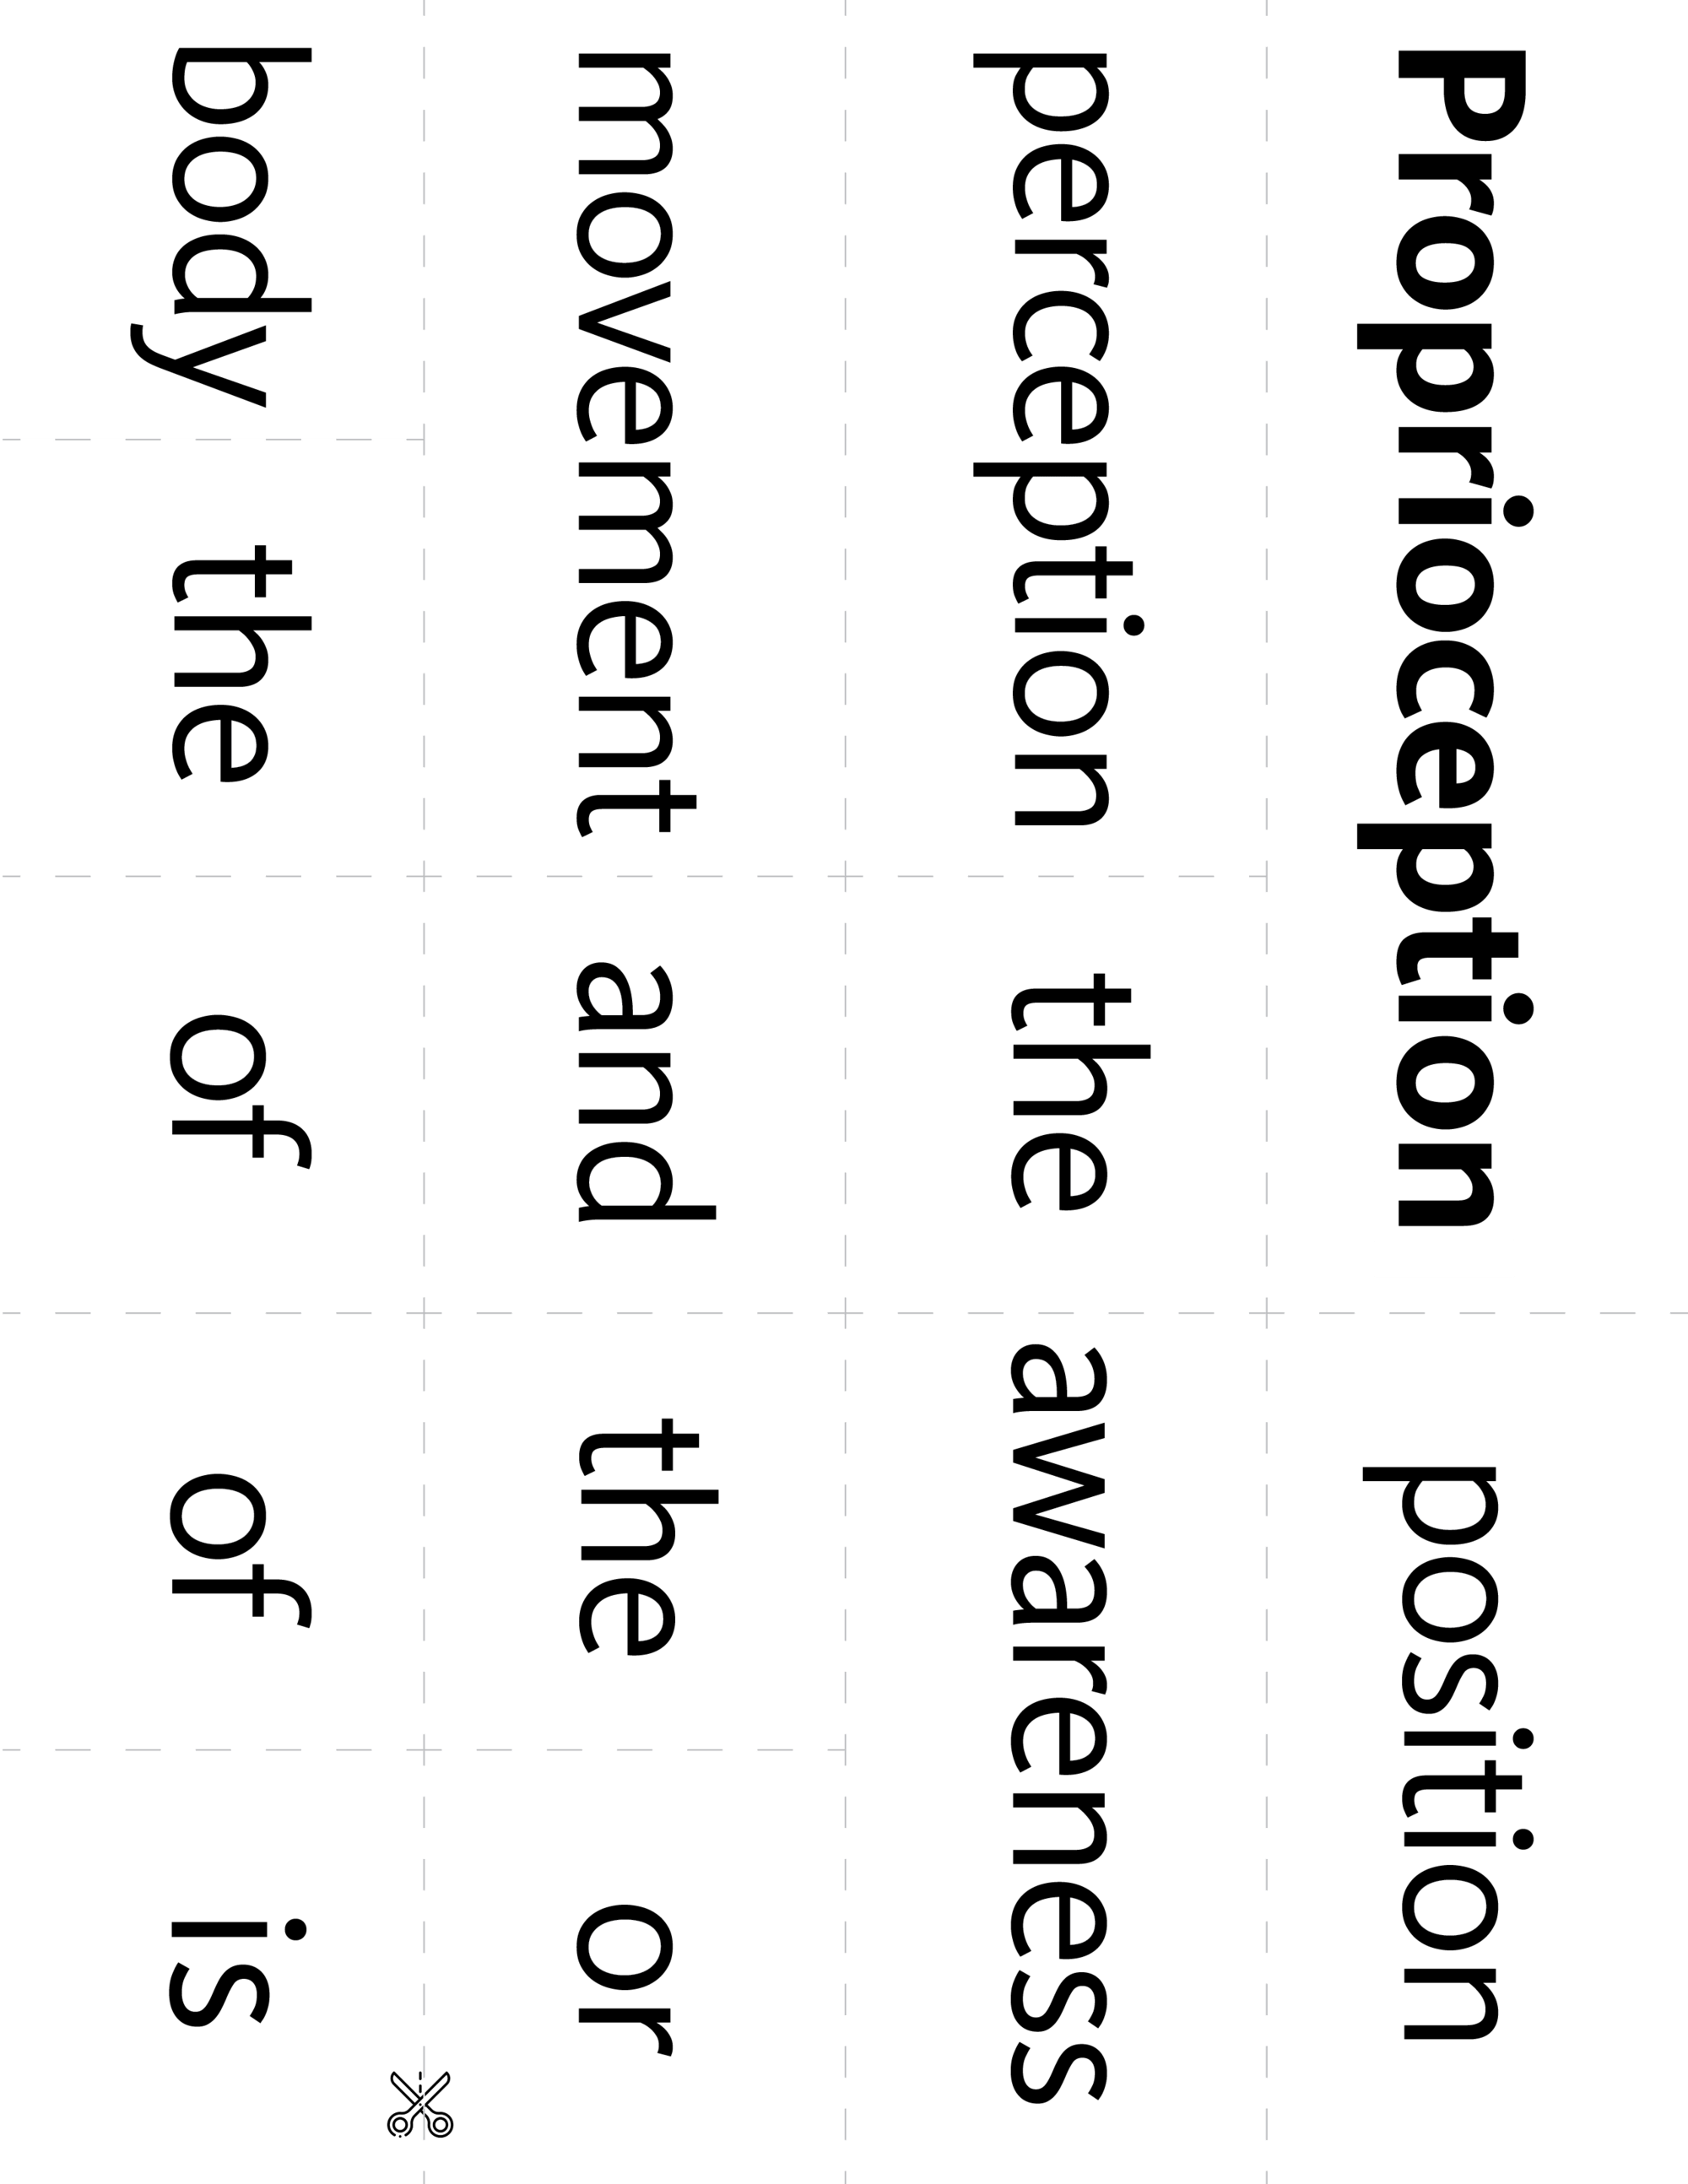
Mini-Lesson: Proprioception
Learning goal
To become familiar with the concept of proprioception.
What you need
- Definition of proprioception typed in large font with wide spacing and cut into individual words, mixed up
- Small bags
Mini-lesson how-to
- Write “proprioception” on a whiteboard or large piece of paper. Draw a line between “proprio” and “ception,” like so:
proprio | ception
Explain the meaning of both Latin roots of the word. “Proprio” means “self” or “own.” “Ception” means “reception” or “awareness.” - Ask youth to gather in groups of six.
- Give each group a bag of the definition puzzle and ask them to guess the definition by placing the words into a complete sentence.
- Set a timer for two minutes to complete. Ask them to raise their hands when done and check their answers.
- Ask for a volunteer from the group to summarize the definition out loud for everyone.
Definition of proprioception
Proprioception is the perception or awareness of the position and movement of the body.
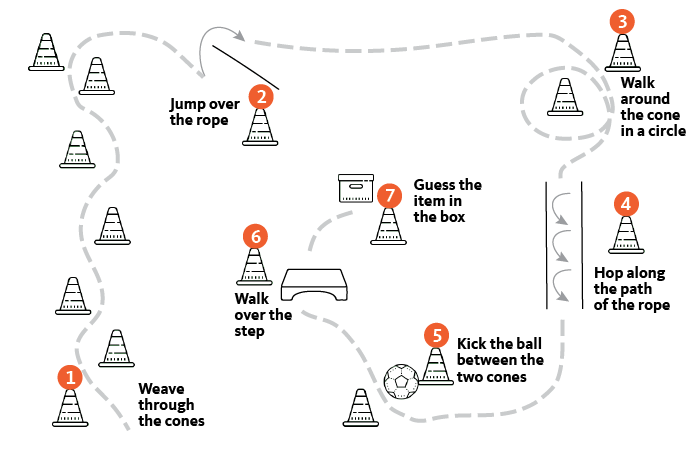
Activity: Blindfolded obstacle course
Learning goal
Practice proprioception, or body awareness, using the help of a team and the senses to successfully navigate through a set of obstacles.
What you need
- 15 blindfolds (1 per group)
- 15 cones
- 4 ropes
- 5 soccer balls
- 1 step
- 1 box
Activity how-to
- Divide youths into groups of three. One of each group will be blindfolded, one will help verbally communicate to the blindfolded youth how to move through the course using the map, and the other will be a safety guide. Guides are permitted to help by touching elbows and arms only; they may use verbal communication unless more help is needed.
- Each team starts at a different station and performs the action listed in the course diagram. See station numbers, pages 9–15.
- Station 1: The blindfolded youth weaves through the cones.
- Station 2: The youth jumps over the rope.
- Station 3: The youth walks in a circle around the cone once.
- Station 4: The youth hops along the path of the rope.
- Station 5: The youth kicks the ball between the two cones.
- Station 6: The youth walks over the step.
- Station 7: Youth guesses the item in the box by feel.
- Continue through all of the stations until each is completed. If time permits, switch blindfold with another group member and repeat. Continue until all members have completed the course.
Round it out
Ask students to explain what challenges they faced being blindfolded and guiding a blindfolded person. Reflect on what strategies made the activity successful for the youth.
Additional resource
Lesson 3
Mini-Lesson: Physical activity facts
Learning goal
To discuss and become aware of federal physical activity standards.
What you need
- Fill-in-the-blank fact sheets for every two to three youth
- Pencils
Mini-lesson how-to
- Use the worksheet on page 18 to share physical activity facts for youth with your students.
- Give out one worksheet per group of two to three students and one pencil.
- Students start when you say “go.”
- Students try to figure out the correct responses to each question. Ask for volunteers to give their answers when everyone is finished.
Activity: Team-building
Activity how-to
This lesson plan was created with 40 students in mind.
- Set up each of the five stations.
- Split youth into four main groups and assign each group to a station (10 to a group).
- After five minutes in their assigned stations, tell youth to switch stations.
- Repeat until each group has participated in each station.
Station 1: Gutterball
What you need
- 10 sheets of paper
- 1 golf ball (or a ball of similar size)
Activity how-to
- Designate a starting point and finish line.
- Each youth in the group grabs one piece of paper.
- Youth must form a straight line from starting point to the finish line.
- Each team member has to curve their paper vertically to create a “gutter.”
- The first person in the line starts with the ball and adjusts as necessary to roll the ball down their paper channel to the person beside them.
- This will continue until each youth has used their channel twice and reached the finish line.
Station 2: Hula Hoop Pass
What you need
2 hula hoops
Activity how-to
- Ask youth to form a circle holding hands or wrists.
- Challenge the students to pass the hula hoops around the circle without breaking hands.
- Place one hula hoop between two members of the group on opposite sides.
- Ask youth to pass the hula hoop around the circle once until it reaches the person who originally had it.
- Youth must communicate to figure out which way to direct the hula hoop and pass it on to the next person.
Station 3: Human Knot
Activity how-to
- Direct youths to form a circle and reach their hands toward the center of the circle.
- Each youth should take hold of two random hands (or wrists) across from them.
- Explain that the goal of the activity is to untangle their hands without letting go of each other.
- Youth must communicate to untangle the knots and re-form the circle.
- If done properly, youths should end up in a circle at the end (but not necessarily facing the same way).
Station 4: Helium Pole
What you need
1 tent pole
Activity how-to
- Ask team members to form a straight line, standing up.
- Explain that the goal of the activity is to lower the stick to the ground, but each person is allowed only one finger on the pole.
- Students may not wrap their fingers around the pole.
- Direct students to point their index finger outwards.
- Place the tent pole on top of the pointed fingers. Make sure each team member is in contact with the pole.
- Youth must communicate with one another while lowering the stick to make sure that it is contact with everyone. If the stick falls or slips from one person’s finger, the group must start over.
Station 5: Balloon Shuffle
What you need
- 5 balloons
- 4 cones
Activity how-to
- Designate a start and finish line.
- Ask youths to pick a partner (five groups of two).
- Give each pair one balloon.
- Explain that the aim of the game is to reach the finish line (marked with cones) without dropping the balloon.
- In pairs, students place the balloon knee to knee
in between each other. - Youth must use communication and teamwork to move toward the finish line.
- Repeat or add new challenges if time allows.
Round it out
Ask students to reflect on what made their activities successful or more challenging. Ask them what their favorite station was.
Additional resources
U.S. Department of Health and Human Services. Physical Activity Guidelines for Americans Midcourse Report: Strategies to Increase Physical Activity Among Youth. 2012.
U.S. Department of Health and Human Services. Physical Activity Guidelines for Americans, 2nd edition. Washington, DC. 2018.
GUIDE, Inc. Team-building activity: hula hoop pass
The Leader’s Institute, Team Building Game: Helium Stick
Physical activity recommendations for middle school students: Worksheet
From the Office of Disease Prevention and Health Promotion, U.S. Department of Health and Human Services
Fill in the following statements with the correct letter from the word bank.
- Youth should do ______ or more of physical activity a day.
- Only ______ % of middle schools provide daily physical education.
- Evidence shows that youth who are more physically active can have healthy ______ from things like running and jumping.
- Physical activity may improve cognitive function among youth and adults. This includes improved ______
- Compared to those who are inactive, physically active youth have higher levels of cardiorespiratory fitness and ______ muscles.
- Youth who are regularly active are less likely to develop ______ such as heart disease, hypertension or type 2 diabetes when they get older.
- Youth should not do only moderate-intensity activity. It is important to include _____________ because it leads to greater improvement in cardiorespiratory fitness.
- Examples of moderate-intensity exercise include __________________.
- Examples of vigorous-intensity exercise include ___________________.
Word bank
- a. stronger
- b. vigorous-intensity exercise
- c. 60 minutes
- d. walking, hiking, playing catch and riding a scooter
- e. sleep, attention and memory
- f. bones
- g. running, bike riding, playing chase, sports (soccer, tennis, basketball) and martial arts
- h. chronic diseases
- i. 8
Physical activity recommendations for middle school students: Answer key
- Youth should do 60 minutes (c) or more of physical activity a day.
- Only 8% (i) of middle schools provide daily physical education.
- Evidence shows that youth who are more physically active can have healthy bones (f) from things like running and jumping.
- Physical activity may improve cognitive function among youth and adults. This includes improved sleep, attention and memory (e).
- Compared to those who are inactive, physically active youth have higher levels of cardiorespiratory fitness and stronger (a) muscles.
- Youth who are regularly active are less likely to develop chronic diseases (h) such as heart disease, hypertension or type 2 diabetes when they get older.
- Youth should not do only moderate-intensity activity. It is important to include vigorous-intensity exercise (b) because they lead to greater improvement in cardiorespiratory fitness.
- Examples of moderate-intensity exercise include walking, hiking, playing catch and riding a scooter (d).
- Examples of vigorous-intensity exercise include running, bike riding, playing chase, sports (soccer, tennis, basketball) and martial arts (g).
Lesson 4
Mini-Lesson: Components of exercise
Learning goal
To learn the five components of physical exercise.
What you need
Printed fill-in-the-blank definitions
Mini-lesson how-to
- Split youths into groups of two to three.
- Pass each group a set of worksheets.
- Ask each group to fill in the missing words.
The 5 components of exercise: Worksheet
- Cardiovascular fitness: the body’s ability to supply ______________ and _____________ to the working muscles during exercise that lasts for an extended period of time.
- Muscular strength: the amount of ___________ a muscle or muscle group can exert against a ____________ resistance.
- Muscular endurance: the ability of a muscle or muscle group to _____________ a movement many times or to hold a particular ____________ for an extended period.
- Flexibility: the _____________ to which an individual muscle will lengthen.
- Body composition: the amount of _________ in the body compared to the amount of _________ mass.
Word bank
- blood
- degree
- fat
- force
- heavy
- lean
- oxygen
- position
- repeat
The 5 components of exercise: Definitions
- Cardiovascular fitness: the body’s ability to supply oxygen and blood to the working muscles during exercise that lasts for an extended period of time.
- Muscular strength: the amount of force a muscle or muscle group can exert against a heavy resistance.
- Muscular endurance: the ability of a muscle or muscle group to repeat a movement many times or to hold a particular position for an extended period.
- Flexibility: the degree to which an individual muscle will lengthen.
- Body composition: the amount of fat in the body compared to the amount of lean mass.
Activity: Relay course
Learning goal
The goal of this game is for each group to complete the activity to the best of their ability in the fastest time possible, practicing teamwork and focusing on the task.
What you need
- 6 ankle spinners
- 6 jump ropes
- 6 resistance bands
- 6 scooters
- 6 hula hoops
- 6 hop-along bouncers
- 6 plastic dinosaurs (optional)
Activity how-to
- Divide youths into groups of six.
- Assign each group a color or number.
- Give plastic dinosaurs to the first person in each group. This will serve as their “relay baton.”
- Each person will perform their activity across the gym, around the cone, and back. Wait for the whole group to complete station 1 before they can move to station 2.
- Station 1: ankle spinners.
- Station 2: jump rope.
- Station 3: use resistance bands across the thighs and duck walk.
- Station 4: students move the scooter using only their legs and feet.
- Station 5: hula hoop.
- Station 6: hop-along bouncers.
- Instruct youth that the next person cannot start unless the dinosaur is passed to them in line.
- If time permits, reassign each youth a new activity to perform in their groups.
Round it out
In what relay task did you practice muscular strength?
Lesson 5
Mini-Lesson: Cardiovascular fitness
Learning goal
To learn about cardiovascular fitness and to measure heart rate.
What you need
- Timer
- Cardiovascular fitness worksheet (page 24)
Mini-lesson how-to
- Tell youth that checking your heart rate is a way to determine cardiovascular fitness, and it is measured in beats per minute, or BPM. The heart rate rises during exercise to give more blood and oxygen to our working muscles.
- The average resting heart rate for youth ages 6–11 is 75–118 BPM. For ages 12–15, it is 60–100 BPM.
- Ask youths to place two fingers on their inner wrists (radial artery), or under their chins (carotid artery) and feel their pulse (See illustration at right). This works best when the room is completely quiet.
- Instruct them to count the total number of beats in 15 seconds when the timer starts.
- Start timer. Stop it after 15 seconds.
- Ask youths to multiply the amount by 4, and tell them that number is their resting heart rate for 60 seconds (15 seconds x 4 = 60 seconds). Each should record the number on their worksheet as their resting heart rate.
- Ask the youths to sprint to a destination about 100 feet away and back to the starting point.
- Once they return, direct them to find their pulse and time it for 15 seconds. Multiply that number by 4 and record their answer in the post-exercise line on their sheet.
*You can also use the included heart rate chart as a reference for the students.
Activity: Rock, Paper, Scissors tag
What you need
- 10–12 cones
- Whistle
Activity how-to
- Mark two “safe” zones on opposite sides of the court toward walls with cones
- Divide youth into two teams.
- Show youth the three signs:
Rock: Hold out two fists
Paper: Hold out flat hands, palms down
Scissors: Hold two “scissor” shapes with each hand (like normal rock, paper, scissors) - Tell youth that Rock chases Scissors, Scissors chase Paper, and Paper chases Rock.
- Ask each team to huddle together near safe zones to pick their sign and a backup sign. Emphasize that everyone on the team must do the same sign!
- After picking their sign, ask the team to form a straight line in the middle with their backs to the other team, with their sign ready (use two cones to designate middle).
- The facilitator will count down from three, and everyone must turn around and show their chosen sign.
- Depending on the sign chosen, one team will chase the other team according to the rules, and try to tag opposing team members by lightly touching shoulders.
- If a team member from the opposing team is in the “safe” zone, that person can no longer be tagged.
- If a person is tagged before they reach the “safe” zone, they switch teams on the next round.
- If the teams pick the same sign, the instructor will inform both groups to change to their chosen backup by having the youth line up again with backs facing each other and count down from three.
- The game ends when there are no more people left on one team, or you may set a timer to designate the end of the round.
- After the first complete round, ask students to check their pulse. (Use the instructions in the lesson plan.)
- Play more rounds as time permits, and then switch to jump rope challenges.
Additional activity: Jump rope challenges
What you need
Jump ropes for all participants. (Regular and long are both good options.)
Activity how-to
Jumping is a great activity to increase your heart rate! Use the jump ropes provided and a large, flat-surfaced area. Write the following challenges up for the youth to try. Playing energetic music during this activity makes it more fun!
With long rope (with two people swinging rope):
- Jumper tries to jump for 20 without the rope stopping.
- Jumper tries to spin while jumping for 20 jumps.
- Jumper tries to jump in while the rope is already spinning.
- Jumper tries to jump on one leg.
- Jumper tries to jump in squat position.
- Make up challenges for each other.
With single rope:
- Try to jump 50 times without stopping.
- Jump 30 times on one leg, then switch.
- Jump in reverse for 25 jumps.
- Add in five criss-cross jumps during 30 jumps.
- Make up challenges for each other.
Round it out
Ask students how physical activity affects heart rate. Reflect on the game, and ask them what other games help get their heart rates up.
Additional resources
Novak, C., and P. Gill, Pediatric Vital Signs Reference Chart, 2018.
Boldy, J. How to Check Your Pulse. 2019.
| Intensity | Heart rate Beats per minute |
|---|---|
| Very light | 104-114 |
| Light | 114-133 |
| Moderate | 133-152 |
| Hard | 152-171 |
| Very hard | 171-190 |
Cardiovascular Fitness: Worksheet
Today we are learning about the exercise component of cardiovascular fitness! Take the next few minutes to fill out this worksheet to the best of your ability.
- What is the measurement for heart rate? (Circle one.)
- RPM
- MPG
- BPM
- HRM
- Where on the body do you check for heart rate?
- How many chambers are in the human heart? (Circle one.)
- Six
- Two
- Four
- Three
- After a light workout, your heart rate will probably ___________. (Circle one.)
- increase
- decrease
- stay the same
- What is the main function of the heart?
- Try to find your pulse on the carotid artery in your neck, or the radial artery in your wrist.
- Resting heart rate___________
- Post-exercise heart rate____________
Cardiovascular Fitness: Answer key
Today we are learning about the exercise component of cardiovascular fitness! Take the next few minutes to fill out this worksheet to the best of your ability.
- What is the measurement for heart rate? (Circle one.):
- BPM
- Where on the body do you check for heart rate?
- There are many places, but most common are the wrist (radial) and neck (carotid).
- How many chambers are in the human heart?
- Four
- After a light workout, your heart rate will probably ___________. (Circle one.)
- increase
- What is the main function of the heart?
- Pump blood, oxygen and nutrients to the body; remove carbon dioxide and waste; help you stay alive.
Lesson 6
Mini-Lesson: Muscle strength
Learning goal
To explore the meaning of muscle strength and to be able to discuss types of muscles, muscle cells and the purpose of strengthening exercises.
What you need
Muscular strength worksheet (page 27)
Mini-lesson how-to
Ask the youths to find a partner and fill out the worksheet to the best of their ability. After three minutes or so, ask them to share their answers.
Activity: Circuit training stations
What you need
- 6 cones
- Whistle
- Station numbers
- Names and description of exercises
- 12 yoga mats
- 6 sets of 2-lb. dumbbells
- 6 resistance bands
- A wall
- 6 jump ropes
- Medicine balls
- Poly spot markers
Activity how-to
- Within the space you are given, set up the cones, numbers and descriptions of each exercise.
- Set up the corresponding equipment with each station.
- Ask the students to perform the exercise for 1 minute; allow 10 seconds to switch.
- Play music during the circuits and ask someone to be the timer. Use a whistle to indicate a station change.
- Additional helpers can assist with form and encourage participation.
Station examples (6 youths at each station)
- Station 1: jump rope
- Station 2: triangle lunges (poly spot markers)
- Station 3: arm extensions (2-pound dumbbells)
- Station 4: resistance band shoulder press (resistance bands)
- Station 5: abs with medicine ball (yoga mats)
- Station 6: walking push-ups (yoga mats)
- Station 7: wall sits
Round it out
Ask the students if they could create a workout for themselves targeting all the major muscle groups. What exercises would they include?
Additional resources
Ross, Sharon. 36 Pictures to See Which Muscle You’re Stretching.
Muscular strength: Worksheet
- Each person should do muscular strengthening activities at least ________ per week.
- Muscular strengthening activities make the muscles work harder than they are used to. This is called ______________
- Your body has more than _____ muscles.
- The strongest muscle based on size is called the masseter. It is a muscle in your jaw, and it can close your teeth with a force as great as _____ pounds on your molars.
- Muscles are made of special cells called __________ ________. They function in muscle contraction.
- The largest muscle in the body is the ________ _________. It is the main extensor of the hip.
- There are three main types of muscles: ________, cardiac and smooth.
Word bank
- overload
- muscle fibers
- skeletal
- gluteus maximus
- 600
- 200
- twice
Did you know? Functional units called sarcomeres inside your muscles give skeletal muscles their striped appearance. When your muscles are being used, sarcomeres change shape. A muscle contraction is when the sarcomeres shorten. Contractions shorten the sarcomeres on the biceps (agonist muscle), but lengthen the triceps (antagonist muscle). This relationship with opposite muscles is what helps us move!
Muscular strength: Answer key
- Each person should do muscular strengthening activities at least twice per week.
- Muscular strengthening activities make the muscles work harder than they are used to. This is called overload.
- Your body has more than 600 muscles.
- The strongest muscle based on size is called the masseter. It is a muscle in your jaw, and it can close your teeth with a force as great as 200 pounds on your molars.
- Muscles are made of special cells called muscle fibers. They function in muscle contraction.
- The largest muscle in the body is the gluteus maximus. It is the main extensor of the hip.
- There are three main types of muscles: skeletal, cardiac and smooth.
Lesson 7
Mini-Lesson: Muscular endurance
Learning goal
To explore the meaning of muscular endurance and how it relates to youth fitness.
What you need
- Worksheets (page 30)
- Pencils
Mini-lesson how-to
- Have the youths work with a partner to fill out the muscular endurance worksheet. Allow two to five minutes to complete the worksheet.
- Ask for volunteers to share their answers.
Activity: Crows and hens
What you need
- 8 hula hoops
- Lots of bean bags or balls
- Colored jerseys
- 4 baskets
Activity how-to
- Scatter hula hoops on each side of the gym. Place bean bags or balls inside hoops. Place four baskets on the half court line. Designate two parallel lines alongside the baskets as a safe zone.
- Split the class into two groups. One group will wear jerseys. (Or, both groups will wear jerseys of two different colors.)
- One group will be in the center of the gym; this area is their safe zone. This group will be the Crows.
- The other team will be scattered throughout the gym, outside of the safe zone. This group will be the Hens.
- Explain that the aim of this game is for the Crows to steal as many “eggs” (bean bags or balls) as possible and place them in a basket without getting tagged by a Hen.
- If tagged by a Hen, the Crow must step to the sidelines and perform 20 jumping jacks. The player may then re-enter the court.
- Play for 3-5 minutes and switch groups. Count how many bean bags or balls were stolen and keep track for friendly competition between groups.
- Switch roles and repeat.
Rules
- Crows can only steal one bean bag or ball at a time.
- The Crow has to gently place the bean bag or ball into the safe zone in the middle of the gym into the basket, for the bean bag or ball to count.
- Hens may not be “broody.” They must not be inside the hula hoop and need to allow for some space around the hoop.
Teacher tip
If time permits for another round, you may assign a specific movement for the Crows and Hens to change the pace of the game. For example, the Crows may only frog hop, and then Hens may only crab walk. Also, you can change the placement of the hoops around the gym; you could spread them farther out or bring them closer together.
Round it out
Ask students what they learned about muscular endurance. What teamwork strategies did they use?
Additional resources
Brown, Tanya, Facts About Muscular Endurance.
Muscular endurance: Worksheet
- Muscular endurance is the ability of the muscles to perform cyclic dynamic contractions over an _______________ period of time.
- The three forms of muscular endurance are: repetitive dynamic _______________, _______________ tension and prolonged intense contraction.
- Two types of muscle fibers are fast-twitch and slow-twitch fibers. Fast-twitch fibers contract faster than slow-twitch fibers, but slow-twitch fibers can be used for a longer period of time. Muscular endurance uses more ________ twitch fibers.
- Muscular endurance acts to improve the ____________ system.
Word bank
- contraction
- extended
- cardiovascular
- continuous
- slow
Fast fact: Slow-twitch fibers are great for endurance exercises such as cycling long distances and running. They are usually a darker red color compared to other muscles because they require more oxygen.
Muscular endurance: Answer key
- Muscular endurance is the ability of the muscles to perform cyclic dynamic contractions over an extended period of time.
- The three forms of muscular endurance are: repetitive dynamic contraction, continuous tension and prolonged intense contraction.
- Two types of muscle fibers are fast-twitch and slow-twitch fibers. Fast-twitch fibers contract faster than slow-twitch fibers, but slow-twitch fibers can be used for a longer period of time. Muscular endurance uses more slow twitch fibers.
- Muscular endurance acts to improve the cardiovascular system.
Lesson 8
Mini-Lesson: Flexibility and balance
Learning goal
To understand the importance of flexibility and balance and to incorporate them into fitness routines.
What you need
- Ruler
- Pipe cleaner
- Popsicle stick
Mini-lesson how-to
Using a Popsicle stick and pipe cleaner, bend both in front of the students and ask students which one is more flexible. Ask youth why flexibility is important for our health.
Why flexibility is important
- Flexibility lengthens muscles, reducing the likelihood of pulling a muscle and causing an injury.
- As you grow up, your muscles become weaker, which can decrease the range of motion around your joints, leading to less elasticity in your muscles. This means it is easier to hurt yourself.
- Flexibility exercises reduce muscle soreness and improve posture.
- Flexibility exercises increase blood and nutrient flow into muscles.
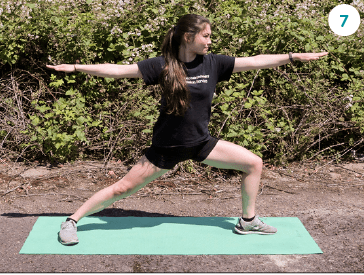
Activity Flexibility and balance stations
What you need
- Yoga mats for yoga and headstands
- Tablet computers
- Handout for tree pose
- Bosu balls and/or balance discs
- Ladder template with blue tape
- 4 cones
Activity how-to
Create six stations for this activity. Demonstrate each task before you ask the youth to perform them.
Yoga Station
Provide yoga mats and tablets for youth to do a simple yoga routine on their mat.
Headstand Station
Someone may need to demonstrate against a wall with a mat.
- Beginner variation: With heads down, bring knees to elbows, push feet off and extend legs into the air.
- Advanced variation: Don’t use the wall.
- If students can’t push up to a headstand, ask them to practice getting their knees to their elbows.
Balancing Station
Bosu ball balance: Balance on the ball side down starting with two feet. Progress to one foot, then progress to squat. Youth may need assistance getting on and off the Bosu ball safely. Place it next to a wall.
Jumping Station
- Create a ladder using tape with 10 squares. Ask youths to jump forward with both feet in each square for the first round.
- For the second round, jump in a zigzag pattern through the ladder for the second progression.
Tree Pose Station
With tree pose handout, practice tree pose on one leg for 45 seconds and then switch.
Dynamic Stretching Station
Set up cones for a start and finish area about 20 feet wide.
- Track warm-up: Youth walk with straight legs, extending up while simultaneously reaching with opposite hand to touch toes.
- Walking lunges: With hands on hips, youth lunge forward, keeping good posture and not overextending or flexing the joints.
- High knees: Youth jog with high knees.
- Heel kicks: Youth jog while kicking their heels to their back pockets.
Rules
Set the timer for 1 minute, 30 seconds. Instruct students to switch stations quickly. Use a whistle to let the Bosu ball and tree pose stations know to switch at the 45-second mark.
Round it out
Ask the students if they regularly stretch and practice balance exercises. Why would it be important to improve these skills while young?
Lesson 9
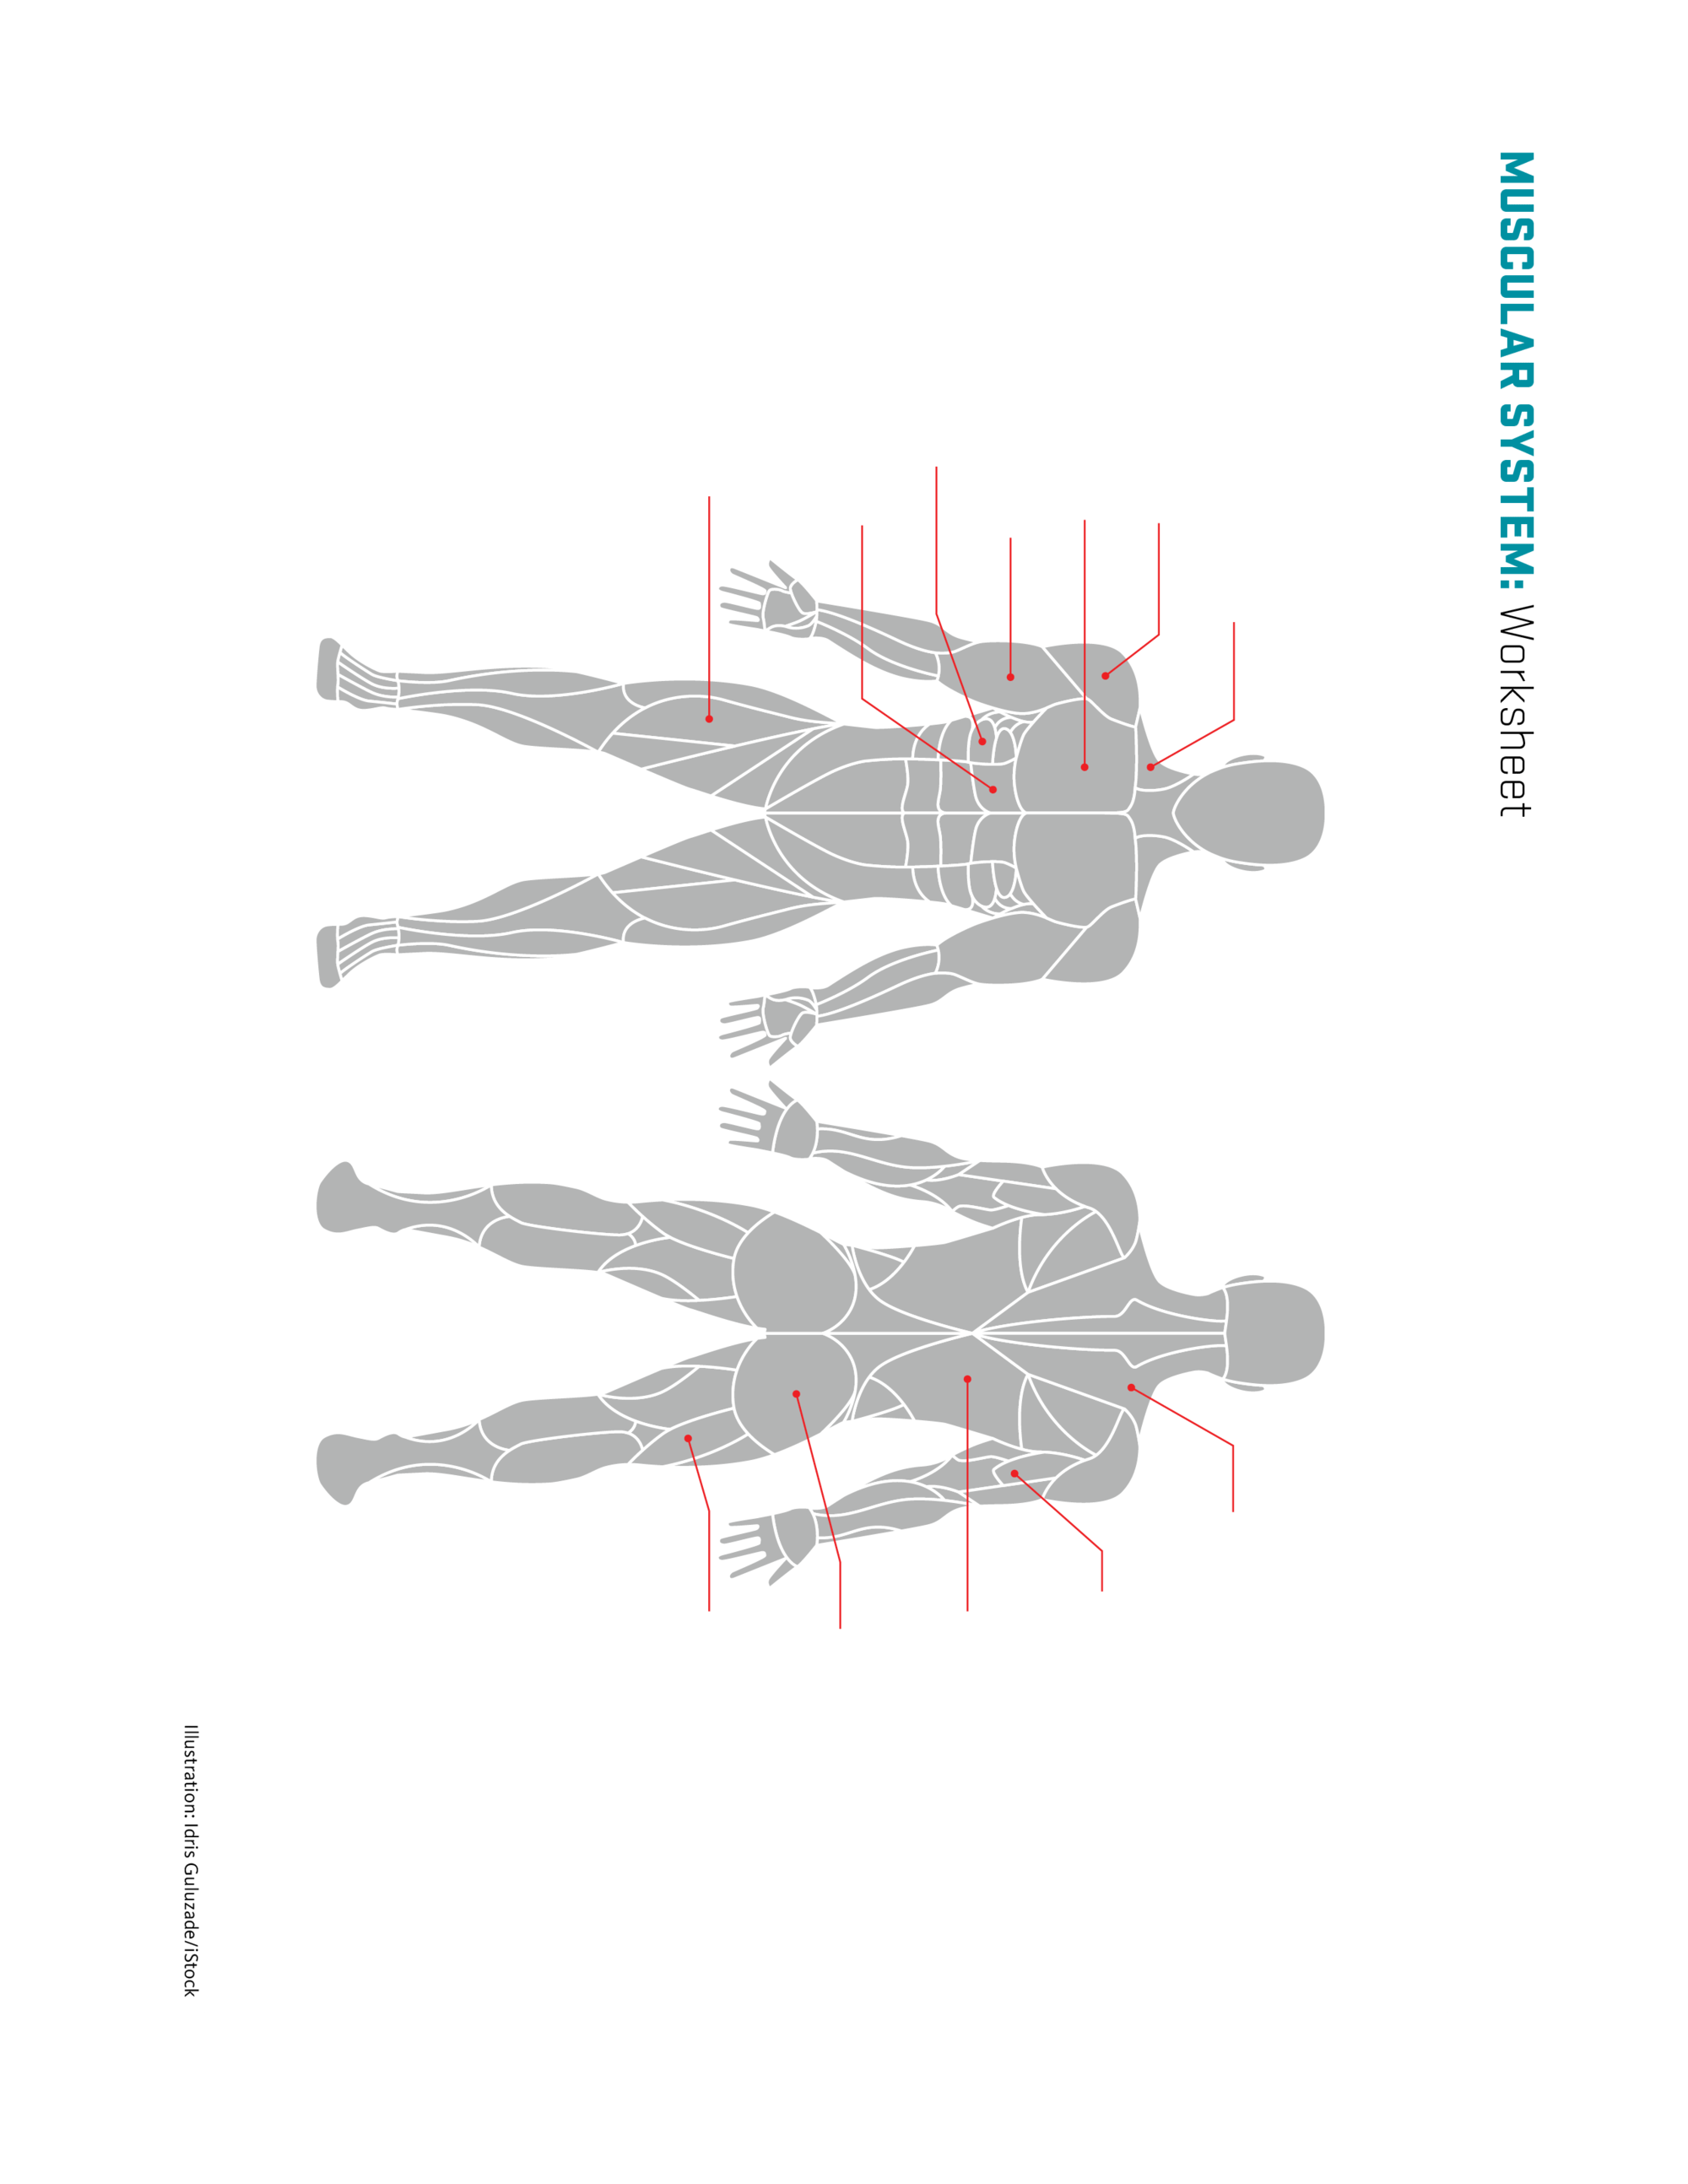
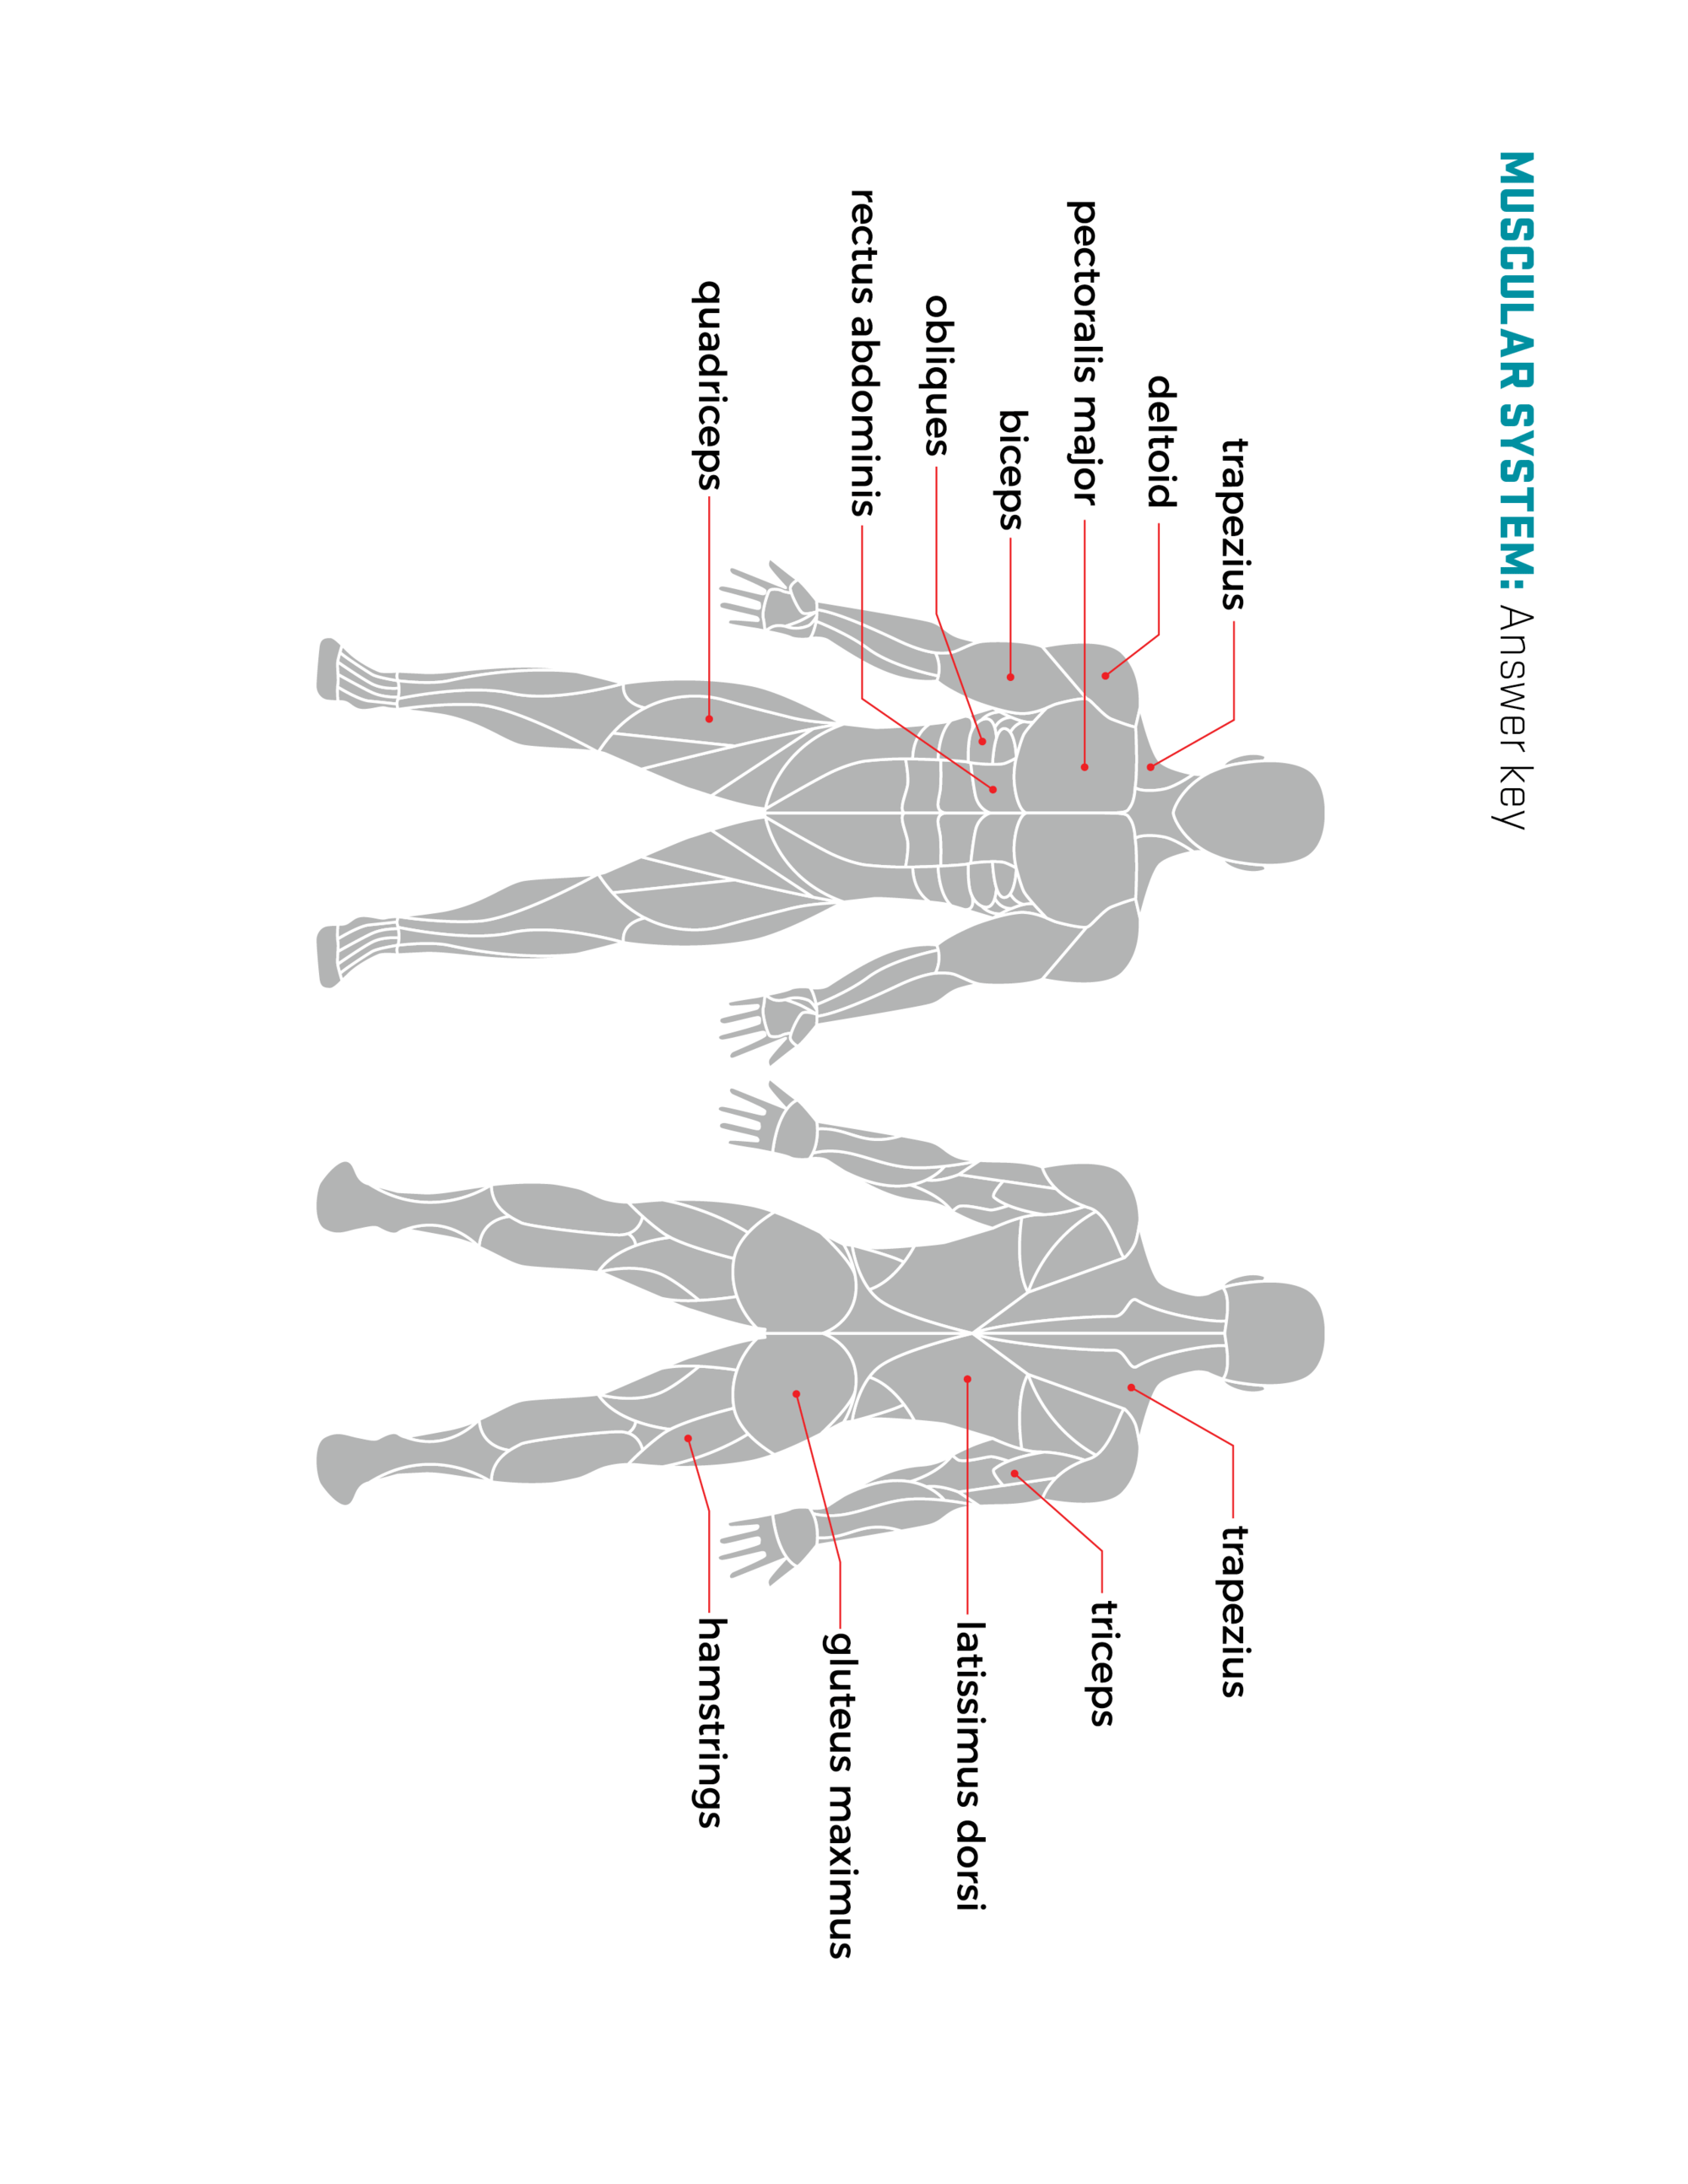
Mini-Lesson: Muscular system
Learning goal
To identify and learn common muscles in the body.
What you need
- Muscle anatomy worksheets (pages 37–38)
- Pencils
- Music
Mini-lesson how-to:
- Assign partners.
- Each team will need one pencil.
- Set labeled diagram on the opposite side of the room.
- Set unlabeled muscular system diagram with youth at the other end.
- When music begins, direct individuals to run (one at a time) to the labeled sheet, memorize a word, run back, and write on the blank one. Then the other partner runs to the labeled diagram and returns with another answer. Continue until complete.
- Review as a group.
Activity: Scooter hockey
What you need
- 24 scooters
- 24 hockey paddles or hands
- 1 indoor puck or soft ball
- 2 goals
- Whistle
- Timer
- 12 jerseys of one color
- 12 jerseys of a different color
Activity how-to
- Designate a goal on each side of the court. Use colored jerseys to distinguish between teams. Assign a referee. Each round is three minutes.
- Assign a goalie. One team will start on one side of center court and vice versa.
- Students get scooters and spread out on their team’s side of the court.
- When everyone is in position, the referee will blow the whistle and drop the ball or puck. Play is now live.
- The goal is for the youth to pass the ball or puck to teammates and try to get it into the goal on the far end of the court (not their own goal).
- The referee should blow the whistle if there is any foul play. If there is a goal, ask the teams to reset and start again. This would be a good time to rotate players if needed.
- Continue playing until time runs out or until all youth have participated.
Teacher tip
If you have more students than scooters, ask them to stand along the sidelines and be “bumpers” to get the puck or ball back within bounds. Rotate these youth into the game after the three-minute round ends.
Round it out
Ask youths to share fun activities they engage in to keep their muscles strong. These may include extracurricular activities, school clubs, community clubs, etc.
Lesson 10
Mini-Lesson: Skeletal system
Learning goal
To learn about the skeletal system.
What you need
- Skeletal system worksheet (page 40)
- Pens or pencils
Mini-lesson how-to
- Divide students into groups of two or three. Provide each group with a pen or pencil.
- Allow groups three to five minutes to complete the worksheet, using the word bank provided.
Activity: Skeleton basketball
What you need:
- Basketballs
- Basketball hoops
- Poly spot markers
- 4–6 sets of paper bones. (Cut them in advance.)
- Hula hoops. (Hoops and markers should match.)
Activity how-to
- Divide class into four to six groups and assign a color.
- Give each team one basketball and assign a set of paper bones in a hula hoop. Each team will know which hula hoop is theirs based on the assigned color.
- The youths take turns dribbling to their team’s poly spot color and taking one shot at the basket. If the youth makes the shot, they get to take one “bone” from the paper set, located behind the hoop in a hula hoop of their team’s color. They will quickly dribble the ball back and pass it off to the next person. The next person does the same thing. No intentional bounces or blocking of another youth’s shot are allowed.
- If the youth made the shot and is able to take a bone, they will start laying out the bones to create a skeleton in their designated space (see setup diagram).
- If the youth misses the shot, the youth will rebound the ball, quickly pass the ball back to the next player in line, and then join the back of the line.
- The first team to correctly put their skeleton together wins!
Teacher tip
For a variation, try changing where each poly spot goes.
Round it out
Ask youth what made the finished product successful or unsuccessful. Ask them what they would do next time.
Skeletal system: Worksheet
- The human body has about __________ bones.
- The body has two types of bones: ________________ and ________________
- One is hard and dense, while the other type is soft and spongy.
- The longest bone in your body is the ________________, which is in your leg.
- To keep your bones strong throughout your lifetime, you have to eat foods containing _____________,which is found in dairy products and dark leafy greens.
- _________ of your bones are in your hands and feet alone!
Word bank
- calcium
- 206
- femur
- trabecular
- 106
- cortical
Fun fact: When you are born you have about 300 bones. Once you’re an adult, some will have fused together, and you will have only 206 bones.
Skeletal system: Answer key
- The human body has about 206 bones.
- The body has two types of bones: cortical and trabecular.
- Cortical bone is hard and dense, while the other type is soft and spongy.
- The longest bone in your body is the femur, which is in your leg.
- To keep your bones strong throughout your lifetime, you have to eat foods containing calcium, which is found in dairy products and dark leafy greens.
- 106 of your bones are in your hands and feet alone!
Fun fact: Your teeth are part of your skeletal system, but are not considered bones.
About the authors