There are several reasons to dry solid wood products:
- Drying wood before use helps prevent staining and decay while in service.
- Drying wood to the average moisture content (MC) where it will be used ensures minimal dimensional change (shrink or swell) while in use.
- Dry wood weighs less and is less expensive to ship than green wood.
- As wood dries below its fiber saturation point (moisture content of about 25 to 30 percent), most strength properties increase.
For more information on the relationship between wood and moisture, see the OSU Extension publication Wood and Moisture Relationships.
Wood can be air-dried only, kiln-dried only, or air-dried to a certain MC and then kiln-dried. For example, green 4/4 white oak can take more than a month to kiln-dry, while air-dried 4/4 white oak can be kiln-dried in 1 to 2 weeks. For most commercial kiln operators, it is less expensive to have inventory on the air-dry yard than to do all drying through the kiln.
The process of drying wood is the same for air- and kiln-drying, but in kiln-drying you have much greater control over air velocity, temperature, and humidity. Controls are much less when air-drying lumber.
Air-drying
Air-drying means stacking lumber and exposing it to the outdoors. Final MC is determined by the air temperature, relative humidity, and drying time.
Depending on outside conditions and lumber species and size, air-drying to a desired MC can take from several months to almost a year. Wood stored outdoors and under cover will dry to an approximate moisture content of 12 to 14 percent in western Oregon and 8 to 10 percent in eastern Oregon.
When air-drying wood, you must stack the wood properly to ensure adequate air circulation, and you must test it frequently to monitor moisture content. Certain controls can make air-drying more efficient. These include orientation and layout of the stack, stacking methods, and covering the stack; all are discussed below.
Air-drying of wood begins as soon as the tree is cut. If the wood is to be used for furniture, moulding, millwork, or other high-value uses, take care to prevent degrade. If you are working with logs of species prone to checking, such as oak, apply an end coating as soon as possible, preferably in the woods before the logs are hauled.
Orientation and layout of the stack
The orientation and layout of the stack(s) of lumber play an important role in how lumber air-dries.
Construct the air-dry yard on gently sloping ground so water does not pool under stacks or in alleyways. Lumber stacked over a surface where water cannot pool, such as concrete or asphalt, dries faster than lumber stacked over bare or vegetation-covered ground.
Vegetation beneath the stack exposes the bottom layer to air with a higher moisture content. Therefore, never stack lumber over vegetation-covered ground.
Wind is not needed to force air through the stack. Air circulation can develop by natural convection. Warm, dry air enters the sides and top of the stack. As the dry air moves over the lumber, it evaporates moisture from the surfaces. Through evaporation, the air becomes cooler, moister, and thus heavier. The heavier air moves toward the bottom of the stack. If the prevailing wind moves freely, the cool, moist air is blown away and is replaced with warmer, drier air. Therefore, increasing the height of the foundation, thus allowing more space under the stack, will increase the drying rate.
You can use orientation and layout in several other ways to increase the drying rate:
- Use shorter and narrower stacks to facilitate air access.
- Stack lumber away from buildings, trees, or other objects that block the wind.
- Orient rows of stacks to allow prevailing winds to blow more directly under foundations.
Stacking
Figure 1 (page 1) shows a stack of lumber properly built for air-drying. This example uses concrete blocks as a foundation, but treated timbers or old railroad ties also could be used. (Caution: Wood preserved with chemicals may stain lumber it contacts.)
Ideally, a bottom support bunk, or bolster, should be under every row of stickers. This is especially important for thin lumber, which is more likely to sag.
Use stickers that are dry and of uniform size. Stickers should be enough wider than they are thick so they are not accidentally placed on edge between a layer of lumber. One-inch thick stickers commonly are used for air drying.
Proper sticker alignment, resulting in proper support for the lumber, is important in reducing warp as the lumber dries. Proper sticker placement also allows air to circulate evenly across the surfaces of the lumber and promotes a more uniform drying rate.
Place stickers as far apart as practical to ensure good air circulation. However, proper sticker distance depends on the size (especially thickness) of the lumber. Place stickers farther apart for thicker lumber, because it does not need as much support as thinner lumber.
Generally, a sticker distance of about 18 to 24 inches is sufficient for lumber of almost any size. However, some hardwoods, such as elm, should have stickers every 12 inches.
It is important to place stickers at equal distances and straight across a layer. Use a sticker at each end of each layer for support. Align stickers one on top of the other.
It is best if lumber pieces in the entire stack are the same thickness, because the time required to air-dry lumber to a target MC depends a lot on thickness. Two-inch lumber can take three to four times as long to air- dry to a certain MC as 1-inch lumber of the same species.
A thick board in a course can cause nearby boards to warp due to inadequate restraint of these boards. So, minimally, each layer should consist of lumber as nearly equal in thickness as possible.
It is best to stack lumber of the same length together. If you stack 3 long and short lengths randomly, the ends of the longer boards may overhang. This situation increases warping, end checking, and splitting and can lead to mechanical damage and safety concerns because forklifts and other machinery could run into the overhanging ends.
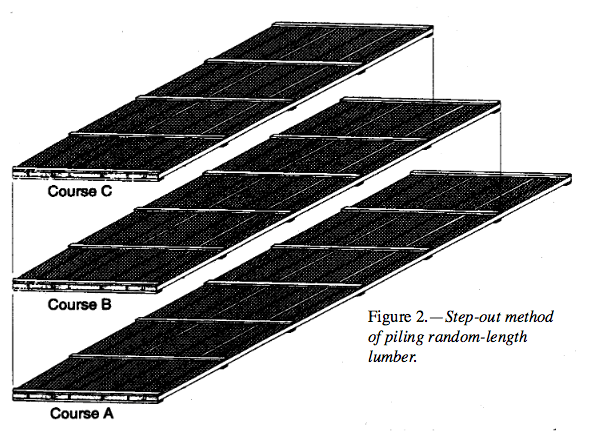
If you must stack different lengths of boards together, two suggested methods for stacking are step-out and box piling.
The step-out method This places the longest lengths at the bottom, with the next longer boards placed on the next layer, and so on until the stack is full (Figure 2). Place stickers across each course, supporting the ends of each board to minimize warping. This method does not allow you to build a roof or cover over the stack.
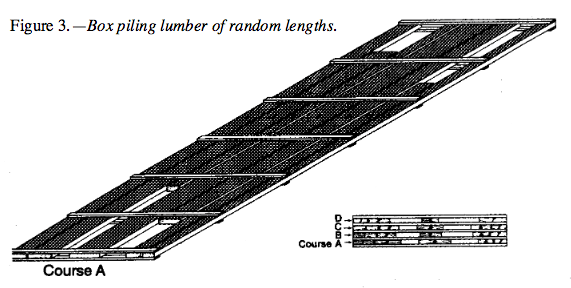
Box piling This arranges lumber so the length of the outside boards in each course is equal to the full length of the stack (Figure 3). Place other full-length boards near the middle of the stack across a course.
Arrange the shorter boards alternately with their ends even with each end of the stack. If you numbered the short boards, the ends of all even-number boards would be even with one end of the stack, and the ends of all odd-number boards would be even with the opposite end of the stack.
You can butt the ends of exceptionally short boards together as long as their combined length does not exceed the stack’s length. Although unsupported ends of short boards may warp, this is the best way to support and hold down different lengths of lumber in the same stack.
Box piling is the preferred way to stack lumber of different lengths. Remember, lumber pieces should be the same thickness, and it is best to stack lumber of the same length.
In Figure 1, thicker and longer pieces are used above the top layer to support a cover. A roof extends over the lumber by 2 to 3 inches on all sides to protect the lumber from precipitation and direct sun. It may be slanted so precipitation runs off. In this case, 4- by 6-inch timbers (4 to 6 inches longer than the stickers) support the roof.
Weight is needed to hold the roof in place. The extra weight also helps keep the top layer of lumber from warping as it dries. In Figure 1, cinder blocks on the roof add weight. The blocks are aligned directly above the stickers.
Controlling the dying rate
Remember the fundamental rule of drying: Quality depends on the rate of drying. You must achieve a balance between drying lumber too slowly, which would result in stain or decay, and drying lumber too quickly, which would result in checking. If you weren’t worried about defects, you could dry wood in a matter of hours in an oven.
In Oregon, especially east of the Cascades, lumber can air dry too fast. A temperature of 90°F and 15 percent relative humidity yields an equilibrium moisture content of less than 4 percent. A kiln operator would not expose green lumber to such harsh drying conditions.
In western Oregon, on the other hand, humidity often is too high to effectively air dry lumber during the fall and winter. The lumber re-wets by either direct precipitation or high relative humidity. However, lumber properly air dried through the summer should reach an MC of 12 to 14 percent by fall.
Uncontrolled air drying may dry lumber too fast. This causes drying defects, most commonly surface and end checks. These defects occur during the initial drying period, when wood is the wettest.
Drying stresses develop because wood shrinks by different amounts in different directions and because shrinkage affects outer fibers before inner fibers, thus creating a moisture gradient between the lumber’s core and shell. (See OSU Extension publication Wood and Moisture Relationships.)
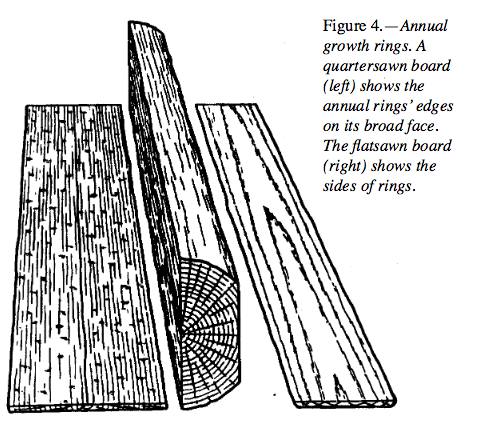
Surface checks form as the moisture gradient develops if the lumber surfaces dry too quickly. Thick, wide lumber is more susceptible to surface checking than thin, narrow lumber. Flatsawn lumber dries faster and is more susceptible to surface checking than quartersawn lumber (Figure 4).
Surface checks, especially in hardwoods, can close in the later stages of drying. This occurs when the stresses reverse (the core becomes drier than the shell), and the lumber shell changes from tension to compression. Although these closed checks cannot be seen, they cause problems for end uses, especially if
End checks usually are in the wood rays on end-grain surfaces. End checks occur because moisture moves much faster in the longitudinal direction (through the ends of the board) than in either of the transverse directions (through the sides of the board). The ends of the board (or log) dry faster than the middle, and stresses develop at the ends. These stresses can cause checks and warp to develop.
Direct sun can have a dramatic impact on the drying rate. Lumber in direct sun can dry faster than lumber inside the stack and on the side of the stack away from the sun.
If the lumber in direct sun dries too fast, you can use covers or barriers to protect the wood from the sunlight. Several commercial covers effectively block sunlight but allow air movement through the stack.
Maximum safe drying rates have been established for some hardwood species (Table 1). Some hardwoods, especially oaks, have low maximum values for rates of moisture loss per day (about 1 to 2 percent). These are maximum per-day values, not values averaged over longer periods.
Table 1.—Safe drying rates of some hardwood 4/4 lumber:
- Yellow birch1: 6.1% maximum daily rate of moisture loss
- Cherry1: 5.8% maximum daily rate of moisture loss
- Chinkapin2: 2.0-3.0% maximum daily rate of moisture loss
- American elm1: 10.4% maximum daily rate of moisture loss
- Soft maple1: 13.8% maximum daily rate of moisture loss
- Bigleaf maple2: 8.0-10.0% maximum daily rate of moisture loss
- Hard maple1: 6.5% maximum daily rate of moisture loss
- Eastern red oak1: 3.8% maximum daily rate of moisture loss
- California black oak2: 2.0-4.0% maximum daily rate of moisture loss
- Eastern white oak1: 2.5% maximum daily rate of moisture loss
- Oregon white oak2: 2.0% maximum daily rate of moisture loss
- Walnut1: 8.2% maximum daily rate of moisture loss
1 Empirically established drying rates for some eastern hardwoods (Wengert, 1980).
2 Estimated drying rates based on anatomical similarities with other hardwoods.
If drying defects occur, there are several ways to slow the drying rate:
- Build the stack of lumber over crushed rock or bare ground rather than asphalt.
- Make the stack larger (especially wider).
- Partially block the wind.
- Orient rows of stacks so prevailing winds do not blow directly under the foundations.
For lumber, such as thick oak boards, that is difficult to dry without causing seasoning checks, several additional steps may be necessary.
You can apply a coating to the ends of the lumber to retard the drying from these points. End coatings usually are wax-based. Apply end coatings as soon as possible because they are not as effective after the lumber starts to dry. You also can cover the ends of the lumber or the entire stack with burlap. Polypropylene fabric, or shade cloth, has been used to cover horticultural and agricultural crops for many years. More recently, this product has been used successfully to slow the drying of lumber and reduce checking. The use of end coatings, burlap, polypropylene, and other materials to slow the drying rate for certain species and sizes of lumber is common among commercial wood drying firms.
Drying sheds
If you are air drying large amounts of lumber, you can use a pole-type shed to achieve greater control over the drying process. Sheds allow more control since one or more sides can be blocked off, slowing the drying process. In addition, the lumber is better protected from precipitation and direct sun.
Drying sheds can be very simple in their construction. They can be made more complex by adding walls that can be raised or lowered and
You can block the sides of the shed and install fans at one end. Leave the other end open. Run the fans when you want increased circulation and shut them off to decrease circulation.
For wood species that have a tendency to check when drying too fast, such as oaks, run the fans when the exterior humidity is high and the air temperature is low. Turn fans off when the humidity is low and the temperature is high. This process slows the drying rate at the beginning, when lumber with a high MC is most susceptible to checking.
After the wood has dried to below about 22 percent MC, you can turn on the fans when the temperature is high and the humidity is low. No new surface checking will occur once the wood has reached this low MC.
When the humidity is high, turn the fans off to avoid reintroducing moisture into the lumber. Because no heat is added with this type of drying (sometimes referred to as fan predryers), the final MC is determined by outside ambient temperatures and relative humidities, just as in air-drying but with more control.
Determining moisture content
When air-drying lumber, you can monitor the lumber for staining or checking to determine whether it is drying too slowly or too quickly. You then can use some of the techniques in Table 2 to either slow or speed the drying.
Table 2.—A guide to reducing checking, warping, staining, and decay:
- A relatively slow initial drying rate reduces checking.
Do the following:- Use wider stacks or a double stack on a single foundation.
- Space stacks no more than 2 feet apart.
- Butt lumber in each course edge to edge as closely as possible, especially in the upper layers.
- Use thinner stickers (0.5 or 0.75 inch)
- Use polypropylene or shade cloth to protect lumber from direct sun.
- Use box piling if you stack different lengths of lumber in a stack.
- Use end coatings for logs and lumber.
- Proper support and restraint reduce warping.
Do the following:- Align stickers exactly above each other. Support both ends of each board with a sticker.
- Use close spacing between stickers, such as 12 to 16 inches.
- Use stickers of uniform thickness.
- Avoid different board thicknesses across a layer.
- Use a roof that extends past the pile by several inches on all sides.
- Use box piling if you stack different lengths of lumber in a stack.
- Fast surface drying reduces staining and decay.
Do the following:- Reduce the width of the stack.
- Provide more space between piles, such as 6 feet.
- Increase space between lumber across a course.
- Keep yard clean and avoid blocking air space below piles.
- Use a chemical dip, which can retard staining and decay.
However, most stains and all checks are permanent once they appear. A better way to track MC loss is to use a moisture meter, and the best way is to use the sample board method.
Moisture content is the total amount of water in a given piece of wood. The MC of wood usually is described as the ratio of the weight of the water to the weight of the wood after the wood has been oven-dried. Although 100 percent usually signifies the total amount of something, the MC of wood can be greater than 100 percent because the water can weigh more than the wood.
Moisture content for green (undried) lumber can range from 35 percent to more than 200 percent. The higher the initial MC, the longer it will take to dry the wood.
Sample boards
You can use sample boards to monitor the MC of lumber while it is drying. For expensive woods susceptible to drying defects, such as oaks, sample boards are especially important during the initial drying phase.
Sample boards should be representative of the moisture content of the lumber being dried. Generally, the wettest lumber has the highest risk of degrade, so sample boards should represent the wettest lumber.
The wettest lumber usually is the most recently cut, or the widest, or the thickest. Also, quartersawn lumber tends to be wetter than flatsawn lumber. Select the largest number of samples from the slowest drying material.
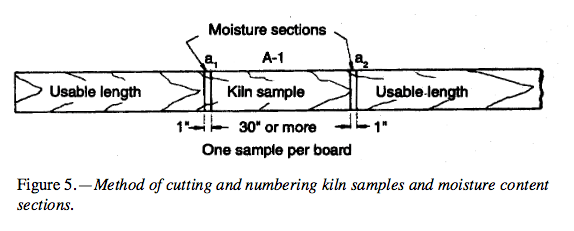
Referring to Figure 5, prepare sample boards as follows.
- Select the lumber to be used.
- Cut a 30-inch sample board.
- Cut two l-inch sections from the sample board. Avoid areas near knots or within 12 inches of the ends of the board.
- Number the two 1-inch sections you cut.
- Immediately weigh the l-inch sections to an accuracy of ± 0.1 gram (± 0.035 ounces). Record the weight directly on the section with a marker pen.
- Weigh the sample board to an accuracy of ± 0.05 kilograms (± 0.11 pounds). Record the weight directly on the board with a marker pen.
- End coat the sample board; a double coating is best.
- Place the sample board in the lumber pile where it will dry at the same rate as the rest of the lumber.
- Dry the l-inch sections in an oven at 215° to 218°F (103°C), just above the boiling point of water. Dry the wood about 24 hours; be careful not to burn or char it.
- Weigh the l-inch sections again and record the weights.
- Repeat steps 9 and 10 until you get the same weight twice in a row. The wood now is oven dry (OD), sometimes referred to as bone dry.
- Use the following equation to determine the wood’s MC percent:
(Weight of wood before drying / Oven-dry weight) - 1 x 100
or example, if the wood weighs 84 grams before drying and 60 grams after drying, the equation is:
(84 / 60) - 1 x 100 = 40%
If the water and wood weigh exactly the same, the MC is 100 percent. If the water weighs more than the wood, the MC is greater than 100 percent; if the water weighs less, the MC is less than 100 percent. - Add together the MC percent of the two sections and divide by 2 to determine the average MC of the wood:
(%MC1 + %MC2) / 2 = average %MC
For example, MC1 (from step 12) is 40 percent. Assume the moisture content for MC2 is 46 percent:
(40% + 46%) / 2 = 43% - Calculate the oven-dry weight of the sample board using the average MC percent you found in step 13 and the weight of the sample board from step 6.
(Wet weight (step 6) / 100 + %MC (step 13)) x 100 = OD
For example, if the sample board weighs 3.84 kilograms:
(3.84 / 100 + 43) x 100 = 2.69 kg - Write this calculated oven-dry weight on the sample board and return it to the lumber stack.
- Periodically reweigh the sample board to obtain a new, current moisture content.
Current weight (step 16)- 1 x 100
Calculated OD weight (step 14)
For example, if the new weight of the sample board is 3.21 kg:
(3.21 / 2.69) - 1 x 100 = 19.33%
This procedure lets you monitor how fast the wood is drying. See Table 1 for maximum safe drying rates of various species.
Moisture meters
You can use a hand-held moisture meter to determine maximum daily MC loss and to help determine final target MC. However, moisture meters are not as accurate as the sample board method. For moisture contents greater than the fiber saturation point (about 30 percent MC), moisture meter accuracy is questionable.
Remember, wood is most susceptible to degrade, including surface and end checks, as it starts to dry from the very wet stage. If you do not use sample boards, you should pay very close attention when drying species susceptible to checking, such as oak, during the early drying stage. If surface or end checking occurs, decrease the drying rate.
The most common type of hand-held moisture meter is the resistance (or conductance-type) meter, which has pins that penetrate the wood surface.
Another type of hand-held moisture meter is the dielectric power loss meter, which has smooth surfaces and does not penetrate the wood. Because of this design, dielectric-type meters are used in-line at wood products mills to monitor lumber, veneer, and other products for high moisture content.
For accurate measurements, you must apply temperature and species corrections to both types of meters. Manufacturers supply these corrections.
Problems when air-drying
- Lumber is susceptible to fungi, mold, and insect infestation while on the yard. Temperatures are not high enough to kill fungi, mold, or insects.
- Lumber that air-dries too quickly can check, split, honeycomb, and warp.
- Lumber is susceptible to chemical reactions and bacteria, and both can cause stains.
- Lumber can become “weathered” from dirt and other contaminants.
- Temperatures are not high enough to set the resin in highly resinous species.
Table 2 summarizes techniques to help reduce checking, warping, staining, and decay during air drying.
Glossary
Bolster-A square piece of wood, usually 4x4, placed between stickered packages of lumber to provide space for the forks of a lift truck.
Bone dry—Wood at zero moisture content. Not a natural state for wood. As soon as bone-dry wood is exposed to air, it will take in moisture.
Bow—A form of warp. Bow describes a deviation flatwise from a straight line drawn from end to end of a board. If the board is laid flat on a wide face, the ends of the board will be off the ground.
Check—Lengthwise separation of wood fibers that extends across the annual growth rings. Commonly caused by stresses during drying. Surface checks occur on flat faces of lumber, and end checks occur on ends of lumber, logs, and other wood products.
Crook—A form of warp. Crook describes a deviation edgewise from a straight line drawn from end to end of a board. If the board is laid on its edge (narrow face), one or both edges will be off the ground.
Cup—A form of warp. Cup describes a troughlike shape in which the board edges remain approximately parallel to each other.
Equilibrium moisture content—The balance of moisture content wood attains in response to the relative humidity and temperature of the surrounding atmosphere.
Fiber saturation point—The stage in the drying or wetting of wood when the cell walls are saturated with bound water and the cell cavities are free of liquid water. Fiber saturation point for most wood species is at moisture contents of about 25 to 30 percent.
Honeycombing—Checks, often not visible on the surface, that occur most often in the interior of the wood, usually along the wood rays.
Moisture content (of wood)—The weight of the moisture in wood, usually expressed as a percentage of its oven-dry weight.
Natural convection—A circulatory transfer of heat due to warmer air rising and cooler, denser air sinking.
Oven dry—See bone dry.
Pile—Lumber stack. Stacking lumber layer by layer, separated by stickers on a supporting foundation or stacking stickered packages one above the other on a foundation separated by bolsters.
Relative humidity—The ratio of the amount of moisture in the air to the maximum amount of moisture the air could hold at that temperature.
Split—Separation of wood fibers along the grain, forming a crack or fissure. Splits may extend partially or completely through the wood.
Stickers—Solid or laminated wood strips used to separate lumber. Typical sizes are 0.5 to 1 inch thick and 1 to 2 inches wide. Use 1-inch thick stickers for air drying.
Twist—A form of warp. Twist describes a lengthwise “twisting” of a board in which one corner twists out of the plane of the three other corners.
Warp—Distortion in lumber and other wood products, causing departure from its original plane. Common forms of warp are bow, crook, cup, and twist.
For more information
USDA Forest Service, Forest Products Laboratory. Visit the Publications section and search on topics of interest.
Other publications
Bond, B., 2006. Design and Operation of a Solar-Heated Dry Kiln, Publication 420-030. Virginia Polytechnic Institute and State University Extension Service.
Peck, E.C., 1962. Drying 4/4 Red Oak by Solar Heat. Forest Products Journal 12(3):103–107.
Plumptre, R.A., 1983. Some Thoughts on Design and Control of Solar Timber Kilns. Wood Drying Workshop of IUFRO, Division V, Conference, Madison, WI.
Reeb, J.E., 1995. Wood and Moisture Relationships, EM 8600. Oregon State University Extension Service.
Rietz, R.C. and R.H. Page, 2003. Air Drying Lumber: A Guide to Industry Practices (USDAForest Service, Agriculture Handbook 402).
Simpson, W.T., ed., 1991. Dry Kiln Operator’s Manual, Agriculture Handbook 188. USDA Forest Service, Forest Products Laboratory, Madison, WI.
Wengert, E.M., 1971. Improvements in Solar Dry Kiln Design, Research Note FPL-0212. USDAForest Service, Forest Products Laboratory.
Wood and How to Dry It. 1980. Fine Woodworking 22:56–59.
This information is provided for educational purposes only. If you need legal [or tax] advice, please consult a qualified legal [or tax] adviser.
Trade-name products and services are mentioned as illustrations only. This does not mean that the Oregon State University Extension Service either endorses these products and services or intends to discriminate against products and services not mentioned.
Use pesticides safely!
- Wear protective clothing and safety devices as recommended on the label. Bathe or shower after each use.
- Read the pesticide label—even if you’ve used the pesticide before. Follow closely the instructions on the label (and any other directions you have).
- Be cautious when you apply pesticides. Know your legal responsibility as a pesticide applicator. You may be liable for injury or damage resulting from pesticide use.