Introduction
The kiwifruit is a vigorous climbing vine native to Southeast Asia. Several species of kiwifruit are available from nurseries. Some have been developed to produce fruit; others are ornamental.
The most common kiwifruit species grown commercially worldwide is the Actinidia deliciosa cultivar ‘Hayward’. Consumers are familiar with this large, brown, fuzzy-skinned fruit. ‘Hayward’ needs a growing season of about 225 to 240 frost-free days.
Fruit do not ripen on the vine in this region. Instead, they are harvested at a physiologically ripe stage and ripened after cold storage (see “Fruit maturation, harvest and storage”). Although this species should tolerate temperatures down to 10°F, plants may be damaged at slightly higher temperatures, depending on when the cold event occurs.
Actinidia chinensis, another large-fruited, fuzzy-skinned species, includes yellow-fleshed cultivars. However, A. chinensis is not quite cold-hardy enough for consistent production in the Pacific Northwest.
The most common kiwifruit grown for fruit production in this region is Actinidia arguta, known as the “hardy kiwifruit” when production first started here but now more commonly referred to worldwide as the “kiwiberry.” Its fruit is also sometimes marketed as “baby kiwi.” This species is characterized by considerably smaller fruit with a smooth, edible skin and highly aromatic, sometimes tropical flavors. Various cultivars are commercially available, with flesh color ranging from green to red.
Oregon is a leading producer of kiwiberries in the U.S., but they are also grown in many other regions of the U.S. and in other countries. Commercial acreage has been limited mainly by marketing factors, such as development of fresh markets for this relatively unusual fruit, the range in fruit size, the limited ripening period for available cultivars, and the relatively short storage and shelf life compared to fuzzy kiwifruit. The continued development of both fresh sales and processed markets has strengthened this industry. More recently, new cultivars have been developed with improved shelf life and a longer fruiting season.
Kiwiberries are better adapted to this region because the vines are very cold hardy when fully dormant (hardy to minus 10°F to minus 25°F). However, even this species is sensitive to cold in late winter because buds break early. The newly developing young shoots of all kiwifruit species are sensitive to frost injury in late winter to spring. Temperatures of 30°F or less for only 30 minutes can severely damage shoots. Thus, in essentially all growing regions of the Pacific Northwest, kiwifruit can only be grown successfully with overhead irrigation for frost protection (see “Irrigation”) or by using some other frost protection method (see “Site selection”).
Kiwiberries will ripen over time on a vine. Fruit do not ripen all at once. Commercial growers will pick fruit at a physiologically ripe stage so that it is easier to harvest and will have better quality for storage and shipping. However, fruit will ripen on the vine, becoming soft and highly aromatic, in all areas of the Pacific Northwest.
Kiwifruit plants are dioecious, meaning there are separate male and female plants. While male plants do not produce fruit, they are essential for pollination and fruit production on female plants. Usually, one male is needed for every six to 10 females, and it is best to plant male and female vines of the same species. There are some home garden, self-fertile cultivars, such as ‘Issai’, that do not need male-pollinizing vines, but cross-pollination can increase fruit size even in these cultivars.
It is important to be able to tell the difference between male and female flowers at bloom. Sometimes vines are mislabeled. Male and female vines also need to be pruned at different times (see “Pruning”). Growers will label male vines in the vineyard (with trunk paint or some other method) to be able to distinguish them from female vines at all stages of growth to facilitate pruning in winter and leaf tissue sampling for nutrient status.
Female vines produce flowers that have both female and male parts (Figure 1). Note that the female part of the flower in the center (the stigma) is multibranched. Each branch of the stigma leads to a row of ovules. With good pollination and fertilization these become seeds, leading to rows of seeds within the berry. The male parts of this flower (the stamens tipped with anthers) are not functional in the female vines and thus do not produce pollen. In contrast, the male vines only produce male flowers (Figure 2). These flowers have lots of stamens with anthers that are rich with pollen. Note that these flowers can be distinguished from the female flowers because they lack the multibranched stigma in the center. These differences between male and female flowers apply to all types of kiwifruit. Fuzzy kiwifruit flowers are larger (approximately 1 to 2 inches in diameter) than those of kiwiberries (one-half to 1 inch in diameter).
The fruit of kiwi vines is a berry. Fuzzy kiwi have green skin with a brown fuzz whereas kiwiberries have a smooth, edible skin that provides extra nutritional value not typically consumed with fuzzy kiwifruit. The most common cultivars (or “cultivated variety”) have green flesh that does not brown when cut. Some commercial cultivars have yellow or red flesh. Kiwifruit are relatively high in acid, with an acid content (1% to 3% of fresh weight), that declines after harvest. Kiwifruit are one of the best natural sources of vitamin C with up to 430 milligrams per 100 grams fresh weight (an orange has about 70 milligrams per 100 grams fresh weight). They are considered a super fruit based on their many health benefits.
Fuzzy kiwifruit can be stored for months after harvest at 32–35°F. However, kiwiberries can be stored for no more than two months under the same storage conditions. Therefore, you likely will see local kiwiberries in stores for only a couple months after harvest (September through October in this region). Fruit produced in the Southern Hemisphere may be shipped here and available at other times, however.
Proper cultivar and site selection, planting establishment, management, pruning and training, and harvest and handling are critical for success in producing kiwifruit. This is considered a labor-intensive crop relative to other berries grown.
Take our online class!
Home gardeners and small farmers will learn to prune and train fuzzy kiwifruit and kiwiberry vines through all seasons and stages of growth.
Kiwifruit cultivars
There are many cultivars available, but a limited number have been tested and confirmed to grow well in this region. Unfortunately, some nurseries have assigned their own name for the same cultivar for long-standing publicly available varieties, creating confusion for buyers.
Kiwifruit are relatively easy to propagate using hardwood cuttings (see “Planting”). There are now some patented and trademarked cultivars available for purchase; these may not be propagated without a license from the patent holder.
Actinidia deliciosa, the green-fleshed fuzzy kiwifruit, is the most widely planted species worldwide. There is very limited commercial production in the Pacific Northwest because this species is not extremely cold hardy and may suffer cold injury in some years. Cold damage usually occurs when temperatures drop during the night after a warm spell, particularly when vines are not fully dormant (in fall or late winter). The trunk usually is damaged, weakening older plants and sometimes killing young vines (see “Site Selection” and “Problems”).
Yellow- or golden-fleshed fuzzy kiwifruit, Actinidia chinensis, cultivars are available in supermarkets (Figure 3). This species is less cold hardy and requires more heat units than A. deliciosa and is not recommended for commercial production in the Pacific Northwest.
The recommended kiwiberries for this region are cultivars of Actinidia arguta. Cultivars are listed below.
The information below on ripening dates, flowering season, fruit weight and plant performance is approximate and is for mature vines. Descriptions are from a cultivar planting at Oregon State University’s North Willamette Research and Extension Center in Aurora, Oregon, and observations in grower fields. Performance may vary with location.
‘Fuzzy’ kiwifruit, Actinidia deliciosa
‘Hayward’
‘Hayward’ (Figure 4) is the most commonly available green-fleshed cultivar found in grocery stores. It produces large fruit with green to brown skin covered with brown fuzz (hairs). The fruit flesh is green and has a good, sweet flavor. This cultivar is only recommended for areas of the Pacific Northwest with mild winters.
- Flowering season: Starts in mid- to late June (Figure 5).
- Harvest: Late October, depending on summer heat units. Fruit need to reach 6.5% total soluble solids (TSS or °Brix) (see “Fruit maturation, harvest and storage”).
- Fruit weight: 80–90 grams; fruit are about six times larger than kiwiberries (Figure 6).
- Vine growth: Vigorous; shoots produce large, round, thick leaves with a brown fuzz on the underside (Figure 7).
- Yield: Up to 100 pounds per vine.
Male
A good male pollinizer of the same species is required (Figure 8). There are many cultivars or selections of males available, but few have been tested in this region. Talk to growers or nurseries for specific information on bloom period and how well it overlaps with the bloom period of ‘Hayward’ in your region.
Kiwiberries
Fruit of hardy kiwi are best when ripened on the vine to maximize development of aroma and flavor; however, shelf life then is shortened. Harvest dates given below are based on TSS or sugar levels of 10–14 °Brix; however, some commercial growers will harvest at 8 to 9 °Brix. If left on the vine, the fruit will reach 18 to 25 °Brix and will be quite soft (see “Fruit maturation, harvest and storage”).
‘Ananasnaya’
This is the most popular kiwiberry cultivar currently grown in the region (Figure 9). Its Russian name means “pineapple-like.” You also may hear this cultivar referred to as ‘Anna’ by some growers or nurseries. Fruit are of very good quality, with a good aroma and sweet, intense flavor. They have green skin that develops a purple-red blush in full sun, especially when vine-ripened. Skin may be slightly tough.
The cultivar ‘Ananasnaya’ brought to Oregon is A. arguta. However, the Russian ‘Ananasnaya’ cultivar is A. kolomikta, considered more of an ornamental vine. Make sure you are purchasing the correct species.
- Flowering season: Starts in mid- to late June (Figure 10).
- Harvest: Starts in mid- to late September.
- Fruit weight: 6–14 grams (Figure 6).
- Vine growth: Vigorous; leaves are dark green, with pointed tips and have no fuzz on their underside (Figure 10).
- Yield: 60–150 pounds per vine.
‘Ken’s Red’
Grown by some in the Pacific Northwest to provide some diversity in fruit type available (Figures 11A and 11B). This cultivar from New Zealand is a cross of A. arguta var. cordifolia and A. melanandra. Fruit are nearly square to cylindrical with a “nib” at the tip. The fruit skin turns from bright green to dull green as fruit ripen. The flesh goes from green to red streaks and is reddish purple when ripe. Fruit size is similar to ‘Ananasnaya’, but this cultivar ripens slightly earlier. Vines are vigorous. Yield uncertain for commercial plantings.
‘Issai’ (self-fertile)
This cultivar from Japan is less vigorous than the other hardy kiwifruit cultivars listed above. Fruit are smaller in size, somewhat cylindrical, come to a point and are fully green, even when exposed to the sun (Figure 12). Flavor and aroma are very good. Harvesting is somewhat more difficult than for the other kiwiberries, because fruit are smaller and ripen rather unevenly within a cluster. There is evidence from trials that ‘Issai’ is more sensitive to phytophthora root rot than the other kiwiberry cultivars listed here (see “Problems”).
This cultivar, although self-fertile, produces larger fruit with seeds when cross-pollinated. Vines are slightly less hardy than other A. arguta at zero to minus 10°F.
- Harvest: Early September.
- Yield: 50–90 pounds per vine.
- Fruit weight: 4–9 grams.
- Vine growth: Moderate vigor.
74-49
This numbered selection came from a USDA program in Chico, California. This selection produces very good-quality fruit of similar size, appearance and quality to ‘Ananasnaya’. Vigor and yield are similar to ‘Ananasnaya’. Grown to a limited extent in Oregon.
‘HortGem Tahi’
This is a trademarked, patented cultivar from New Zealand. It is being grown by some commercial growers for earlier fruit production, to complement the season of ‘Ananasnaya’.
‘Jumbo’
A large-fruited, green-skinned, green-fleshed kiwiberry (Figure 13) that ripens later than ‘Ananasnaya’. Has a bland flavor compared to ‘Ananasnaya’. Not currently widely grown.
‘Geneva 3’
This cultivar reaches physiological maturity one to two weeks earlier than ‘Ananasnaya’ and has excellent flavor, ripens more evenly and stores well (Figure 14). It has been tested in New Hampshire and is strongly recommended for the northeastern U.S. but has not yet been tested in the Pacific Northwest. A potential concern is that it breaks bud in late winter about one week earlier than ‘Ananasnaya’, which could result in more frost damage, but in northeastern trials it has recovered from this damage by breaking more buds.
Male
Pollinizer for above female kiwiberry cultivars (Figure 15). Male vines should be planted among female vines in a commercial vineyard (see “Planting establishment”). If male vines are damaged by late winter frost and will not flower, kiwiberry cultivars can be pollinated using A. deliciosa pollen, which can be purchased commercially (see “Pollination” and “Problems”).
There are many cultivars or selections of males available, but either few have been well tested or compared in this region or there has been uncertainty related to mislabeling. ‘Meader’ male and 74-52 male are known for having early flowering and a long bloom period, respectively, suiting the flowering period for the female cultivars grown here. Planting a combination of males is recommended to increase the length of the bloom period for best pollination. Talk to growers or nurseries for specific information on bloom period and how well it overlaps with the bloom period of the female cultivars you are planting.
Planting establishment
Vine growth and fruiting habit of fuzzy kiwifruit and kiwiberries are similar and they are established, pruned and otherwise managed similarly. Any differences between these types are noted.
Site selection and preparation
Proper site selection, soil preparation, irrigation system design, planting design and training are essential to developing a productive kiwiberry vineyard.
Temperature
The most limiting factor for fuzzy kiwifruit production is minimum winter temperature and summer heat units. It is sometimes difficult to get fruit to adequately mature in cooler areas of this region (such as cooler coastal sites). ‘Hayward’ can withstand temperatures as low as 10°F, but injury can occur at warmer temperatures depending on when the cold weather occurs and the preceding temperatures. Cold injury to ‘Hayward’ has occurred in some winters in the Pacific Northwest (see “Problems”), making large-scale commercial production risky.
Dormant kiwiberry vines are more winter cold hardy (to minus 10 to minus 25°F). However, young vines may suffer winter injury, particularly to the trunk, if temperatures fluctuate from warm to cold in late winter.
All types are sensitive to late winter or spring frost damage after bud break (see “Problems”). In Oregon, growers have noted that male vines are more susceptible to freeze or frost damage than female vines. Choosing sites that are less prone to frost is important to minimize risk. Other factors that need to be considered include water availability (see “Irrigation”), wind, soil type, drainage and prior crops.
Factors that affect temperature of the site
- Check available historical weather data for the area. Particularly, high and low temperatures, the frost-free season, risk of hail during the growing season and rainfall patterns.
- Weather stations nearby often have data on growing degree days (GDD), a measure of heat accumulation throughout a season. Different cultivars and types need specific numbers of growing degree days to mature. In Oregon, kiwiberries are typically harvested in the Willamette Valley between 2,400 to 2,600 GDD (using base 50°F and a maximum of 86°F).
- Higher elevation sites usually have shorter seasons and colder temperatures in comparison with lower elevation sites.
- Aspect (slope/direction the site faces) also affects temperature and season. North-facing slopes are cooler and more prone to frost. South-facing slopes tend to have earlier seasons (earlier bud break), which means they can be more susceptible to frost in frost-prone areas. West-facing slopes are susceptible to the hot afternoon sun during the summer and frost in frost-prone areas. The effect of aspect increases with steeper slopes.
- Coastal sites might be particularly susceptible to fog. Fog reduces the temperature, increases the moisture on fruit and in the canopy, and can result in increased disease pressure.
- Cold air will drain to the lowest point on the site, but frost pockets can develop if the air is blocked by trees or wind breaks. Assess this and correct if possible.
Wind
Long shoots are very susceptible to wind damage or breakage in spring and summer (Figure 16). Wind can damage or blow over young plants and reduces fruit quality and marketable yield through fruit rubbing against each other or stems. When rubbed, fuzzy kiwi first lose their fuzz and then develop a callus, whereas kiwiberries develop a scar or dark brown damaged area (see “Problems”). Scabbing or scarring is a cosmetic defect making fruit only suitable for processing, but does not impact fruit flavor. Wind also may increase plant transpiration (water loss through the leaves) and affect irrigation requirements. Finally, wind during bloom reduces pollinator activity and fruit set, size, and fruit shape or quality.
When evaluating a site, check weather data available or geographical patterns that impact frequency and speed of wind to the proposed planting area. Windbreaks, windscreens, grow tubes and trellises are all tools that can be used at a windy site. In windy areas, wind breaks such as poplars help reduce economic losses. Plant wind breaks to provide 200 to 250 feet of protection downwind. Make sure wind breaks are not planted close enough to the vineyard rows to reduce yield of the kiwifruit vines through competition for light and water. See Trees Against the Wind, PNW 5, in “Resources.”
Soil
The optimum soil pH for kiwifruit is between 5.6 and 6.0. Vines show poor growth at pH values outside this range.
Kiwi vines do best in deep, well-drained soils. They are sensitive to standing water, especially after bud break in spring. Research in New Zealand has shown that if roots are waterlogged for three days or more, the root system and vine growth are severely limited and vines may die of root rot (see “Problems”).
In California, it is recommended that kiwifruit be planted on 3 feet of well-drained soil. However, ‘Hayward’ vines have grown well on soils with an effective rooting depth of 2 feet, provided the water table is lower than 2 feet. Kiwiberry vines in Oregon have performed well when planted on typical valley floor soils (Woodburn and Willamette series), but still benefit from being planted on raised beds of at least 1 foot high. This planting method reduces risk of vine death from phytophthora root rot. Young and mature vines of A. deliciosa and A. arguta have been killed by phytophthora when grown on flat ground in Oregon (see “Problems”). Do not pile soil around the base of the trunk of established kiwifruit vines with the objective of forming a “raised bed” after planting. Doing so can kill vines.
Improve drainage prior to planting, if needd, by installing well-designed drain tiles. Ripping the soil below the row before planting also can benefit growth.
Collect a representative soil sample in the proposed planting site (see A Guide to Collecting Soil Samples for Farms and Gardens, EC628, in “Resources”). Send the sample to a testing lab for analysis (see Analytical Laboratories Serving Oregon, EM 8677, in “Resources”). Then, assess soil properties and nutrient levels (see Soil Test Interpretation Guide, EC 1478, in “Resources”) for suitability for kiwifruit. Apply fertilizer nutrients and incorporate them into the soil prior to planting, as needed.
Table 1. Suggested soil nutrient levels for kiwifruit
Soil N is not included, as it is not applied until after planting and is not a reliable indicator of needed fertilizer applications once vines are planted.
- Phosphorous (P; Bray): Deficient at less than 20-40 ppm
- Potassium (K): Deficient at less than 150-350 ppm
- Calcium (Ca): Deficient at less than 1000 ppm
- Magnesium (Mg): Deficient at less than 120 ppm
- Manganese (Mn):Deficient at less than 20-60 ppm
- Boron (B): Deficient at less than 0.5-1.0 ppm
Soil quality
- Test the soil six months to a year before you plant to give yourself enough time to modify the soil pH and nutrient levels, if required. Kiwiberries require a soil pH of 5.6–6.0; if the pH is too low, incorporate lime based on results of a soil analysis.
- Check soil maps to discover soil type. Also, get permission, if needed, to dig pits to assess soil type and depth, since soil maps are not always accurate. Bring an expert if needed. Silt and sandy loam soils are best, but clay loams may be made suitable by planting on raised beds.
Drainage
- Good drainage is essential. Install drain tile prior to planting, if needed, to remove standing water in areas of the proposed planting site.
- Sites with a high water table should be avoided.
Previous cropping history
Prior crops or virgin vegetation can be hosts for diseases or pests that may adversely impact your kiwifruit vineyard, even if they have been removed. (See PNW Plant Weed Management Handbook, PNW Plant Disease Management Handbook and PNW Insect Management Handbook in “Resources.”) Kiwifruit species are particularly sensitive to phytophthora root rot and Verticillium wilt, both soil-borne diseases that are persistent in the soil (see “Problems”). Sites with prior crops that have had problems with root rot should be avoided or fumigated prior to planting. Prior crops that are known hosts for Verticillium (peppermint, spearmint, black raspberries) should be avoided as fumigation is less effective against this disease. Kiwifruit also are susceptible to Armillaria oak root fungus, which may be present on sites where oak trees have grown.
Plants also are sensitive to root knot nematodes (Meloidogyne spp.). Although the literature on nematodes relates to ‘Hayward’, it is best to assume that kiwiberries are similarly sensitive. A preplant soil test for parasitic nematodes is recommended, and if present above threshold levels, use an appropriate preplant fumigant.
Young kiwifruit vines compete poorly with weeds, so eliminate as many perennial weeds as possible before planting. Consider maintaining a permanent cover crop or a natural weed strip between rows.
Crops grown by neighbors (such as grass seed or Christmas trees) may pose a threat of pesticide drift and damage to your vineyard. Talk to neighbors about how to minimize risk of pesticide drift (see Preventing Herbicide Drift and Injury to Grapes, EM 8860, in “Resources.”).
Water availability and quality
Kiwifruit production requires a plentiful supply of good quality water. Water must be available during the growing season, either through rainfall or irrigation. The amount of water needed depends on climate, planting age and irrigation method. Water must also be available at times of frost after bud break (late February through early May in the Willamette Valley) if it is going to be used for frost protection (see “Problems”).
How much water a mature vineyard needs depends on frequency of overhead irrigation needed for frost protection, weather (plant evaporative demand) and irrigation method. Under-canopy sprinklers are a less-efficient method of applying water than drip irrigation. Over-canopy sprinklers are not recommended for plant water needs because water runs off the edges of the dense leaf canopy in late season. Irrigation with hard water (high in calcium) can lead to spotting of fruit, which is undesirable for fresh market (see “Irrigation”).
Water should be tested for quality before planting (see Managing Irrigation Water Quality for Crop Production in the Pacific Northwest, PNW 597, in “Resources”). Some aspects of water quality may be adjusted or mitigated by using additives or filters. Iron bacteria can plug emitters in drip systems, so if tests are positive, expensive filters need to be installed.
Guidelines for irrigation water quality
- Chloride: Less than 70 ppm
- Bicarbonate: Less than 200 ppm
- Boron: Less than 0.25 ppm
- Sodium: Less than 50 ppm
Organic production
Previous management practices, particularly the presence of residual herbicides in the soil, may affect the ability to succeed with a transitional or organic planting. In addition, crops grown by neighbors may impact risk of pesticide drift and loss of certification or plant injury.
Kiwifruit types can be grown in transition during planting establishment, using only Organic Materials Review Institute-approved materials and then certified organic when the first fruit are produced.
Vineyard planning, planting and spacing
There is no cost-of-production study available for commercial kiwifruit production in the Pacific Northwest. However, plantings are expensive to establish due to plant costs, extensive trellis costs and the time required to bring the vineyard into full production. It takes three or more years after planting to produce a commercial crop and up to five years for mature production.
Planting design
The kiwifruit is a dioecious plant — it has separate male and female plants (with the exception of a few self-fertile cultivars). Male vines are essential for pollination and crop production. Plant the same species of male as the female vines (see “Cultivars”).
Male and female vines must be present in a block and must flower at the same time. You can achieve a recommended 1-to-8 (male-to-female) ratio for this region with the following design (different planting strategies may be used depending on trellis system, see below):
- Plant only female plants in all outside rows.
- Plant the following row with a male plant between every two female plants.
- Plant the next two rows with all female plants. Plant another row with a male plant between every two females.
- Plant two more rows of all female plants.
- Continue as above.
Male plants in these planting systems run at right angles to the rows.
Vines are commonly planted 15 feet apart in rows that are 15 feet apart, resulting in 194 plants per acre. Using this ratio of one male to eight females, there are 174 female vines per acre.
Kiwifruit vines are extremely vigorous. Canes grow 6 to 12 feet per year, and occasionally 20 feet. Higher density plantings may increase production in the early years, but in later years, overgrowth and shading will require excessive summer and winter pruning.
Trellis
Kiwifruit vines are not self-supporting; their size, vigor, longevity and heavy crop load mean they need a strong, permanent support structure.
Two main types of support structures or trellises are used in commercial kiwifruit production: the pergola and the T-bar. A pergola provides a single plane of canopy about 6 to 7 feet above the ground (Figures 17A, 17B). The T-bar trellis system consists of posts in rows with a cross arm at 6 to 7 feet high; this maintains vine growth in rows with light getting in at each side of the row (Figures 18A, 18B).
The T-bar trellis is less expensive to construct than the pergola and pruning may be less labor-intensive. Once the full canopy is established in a pergola, the shade reduces weed growth. The more uniform light exposure to fruit in a pergola system, where all fruit hang below the leaf canopy (Figure 19) leads to a more uniform fruit color, considered of benefit in all types of kiwifruit by some marketers. However, if the canopy on a pergola is too dense, fruit quality of kiwiberries may be reduced as a result of premature softening or a greater level of uneven ripening.
T-bar
A typical T-bar trellis consists of posts with a 5- to 6-foot-long cross arm (depending on row width) extending across each post (Illustration 1A). The vine’s fruiting canes are tied to wires on top of the cross arm after pruning.
Use pressure-treated, 4- to 6-inch-diameter posts that are 9 to 10 feet long spaced at 15 to 20 feet down the row. Square posts are easier to work with. Drive posts 2 to 3 feet into the ground. Use end posts that are at least 6 inches in diameter and drive them at an angle with the top of the post leaning 1 foot from perpendicular away from the row. Anchor the end posts well (Figure 18A).
The top of the cross arm is 6 to 7 feet above the ground. Cross arms usually are a 2-by-6-inch board bolted into a cut notch on the post. You can brace cross arms back to the post for added strength.
Run a wire down the row from the top middle and each side of the cross arms (Illustration 1A). Two additional wires can be added, one between the center and each end wire. Use galvanized, high-tensile, 12-gauge wire for the vine supports. Good wire tighteners are needed to keep a strong tension on the wires to support the vines and crop.
A common modification of the T-bar is the winged T-bar, in which an additional wing and wire are added to each side of the T-bar cross arm (Illustration 1B). Tying down a cane from the center wire onto the two wires pulls it into a more natural curve.
For T-bar systems, you may want to place male vines in every row, as there is some evidence that bees prefer to work down rows rather than across.
Pergola
A pergola trellis is designed to support a solid canopy of foliage and fruit (Illustration 2). Wires not only extend down the row, but also are used as “cross arms” (more commonly than using wood) running perpendicular to the vine rows (Figure 17A). Rows may be spaced 15 to 20 feet apart and the wires are placed 1 to 3 feet apart.
In both trellis systems, plan the planting such that row posts are situated between plants so that if post repair is needed, the vine trunk will not be in the way.
Planting
Self-rooted vines perform better than grafted vines in the Pacific Northwest’s cold winters. Although grafted kiwifruit are available from some nurseries, planting kiwifruit on their own roots in areas where cold injury may occur is recommended. Severe cold events can kill a grafted vine past the graft union, thus killing the vine. On cold-injured, self-rooted vines, suckers can be trained up from below the winter-killed portion (see “Problems”).
Install your irrigation system before planting (see “Irrigation”). Establish your trellis prior to or just after planting (see “Trellis”).
Plant as early in the spring as possible. Plant 2-year-old bare-root or container stock. Purchase bare-root nursery stock as close to planting time as possible. Don’t allow the roots to dry out. Container-grown plants can be planted at any time except midsummer, which may be too stressful for the plants.
Kiwifruit can be propagated by hardwood cuttings. Some established growers will allow their prunings to be used for cutting wood. Ensure that you maintain the proper direction of growth for cuttings, because the nodes are confusing in kiwifruit. Cut just below a basal bud and at an angle in the internode for the top end of the cutting. Make cuttings about five to six nodes long. Take cuttings in winter before sap starts to flow (early January). Insert two nodes into the container or potting/rooting mix. You may wound the basal node with some shallow cuts and use rooting hormone. Propagate both male and female vines in winter, even though male vines are pruned in summer (see “Pruning”).
Plant on raised beds to reduce the risk of Phytophthora root rot (Figure 20). Carefully mark your field prior to planting. Plant all of the males first, ensuring they are well labeled, and then fill in with females.
Make the planting hole large enough to accommodate the roots without bending them. You may trim the roots a little to make them fit the hole. Do not dig the hole deeper than needed. Do not add any fertilizers, including manures or composted yard- or animal-debris, to the planting hole, as the roots are very sensitive to fertilizer burn or high salts (EC). If needed, incorporate soil amendments the fall prior to planting.
Plant vines just deep enough to cover the top roots. Never mound soil around the plant, even after the plant is established. Keep the soil moist enough to promote root growth, but don’t overwater, which can cause anaerobic conditions that promote root rot.
You may use grow tubes or paint trunks to prevent some environmental problems in young vines (see “Problems”).
Irrigation
Irrigation is necessary to keep vines growing and productive and to maximize fruit size. Nearly all of the water taken up by the kiwifruit vine is lost by transpiration, a process that consists of the vaporization of water contained in the plant to the atmosphere; only a tiny fraction is used by the plant. The water, together with some nutrients, is absorbed by the roots and transported through the plant. The water is vaporized within the leaves and transferred to the atmosphere through the leaf stomata or pores. A mature vine will have a canopy surface area of approximately 75 to 125 square feet, so a lot of water can be lost through crop transpiration. Water use by the crop will also depend on numerous factors, including weather, plant age, type of kiwifruit, cultivar, soil conditions and cultural practices.
In British Columbia, Canada, mature kiwiberry water use ranges from 25 to 35 gallons per vine per day during full canopy in late summer (at 70 to 80°F).
Vines under mild or moderate water stress have a subtle off-color look, with the foliage turning blue-green. Other symptoms include poor shoot growth, wilting, small fruit, sunburn, premature fruit drop, and reduced yield in the current and following season (through reduced flower bud development). In situations of severe water stress, vine leaves will turn yellow. Summer drought can cause leaf drop and premature fruit ripening in kiwiberries; however, fruit ripen more unevenly and are of poorer flavor. Maturity of wood also seems to be delayed by drought, thus increasing risk of cold injury. In contrast, excessive irrigation, leading to vines being subject to soil that is frequently at full field capacity during the growing season, reduces root and top vine growth and promotes root rot.
Judging vine water needs is difficult. Growers often irrigate by experience rather than irrigation scheduling tools. In kiwifruit, however, observing vines for trouble signs does not work well, because by the time water stress symptoms are visible, damage has occurred.
Irrigate young plants enough to wet the root zone without keeping the crown too wet; otherwise, crown or root rot may occur. In young plants, the range between too wet and too dry is narrow.
Growers should use a soil core sampler to assess soil moisture status. Sample immediately after irrigation and then irrigate again when soil water content is about 50% of full capacity.
Estimating water use by established kiwifruit vines is fairly complicated. In addition to vine transpiration, water is also lost from the soil surface by evaporation, particularly within the first few days after rain or irrigation. Crop transpiration and soil evaporation occur at the same time and there is no easy way of distinguishing between the two processes. Therefore, crop water requirements are typically estimated as the combination of the two processes, collectively termed crop evapotranspiration (ETc). Weather data are used to estimate the ET of a reference surface such as grass or alfalfa, which is then converted to crop ET using an appropriate crop coefficient (Kc). For example, in the northern Willamette Valley the Agrimet weather station at Aurora has crop water use information. However, there is no specific crop information (Kc) listed for kiwifruit. Considering research done in other areas, we recommend you use a Kc of 0.9 for kiwiberries, representing the relative amount water used by kiwifruit to that used by grass or alfalfa. The value will change over the season as the crop canopy develops. Estimate a full canopy for kiwifruit by mid-July through mid-October.
There are numerous devices available for monitoring soil moisture, although some are more accurate and reliable than others. Many of these monitoring devices need to be calibrated to a particular site so that gathered data can be related to actual soil moisture conditions. Soil moisture monitors should be installed within the root zone (usually 12 inches deep) of a representative plant and should not be located directly beneath an irrigation emitter.
Regardless of the method used to schedule irrigation, pay close attention to soil moisture conditions. Use a soil core sampler to avoid under- or overirrigating the kiwifruit vines.
Irrigation methods
There are various types of irrigation systems. Unfortunately, there is no single best system. Design a system that can supply up to 35 gallons of water per mature vine per day during the hottest part of the growing season when vines are at full canopy cover. Irrigate vines several times per week to supply sufficient water to the top 1 to 2 feet of soil. The amount of water to apply as well as the most efficient number of applications per week, depends on weather and application method (irrigation system efficiency). The best irrigation system to use may also be affected by the maximum flow rate (gallons per hour) your pump or system can supply at any one time and at what pressure.
Drip systems
Drip irrigation systems economize on water use, but on lighter soils often supply water to only a narrow cone of soil. Frequent irrigations are necessary, particularly to young plants with small root systems. However, as the crown tends to stay drier, risk of crown rot (phytophthora) may be reduced.
Drip irrigation systems (Figure 18B) are commonly used in all young plantings. At planting, one emitter is placed near each plant. The second year, two emitters are placed 12 to 18 inches from the trunk, and the one near the trunk is removed (to keep the trunk relatively dry). When the plant is 4 years old, two more emitters are added 3 feet away from the trunk. Having two drip lines per row and suspending drip lines on an additional wire (approximately 1 foot high) may improve uniformity of irrigation water application.
In some regions, growers find it difficult to supply enough water with four emitters per vine, so they add more emitters (as many as 10 per vine) or switch to under-canopy microsprinklers.
Microsprinkler systems
Under-vine pressure-compensated microsprinkler systems, which produce a wetted area of greater size, often are preferred over drip systems. In general, they wet more soil than drip emitters do, are easy to install and tend to plug less frequently than drip emitters. They can be used to replace drip systems as vineyards age. In young vineyards, however, microsprinklers tend to over-irrigate, and thus are an inefficient method of irrigation, and lead to more weed growth.
These sprinklers spray water in a 6- to 18-foot diameter circle. One full-turn microsprinkler per vine, located equidistant between vines, should be adequate in mature plantings. Generally, they are run six to 12 hours, two to four times per week. Test the amount of water applied using collection cups, as needed.
Impact sprinklers
Impact sprinklers are a commonly used irrigation system in the Pacific Northwest. They can be placed over or under the canopy, but irrigating well-established vines from above the canopy is very inefficient (water runs off the canopy, leading to insufficient application to the root zone area) and may lead to fruit spotting (from calcium in the water).
Some growers use a T-assembly on the sprinkler riser to switch from over-vine sprinklers to under-vine sprinklers. They use the over-vine positions for frost protection and switch to the under-vine position in summer. In such situations, place the risers between vines such that when the sprinklers are moved to the under-vine position, impact on the trunk is reduced.
Overhead, low-volume sprinklers are best for frost protection (Figure 21). Irrigation for frost protection is necessary to protect young shoots in late winter or early spring (see “Problems”). Some growers have dual systems (drip or microsprinklers for vine water use and overhead, low-volume sprinklers for frost protection) (Figures 18B, 21, 32).
Fertilization
Urea or organic fertilizer products work well for providing nutrients to kiwifruit vines as long as the soil pH is in the acceptable range (see “Soil”). In young vines, apply any needed nutrients other than nitrogen (N) prior to planting based on soil analysis (see “Soil”). In mature plantings, soil analysis in autumn may be used to judge whether any nutrients other than N are needed. In addition, tissue analysis on mature vines is an important tool to modify fertilization programs for all nutrients, as needed (see “Tissue analysis”).
Kiwifruit plant roots are very sensitive to fertilizer burn or high salts, especially near the trunk. Fertilizer burn symptoms include leaf necrosis or blackening of the leaf edges and poor growth.
To apply granular inorganic or organic products, broadcast fertilizer over the entire root zone area. Liquid organic fertilizer sources may be applied using a tank with attached hose or nozzles; apply to the under canopy or root zone area. With drip irrigation systems, inorganic or liquid organic fertilizer products may be applied through the system provided the required filters, injection and back-flow prevention equipment are installed. For the rates of N to apply, as outlined below, adjust the rate based on any inefficiency of fertilizer application equipment. For example, if granular fertilizer is being applied using a broadcast spreader to the in-row area and an estimated 60% of the fertilizer is applied to the rooted area of the establishing vines, then increase the rate of fertilizer to apply by 1.6-times (recommended rate times 1.6). Similar adjustments may need to be made when fertigating and emitters are located out of the current estimated vine rooting area in young plantings.
Young vines
In the planting year, apply no more than 0.4 ounce of actual N per plant per month in May, June and July. The rate of product to apply will vary depending on the percentage of N in the product (as stated on the label). Divide the fertilizer product in an area around the trunk to a distance of 6 to 12 inches from the base of the trunk.
Plants should have good soil moisture when they are fertilized. Irrigate first, wait one or two days, then fertilize; or fertilize after a good rainfall.
The year after planting, apply 0.8 ounce N per plant per month in April, May, June and July; spread the fertilizer evenly within a 2- to 3-foot diameter circle around each plant or broadcast it down the row (at a rate of approximately 50 pounds N/acre/season divided into the four months).
Do not fertilize young plants with liquid or granular forms of nitrogen later than July. Late fertilization forces late vegetative growth, which is very sensitive to cold injury. Once plants bear fruit, the crop load tends to suppress late vegetative growth and reduce the risk of fall frost damage.
In the third and fourth year, fertilize with a total rate of 60 to 90 pounds N per acre, divided into three applications (every other month from late March through late July). In the fifth year, apply 90 pounds N per acre using similar methods and timings.
Nitrogen rates may need to be adjusted based on observations of plant growth and tissue analysis (see “Tissue analysis”).
Mature vines
For vines over 6 years old (mature) use 100 to 190 pounds N per acre per year, depending on the cultivar or vine vigor. For example, ‘Issai’ and ‘Ken’s Red’ may require less N per acre than ‘Ananasnaya’ as they normally have a smaller canopy size. Divide the total N rate by applying two-thirds in March (early shoot growth) and then the last third in May or June (fruit set and early fruit growth). Irrigate a day or two before applying fertilizer, unless there has been a good rainfall, and then irrigate again after fertilizing. Male vines may need an additional 10 to 25 pounds of N about two to three weeks after pruning to support the large volume of shoot growth that subsequently occurs.
You can substitute liquid fertilizer applied through the irrigation system (fertigation) for dry fertilizer. When applying liquid fertilizers containing N, apply the same total rate, dividing it into applications with no more than 10 pounds of N per application during this same time period. Higher rates of liquid N (20 pounds per application) have injured roots on lighter soils due to high salt concentration.
Avoid using fertilizer blends that contain high levels of phosphorus (P) and potassium (K) unless these nutrients are needed based on soil and tissue analysis (see below). If so, avoid products that contain high amounts of potassium chloride (muriate of potash) as high levels of chloride are toxic in kiwifruit. If soil and tissue levels indicate levels are insufficient, apply any needed P, K and magnesium (Mg) fertilizers in late winter by broadcasting to the in-row area under the vine canopy. Required micronutrients can be applied to leaves (foliarly).
Monitor soil pH every few years through soil analysis and add lime in autumn to maintain the soil pH within the desired range for kiwifruit (see “Soil”).
Tissue analysis
Adjust fertilizer programs based on soil and tissue analyses. Research at Oregon State University has confirmed that kiwiberry vines do not have the same leaf nutrient concentrations as ‘Hayward’ fuzzy kiwifruit and that cultivars differ in leaf nutrients.
Critical levels for fuzzy kiwifruit leaf samples (based on research in California and New Zealand) as well as standards recently developed for kiwiberry in Europe are provided in Table 2.
Table 2. Fuzzy kiwifruit and kiwiberry leaf nutrient sufficiency levels
(Leaves were sampled in mid- to late-August)
- Fuzzy kiwifruit
- Nitrogen: 2.0-2.8% dry weight
- Phosphorous: 0.13-0.3% dry weight
- Potassium: 1.5-2.5% dry weight
- Calcium: 2.0-4.0% dry weight
- Magnesium: 0.2-0.8% dry weight
- Boron: 25-220 ppm
- Copper: 5-15 ppm
- Iron: 60-200 ppm
- Manganese: 50-200 ppm
- Zinc: 15-30 ppm
- Kiwiberry
- Nitrogen: 1.8-2.7% dry weight
- Phosphorous: 0.2-0.4% dry weight
- Potassium: 1.5-2.5% dry weight
- Calcium: 2.5-5.0% dry weight
- Magnesium: 0.22-0.55% dry weight
- Boron: 50-100 ppm
- Copper: 6-14 ppm
- Iron: 80-160 ppm
- Manganese: 50-180 ppm
- Zinc: 12-30 ppm
Leaf tissue analysis will provide information on the level of nutrients taken up by the kiwifruit plants. Sometimes nutrient levels are sufficient in the soil, but some cultural issues prevent the plant from taking up the required nutrients (nutrient imbalances in the soil, insufficient or excess irrigation, insufficient pruning, shade).
In order to compare your leaf test results to the standards in Table 2, it is important to use proper sampling procedures.
- Collect leaf tissue samples in mid- to late August. Since tissue nutrient concentrations vary over the growing season, sampling at other times can lead to misleading results; for example, Illustration 3 (page 17) shows changes in leaf N and K concentrations over the growing season.
- Sample the most recent fully expanded leaves on shoots only; these leaves are just back from the growing shoot tip, as shown in Figure 22.
- Collect 50 leaves per “block” or distinct planting area.
- Sample cultivars separately (values will differ between cultivars).
- Only sample female (fruiting) vines, because leaves from male and female vines have different nutrient levels (see Illustration 3).
- Do not soak leaves in water as this may leach out some nutrients (such as potassium); if leaves are very dusty then you may rinse leaves with distilled water and then air dry them. Send in paper bags to a laboratory in your region. See Analytical Laboratories Serving Oregon, EM 8677, in “Resources.” Keep records of fertilization, yields, and leaf and soil nutrient analysis results from year to year to better understand trends over time.
Plant tissue analyses indicate which elements are accumulated in adequate, deficient or excessive amounts.
Take care when adjusting N fertilizer programs based solely on tissue nutrient results. Vine growth must also be considered as follows.
- Low N tissue analysis results and abundant growth. If growth is sufficient or vigorous, do not apply additional N fertilizer next season (too late to apply in current season). This situation is usually caused by an oversupply of N. Lower than normal tissue nutrient concentrations are common with excessive growth. In this situation, low tissue nutrient concentration is caused by the nutrient content of the tissue being diluted by the intensive growth. This condition should correct itself when growth returns to normal.
- Low N tissue analysis results and weak growth. If shoot growth is weak, discolored or stunted, apply N fertilizer at rates recommended and seek guidance to determine whether any cultural or soil factors are limiting nutrient uptake.
- Normal N tissue analysis results and growth. If your tissue analyses are within the normal range, continue with your current fertilizer program next year.
- Above normal N tissue analysis results and weak growth. If shoot growth is weak, discolored, or stunted, and the tissue analyses are above normal, look for stress from pests, drainage, drought, frost, excess fertilization or other factors limiting growth.
- Above normal N tissue analysis results and growth. If your tissue analyses are above normal and growth is adequate or above normal, reduce the amount of fertilizer you have been applying, especially N.
If leaf tissue analysis results indicate nutrient levels for other nutrients are insufficient, then fertilizer is generally needed. For the macronutrients, adjust fertilizer programs for the following season. For example, if soil (see “Soil”) and tissue K levels are insufficient, apply 80 pounds of potash (K2O) per acre in late winter. If soil and tissue P levels are low, apply 60 pounds phosphate (P2O5) per acre in late winter. If calcium (Ca) and Mg are needed and soil pH is below the upper end of the recommended range, apply 1 to 2 tons per acre of dolomite lime. If tissue levels of micronutrients are insufficient, then these may be adjusted in the current season using foliar application. For example, if boron (B) is insufficient, spray sodium pentaborate (20% B) in fall at a concentration of 2 pounds sodium pentaborate in 100 gallons water.
Nutrient application influences yield, fruit quality, fruit maturity and sustained plant vigor. Management practices from selection of certified plants to pre- and postharvest irrigation must be performed in an appropriate and timely manner to gain benefits from applied nutrients. Nutrient application is not a substitute for poorly timed irrigation, insufficient pruning or failure to control insects, diseases or weeds, which may affect kiwifruit vine health. Soil properties such as low pH and poor drainage can be significant limiting factors in obtaining high yields. Increasing fertilizer rates or adding a nutrient already in adequate supply will not correct these limiting factors. The use of fertilizer should be part of a complete management package.
Pruning
Growers consider pruning one of the most time-consuming and expensive aspects of kiwifruit production and one of the most difficult aspects to learn. Proper training in the establishment years is important to develop the framework (permanent structure) of the vine such that it may be properly and most efficiently pruned each year when vines are mature.
Proper pruning and training are necessary for several reasons:
- To establish and maintain a well-formed permanent framework for the vine during the establishment years.
- To obtain a balance between vegetative growth and fruit production when vines are mature.
- To maintain consistent yield and fruit size from year to year.
- To develop a canopy that uses available light efficiently (for photosynthesis), yet is open enough to obtain maximum fruit quality and flower bud formation for next year’s crop.
All kiwifruit are trained to a single trunk (Figure 23). Kiwifruit are most commonly trained to a bilateral cordon — two permanent structures, one in each direction down the row, from which fruiting canes and spurs (short 1-year-old canes) originate.
Once shoots lose their leaves in autumn, they are called canes. These canes will contain one bud at each node (where leaves used to be) (Figure 23). Many of the buds on these canes will be fruitful; that is, they will produce a shoot next growing season that contains flowers at many nodes. Buds will break in late winter or early spring, depending on the weather and production region (Figure 24,). Some shoots are indeterminate and will keep growing after the last flowering node (Figure 25), whereas others are determinate, stopping growth at the last flowering node (Figure 26). Thus, in all kiwifruit, flowers and fruit are produced on shoots that grow from 1-year-old canes (last year’s growth). The most basal buds on many canes are often vegetative and will only produce a shoot without any flowers next growing season. New shoots may also be produced from latent (resting) buds on older wood (the cordon); these are always vegetative (no flowers) in their first growing season. Shoots produced from latent buds at the base or higher up on the trunk are typically called suckers (see “Summer pruning” and “Problems”).
Female vines are pruned every winter, whereas male vines are mainly pruned after bloom, approximately in late June in the Pacific Northwest. Some additional pruning or training in summer is needed in female and male vines. While all types of kiwifruit may be pruned in a similar manner, there are many different ways to prune a kiwifruit vine. The following descriptions cover the basic techniques.
Training young vines
Female and male vines should be pruned and trained similarly from year one through three, whether grown on a T-bar or pergola.
First growing season
The main objective during the planting year is to develop a single, straight trunk. At planting, prune plants back to one or two buds (Illustration 4A).
Once shoots start to grow, select one vigorous shoot to train upward as the trunk. Place a stake beside the shoot (Illustration 4B) and tie your chosen leader shoot to it (Figure 27). Don’t tie it too tightly or you could girdle the shoot; flexible tie tape is a good choice. A string from the trellis wire to the stake can help support the stake and vine as it grows. The shoot should not wrap around the stake. Remove any new shoots that emerge at the base of the plant (remove basal shoot shown in Figure 27) and any lateral branches (Illustration 4C) to direct the plant’s energy and growth into the trunk. If the trained shoot loses vigor and begins to twist early in the season or it breaks, top the shoot (Illustration 4C and 4D) and train up a new leader from the uppermost branch; remove any other branches. The trunk should terminate near the trellis wire or 2–3 inches above the trellis wire (at about 6.5 feet).
If the shoot reaches the wire early in the season, you may try to form the future cordons in the first year. To do so, top the shoot to about 4 inches below the training wire to encourage lateral branch formation. This forms a nice “Y” for the cordons. Select two shoots, growing in opposite directions, and train them along the center wire; these shoots will become the cordons (Illustration 4E; Figure 28).
Another option is to train the trunk up one way along the wire and wait until the next season to train a shoot the other way (Figure 29). This results in cordons of unequal age, which may make management a little more difficult in the short term.
During the first dormant season (in December to early January), head back the canes (future cordons) to wood of about pencil width (one-quarter inch) in diameter or larger (Illustration 4E). If vines did not have adequate growth to form cordons the first season, head the trunk back about 2 inches below the trellis wire to force new buds early the next season (in year two).
Second growing season
If full or partial cordons were established in the planting year, there will be a light fruit crop produced in year two. If only a trunk was established in the planting year, train two shoots near the top of the trunk, just under the wire, to become the cordons (Figure 28).
The objective in this season is to develop or finish the development of two permanent cordons per vine, growing in opposite directions from the trunk along the center wire (Figure 23). Even if the cordons were established in the first year, they are often not long enough. If needed, extend the length of each cordon by choosing a new leader shoot near the tip of the cane (last year’s growth) to continue the length of the cordon (Figure 30). Cordons of adjacent vines should meet halfway between plants. As the leader shoot grows, lay it atop the wire and tie it every 18 to 24 inches with tie tape to ensure that it’s securely attached to the wire. Remove all other shoots and any suckers throughout the growing season.
If full or partial cordons were developed in year one, retain shoots that are produced along the cordons at about 8- to 12-inch intervals (Figure 30). Carefully tie these shoots to the outer trellis wires to reduce risk of the shoots breaking from wind. Remove all other shoots by summer pruning before they twist around the shoots you want to keep. Also remove unwanted suckers and shoots throughout the season.
In the dormant season, prune the main cordons and the retained lateral canes (fruiting canes for year three) back to wood one-quarter inch in diameter or larger (Illustration 4F). A crop will form on shoots from these canes in the third year.
Third growing season
Continue to extend the cordons, if necessary, by training the strongest shoots down the center wire until they’re within about 1 foot of the cordon of adjacent vines. If the shoots that are being trained as cordons begin to twist around the wire, unwind them and tie them down to prevent the restriction of sap flow that can occur when shoots twist tightly around the wire (Figure 31).
On sections of cordon that were extended in year two, choose and tie new shoots to the trellis wires, perpendicular to the cordon. On older sections of the cordon, where fruiting canes were retained at pruning last winter, fruiting shoots will grow and will be supported by other canes; they generally do not need to be tied to any wires (Illustration 5). In general, pruning the following winter will involve techniques similar to those described below for mature vines.
Mature vines
When mature, male and female plants should be pruned differently. Pruning here is divided into dormant pruning and summer pruning. Most pruning on female vines is done in winter when vines are dormant. In contrast, the largest proportion of wood removed in male vines is done in the summer.
Dormant pruning
Dormant pruning is best done in December to late January in the Pacific Northwest. Late-pruned vines may have excessive sap flow, which may weaken vines.
Pruning videos demonstrating how to best prune mature female fuzzy and kiwiberry vines in winter are available through Professional and Continuing Education at Oregon State University.
Female vines
In female vines, approximately 70% to 90% of last year’s growth and associated 2-year-old wood is removed when pruning in winter. New fruiting canes usually will have developed at the base of last year’s canes or from latent buds on the cordon (see below). Illustration 6 shows typical growth from a 2-year-old cane (left after pruning the prior winter) and ideal pruning cuts this winter. Spurs (shorter fruiting branches with short internodes) often originate from the older wood. Do not remove them unless necessary, as they also are fruitful.
In most cases, replace last year’s fruiting cane with a new, 1-year-old cane. Do this by cutting back to a vigorous basal cane — typically a vegetative shoot this past season. This will lead to removing most of the 2-year-old fruiting cane left last winter and the 1-year-old canes that produced fruit last season (Illustration 6). It is not unusual to see new shoots originating directly from the cordon; these are often ideal replacement canes if they are in a suitable or desirable location as shown in the lower right section of Illustration 7.
When there is insufficient vigor on the 1-year-old canes originating from the 2-year-old cane left last winter, you can leave some 2-year-old wood with 1-year-old wood attached for fruiting wood as shown in the lower left section of Illustration 7.
It is not unusual to have a combination of standard replacement canes from basal shoots of last year’s fruiting cane, some canes that are growing off of 2-year-old canes, some new replacement canes that originated from the cordon, and spurs on mature female vines within the same area of the plant/cordon (Illustration 7). Take care that you are not leaving too many fruiting cane buds on a vine or in one area of the vine such that yield will be too high next season, fruit size too small or the canopy too dense (see below).
In all but the spurs, head back replacement fruiting canes (Illustration 7) to force growth next season and tie them to the wires for support. In the T-bar system head these canes to a length that allows tying them to the outer trellis wires. In the pergola, head these canes back to about one-quarter inch in diameter. Do not tie canes too tightly or they’ll girdle during the growing season.
Remove twisted and tangled growth, shoots that cross from one side of the vine to the other, and wind-damaged or broken shoots.
Remove most of the older wood by cutting back to the cordon. However, leaving “stubs” of older wood may be an advantage, as new vegetative shoots often originate at this location rather than randomly along the old cordon (Figure 32). This facilitates pruning choices for new replacement canes next winter.
Mature vines, spaced at 15 feet in the row, should have 28 to 44 fruiting canes per vine (spaced at 8 to 12 inches on both sides).
Choosing fruiting canes and limiting bud number
Overcropping or producing too much fruit will lead to high yield but small fruit size, reduced vegetative growth and, as a result, a reduced crop the following year.
Shoots that grow from older wood seldom produce fruit in their first season of growth. Shoots from buds that were heavily shaded during the preceding season are less productive than those from buds that were exposed to the sun. That’s why it’s important to prune well so that the canopy is open and well exposed to light. Research at Oregon State University has shown that hardy kiwifruit start initiating flowers for next year’s crop in July and that shading reduces the number of flowers formed.
Our research has shown that in kiwiberries, all 1-year-old canes and spurs are equally productive per foot of length and produce a similar fruit size next year, regardless of where they originated (whether from a cordon or 2-year-old wood). That’s why it’s easy to prune a kiwifruit vine too lightly, leaving too many fruiting buds. The most productive part of long 1-year-old canes is from nodes six to 40. The buds at the base of canes usually produce only a vegetative shoot (no flowers). The fruitful buds produce shoots that bear flowers from nodes six to 12.
Male vines
The goal when pruning male vines is to produce as many flowers as possible for pollination, while keeping the vine manageable. Male vines should be pruned only lightly in the dormant season — just enough to remove tangled shoots growing into the row middles (aisles) and keep vines manageable. This ensures that the male vines have as many flowers as possible prior to the pollination period. Most of the wood removal when pruning in male vines should be done in summer (see below). Thus, at the end of the winter pruning season, male vines will look relatively unpruned compared to female vines (Figure 33).
Replacing the cordon
In kiwiberries we have found that the cordons of female and male vines need to be replaced every four to five years. To replace the cordon, lay a vigorous vegetative shoot down along the center training wire in each direction during the growing season. Do this the year before you plan to remove the old cordon. The following season, lateral shoots will be formed along the new cordon; space these as discussed previously. Once a good replacement cordon and fruiting canes are established, cut off the old, unproductive one.
Training system differences
To form the canopy of a pergola, develop a system of fruiting canes from the cordons at right angles to the wires. Fruiting canes can be left longer on pergola, in contrast to the 2- to 2.5-foot length restricted by the T-bar. In addition, more 2-year-old cane sections may be left on pergola systems than on T-bars. It takes up to seven years to develop a full canopy in a pergola. Note that it is easier to leave too many fruiting buds on a pergola, thus reducing fruit size the following season.
Summer pruning
Male vines
Most of the wood removal when pruning male vines should be done in summer, after flowering. Flowering generally occurs in mid-June, thus vines should be pruned by the end of June when flowering of the female and male vines is finished. This provides as long a growing season as possible for shoot growth after pruning.
Pruning videos demonstrating how to best prune mature female fuzzy and kiwiberry vines in winter are available through Professional and Continuing Education at Oregon State University.
In general, prune male vines by removing the older, multibranched wood, choosing new, current-season shoots that grow from the cordon or near the cordon (Figure 34). Leave from 30 to 44 shoots per vine (Figure 35). Plants will be stressed, showing some leaf wilting after pruning as a result of manipulating shoots and sudden greater exposure to light. This is normal. Ensure the vineyard is well irrigated. Male vines may need additional N fertilizer after pruning to support the new growth stimulated by the heavy pruning (Figure 36; see “Fertilization”).
Hedging
Hedging is done only in the T-bar system to keep the aisles open. Use a sickle bar or hedge clippers on smaller acreage to cut the shoots on female and male vines back to about 2 feet from the edge of the trellis in mid- to late summer. Take care not to prune excessively in the summer, as fruit and sometimes canes may become sunburned (see “Problems”).
Suckering
Suckers that originate from the base of the trunk just below the top of the trunk should be removed during the growing season as this is wasted growth and is easier to remove when less woody (Figure 37).
Pollination
For fruit to be produced, male and female vines must be present in a block and must flower at the same time. Male flowers (Figure 2) produce viable pollen for only the first two to three days after opening. However, female flowers (Figure 1) are receptive to pollen for seven to nine days after opening, even when the petals have started falling.
Pollination is extremely important in kiwifruit production. Large ‘Hayward’ fruit contain 1,000 to 1,400 seeds, and ‘Ananasnaya’ fruit contain up to 240 seeds. If pollination is poor, fruit will be malformed (see “Problems”). Female kiwiberry vines, even when well pruned, can have 10,000 flowers per vine.
Kiwifruit flowers are pollinated mainly by insects, although wind may play a minor role. Honey bees are the main pollinator used in kiwifruit vineyards (Figures 10 and 38).
Kiwifruit flowers do not produce nectar and are relatively unattractive to bees. About three to four hives per acre are needed to adequately pollinate kiwifruit. Place hives in the vineyard no sooner than 10% bloom of the female vines.
In some years, you may have no male vines in flower as a result of cold injury to male plants in late winter or early spring (they are less cold- or frost-hardy than the females). In this case, no naturally produced pollen will be available. To get a crop, the females will have to be pollinated artificially. There are presently no sources of A. arguta pollen. Fortunately, A. deliciosa pollen will work well for A. arguta females. Purchased pollen, generally from labs in California, is sent in a pure form with about 20 million pollen grains per gram. To provide artificial pollination, you must apply 10 grams per acre per day starting at about 10 percent bloom of the female vines. You can apply pollen with a special “dry” applicator or in a solution. Call your county Extension faculty for more information on sources of pollen and methods of artificial pollination.
Fruit maturation, harvest and storage
Most of the research on harvest, handling and storage of kiwifruit has been done with the most common kiwifruit grown commercially, ‘Hayward’ (A. deliciosa), but as worldwide production of kiwiberry cultivars increases, information is becoming more widely available.
Fruit maturation
Kiwifruit continue to increase in fresh weight and size until harvested, but the most rapid size increase occurs in the first 100 days after bloom in ‘Hayward’ and 60 days in ‘Ananasnaya’ (Figures 39 and 40). Still, picking fruit too early in ‘Ananasnaya’ and other kiwiberry cultivars can lead to a significant loss in fruit size and yield.
Fruit size within a vine is not related to fruit maturity. Also, most cultivars show little visual change in fruit appearance as they mature. While fruit color may vary within kiwiberry, this is related to sun exposure most commonly. For example, ‘Ananasnaya’ fruit that remain in shade will have a green-colored skin (Figure 41A), as compared to the red blush or fully red color on fruit exposed to the sun (Figure 41B).
Kiwiberry fruit do not ripen uniformly on a vine. Fruit that are vine ripe will be soft and have a dark green color (Figure 42). Even when picked as early as possible when the average fruit are physiologically ripe (see below), a small percentage of the fruit (1% to 3%) will be soft and overripe. Multiple harvests from a vine are not practical or economical. Fuzzy kiwifruit tend to have less variability among fruit for stage of ripeness and show relatively little difference in external fruit appearance from the immature to the physiologically ripe stage.
The first indication that fruit are entering the latter stages of ripening is that seeds change in color from cream to light brown, dark brown and then black. Seed color may be assessed by slicing fruit horizontally. The much later ripening of ‘Hayward’ may be illustrated by seeds being very light in color in mid-September as compared to the black seed color in ‘Ananasnaya’ (Figure 43). In addition to changes in seed color, fruit will change in starch and sugar levels, both of which may be measured to assess ideal harvest time.
Kiwifruit are one of the few fruits that retain a high starch content at maturity. Starch hydrolysis, or breakdown, continues after harvest, even at 32°F. A decline in starch content as fruit mature is coupled with an increase in percent soluble solids (sugars or °Brix). The increase in Brix that begins as kiwifruit approach maturity continues after harvest and peaks about the time that starch hydrolysis is complete. As fruit mature on the plant, part of the increase in sugars occurs as the plant produces more carbohydrate through photosynthesis.
With advancing fruit maturity, the accumulation of carbohydrate slows, yet the Brix continues to increase. At this time, the increase in Brix is primarily due to the conversion of stored carbohydrates (mainly starch) to sugars. The sugars in kiwifruit are mainly glucose and fructose with a small amount of sucrose.
Brix is the most commonly used maturity index for kiwifruit. ‘Hayward’ fuzzy kiwifruit are harvested at 6.5 °Brix. Fruit then will attain good quality in storage. In Oregon, ‘Hayward’ fruit do not reach 6.5 °Brix until the end of October to early November, usually after the leaves change color or a few frosts have occurred. Many growers just check Brix in this cultivar to ensure it has reached the minimum average level for good storage.
In kiwiberries, fruit are at about 18–25 °Brix when ripe. However, at this stage fruit are also too soft to pick without pulling the fruit stem (pedicel) from the skin, tearing the fruit and making it unmarketable as it may not be stored. Kiwiberries are thus harvested when physiologically ripe and at a sufficient Brix to store and to ripen properly after storage. There is considerable variation in what average Brix growers in Oregon use to decide when to harvest ‘Ananasnaya’. An average of 8–14 °Brix is recommended — usually in early to mid-September in Oregon. However, some want to pick at lower levels (6.5 °Brix) to have fewer soft fruit present in the vineyard. Growers are concerned that if soft fruit is picked into lugs it can break apart, covering sound fruit in pulp. This could reduce storage life, as fruit are not washed prior to packing. Finding a good compromise is important to preventing a loss of yield and fruit quality. Fruit that are picked when immature, at a lower than recommended Brix, will not be as large and will not achieve as intense an aromatic flavor when ripened after storage.
The Brix of kiwifruit can be measured with a hand-held refractometer. Cut a wedge extending from the stem to blossom end of the fruit and squeeze the juice from the fruit. Starch in unripe kiwifruit will cloud the solution and make refractometer readings difficult. Pour the sample through a few layers of facial tissue to clear the solution. For a non-temperature corrected refractometer, follow the directions for accurate Brix readings carefully.
Some fresh fruit packers also want to assess fruit maturity of kiwiberries in this region using percent dry matter readings, particularly for the newer proprietary cultivars. A one-sixteenth-inch-wide slice is cut from the equator of the kiwiberry (crosswise) for various samples throughout the vineyard. The fresh weight is then determined and the slices are dried in an oven (24 hours at 130 to 140°F). After obtaining the dry weight, the percent dry matter is calculated. A range in dry matter for ideal harvest is from 17% to 20%, depending on the cultivar, packing company and growing region.
At the peak of carbohydrate accumulation, fruit have essentially achieved their best potential eating quality, and further delays in harvest will not improve flavor and will reduce firmness or storage life.
Harvesting
Once the minimum maturity standards have been achieved, all of the fruit can be harvested in one picking for all types of kiwifruit. Harvest fruit by hand.
To harvest fuzzy kiwifruit (Figure 44A), pickers should wear soft cotton gloves to prevent damage to the skin (fuzz) of the fruit and use cloth slings to hold fruit or gently place fruit in buckets and then transfer fruit to lugs (Figure 44B). Fruit are easily damaged by rough handling even though they seem quite hard at this stage of maturity.
Kiwiberries should be picked similarly, taking care to wear gloves and to not damage the fruit by rough handling (Figure 45). Kiwiberries are much more sensitive to bruising or skin damage than are fuzzy kiwifruit. Fruit should be picked without the pedicel or fruit stem; it can be snapped off at the berry stem juncture on hard fruit. However, when fruit start to soften, the stem will pull out of the berry, leading to tearing. This fruit cannot be stored and should be placed in a separate container — it can be frozen or enjoyed immediately fresh.
In both types, avoid picking when fruit is wet from dew, fog or rain, and don’t wash it before storage. Wet fruit will decay faster.
Keep fruit in the shade while awaiting transport, and cool fruit as quickly as possible to maximize storage life. Field heat must be removed quickly from fruit after harvest, because the fruit can lose water quickly, especially in kiwiberries. After 3% to 4% water loss, fruit may appear shriveled, especially at the stem end.
Fruit usually are sorted for size and quality before packing. If fruit are not packed immediately, store them in large bins. Refrigerate fruit immediately for optimal length of storage and quality.
Storage
Softening of kiwifruit is temperature dependent. Fruit at 41°F soften three times faster than fruit at 32°F. Fruit are also climacteric, producing ethylene as they ripen. Fruit will lose water or desiccate if not stored at higher humidity. Store kiwifruit as near to 32°F as possible at 90% to 95% relative humidity with ethylene gas scrubbers to maintain an ethylene-free atmosphere. Make sure oxygen is circulated to the cooler. Low oxygen levels lead to anaerobic respiration, making fruit nonmarketable due to an off flavor. Even when fruit are held at this temperature, about one-third to one-half of the remaining flesh firmness may be lost per month of storage (‘Hayward’). Fruit are sensitive to freezing injury; be careful that the temperature of the fruit does not drop below 32°F.
For long-term storage, use of controlled atmosphere (5% C0₂; 15%-20% O₂) has been effective for ‘Hayward’, provided temperature is kept at 32°F and an ethylene-free atmosphere is maintained. These same controlled atmosphere conditions have improved firmness during storage in some kiwiberry cultivars. However, controlled atmosphere storage may also increase the incidence of skin blemishes in this type of kiwifruit, making fruit less marketable.
Note that only battery-operated forklifts should be used in storage rooms to avoid generating ethylene. Monitor levels of ethylene in storage on a regular basis, because a week or more of 10 ppb ethylene will hasten fruit softening. Ethylene inhibitors have also been used successfully for long-term kiwiberry storage without any detrimental effects to quality. If fruit are being stored for only a few weeks, normal cold air storage may be sufficient.
‘Hayward’ fruit can be stored three to six months under ideal storage conditions. Kiwiberries, however, can be stored less than two months, because fruit are more perishable.
Before shipping, fruit can be exposed to ethylene to trigger the ripening process. Although fuzzy kiwifruit are sold as individuals or in large clamshell packages, kiwiberries are best sold in clamshell packages that maintain a higher humidity (to prevent shriveling) and prevent fruit damage.
Problems
Physiological or environmental problems
Sunburn
The trunks of young vines may be sensitive to sunburn in some areas. You can paint the trunks with a mixture of 1-to-1 water and interior white latex paint to help prevent sunburn to the trunk. Milk cartons, trunk wraps or grow tubes also can protect against sunburn and may provide added benefit against feeding damage from vertebrates. Grow tubes can be used on young plants throughout the growing season for protection. However, in warmer areas cold damage has occurred in autumn through late winter to the young trunk at the point where the top of the grow tube ends.
Kiwiberry fruit may be sunburned if suddenly exposed to intense sunlight (such as when removing too much shoot growth upon hedging in summer) or late in the season when sun is intense and humidity may be low (Figure 46).
Shoot tip dieback
Some shoots in kiwiberry vines will naturally stop growing. Early in the growing season, after bloom, the tip of some shoots will die, leaving a dead, black tip approximately 6 inches long. This is natural and does not indicate the presence of a disease.
Frost damage
All kiwifruit species are sensitive to frost damage in the Pacific Northwest. After winter cold or chilling requirement is satisfied and temperatures warm up in late winter or spring, buds will break. Only one shoot is produced per node. If that shoot is damaged by frost, no crop will be produced at that node. Research at Oregon State University has found that typical bud break in kiwiberry is from 25% to 57%, likely due to the high number of buds per vine after pruning. If a first flush of young shoots are damaged by frost, buds that did not initially break will do so, compensating for the first frost event (Figure 47). Frost protection for these later shoots would be needed to prevent crop loss (Figure 48). We have observed total crop loss in vineyards without frost protection.
Shoot tissue is damaged at temperatures below 32°F. Over-canopy sprinklers can provide 6 to 8°F frost protection, whereas under-vine impact sprinklers can provide about 2 to 3°F protection. Typically, five-sixteenth-inch sprinklers are used at a spacing of 30 x 40 feet (at 50 pounds per inch pressure) to supply 0.1 inch per hour (50 gallons/acre/minute). Start sprinkler irrigation before temperatures fall below the critical level (31 to 32°F) and continue until temperatures are above critical levels and ice melts (Figure 49).
Winter cold damage
In general, damage to dormant vine tissue only occurs in fuzzy kiwifruit in this region. Depending on the severity of the cold, how long it is cold and temperatures preceding the cold spell, damage may occur to the trunk or the canes (Figures 50A and 50B) left when pruning. Significant crop loss may occur for one or more years.
Wind and hail
Wind can damage shoots at any time of the growing season (Figure 16). Wind may also aggravate rubbing of one fruit to another or a fruit against a shoot or leaf stem — rubbing of fruit leads to scarring, which renders fruit unmarketable depending on the level or intensity of the scar (Figures 51A and B). Hail events after fruit set can damage fruit leading to scarring (Figure 52).
Malformed fruit
Poor pollination will lead to grooved fruit (Figure 53) if the percent ovule set or seed set was poor on one or two branches of the stigma, or small fruit in general.
Weed management
Refer to the PNW Weed Management Handbook (see “Resources”) for detailed information on weed control and specific weeds.
Weeds compete with the kiwifruit plants for water, nutrients and light, depending on vineyard age, so it is important to keep weeds out of the row. Hoe or hand-pull weeds before they become well established and to keep the soil loose, which will promote root and plant growth.
A mulch layer of sawdust or bark may help control weeds, particularly annual weeds. Do not mulch with a straw, as this can encourage voles, which feed on the bark and damage the trunk.
For chemical weed control, check with your county office of the OSU Extension Service or a garden or farm supply store for herbicides registered for use on kiwifruit. Not all herbicides are registered for all crops. As vines age, the shading provided by the kiwifruit canopy often prevents weeds within the row or even between the rows in a pergola trellis system.
You will also want to manage weeds between the rows (the alleyways), so that they do not spread into the rows. The aisles can be cultivated and kept as bare soil or seeded with grass or another cover crop.
Pests
Although a few pests are reported to be of concern in kiwifruit, there are several that may cause problems if not managed. Refer to the PNW Plant Disease Management Handbook and the PNW Insect Management Handbook (see “Resources”) for detailed information on disease and insect pests.
Phytophthora root rot
Root rot has been positively identified in young and mature kiwiberry vineyards and has killed vines. Initial symptoms include brown leaf edges, a symptom of water stress as roots are killed by the fungus (Figures 54A and B). Ultimately vines will die. Cultivars likely differ in sensitivity. Choose good sites with soil and slopes that encourage good drainage. Plant on raised beds. Refer to the PNW Plant Disease Management Handbook for registered pesticides.
Gray mold
Gray mold or botrytis does not affect fruit prior to harvest, but impacts berries after harvest, during storage or shipping. Growers should prune well to minimize fruit wetness and should practice a good fungicide program if this has been an issue in their vineyard.
Other pests that may be an issue in the vineyard are verticillium wilt and nematodes. These are best addressed prior to planting (see “Site selection”).
Insect pests
Check with your local OSU Extension Service office for control recommendations if insects become a problem. Control methods are also outlined in the PNW Insect Management Handbook (see “Resources,” below).
The only insects observed to have caused problems in some kiwiberry vineyards in Oregon are thrips. High populations at bloom may cause scarring injury (ladderlike appearance) to fruit.
Resources
- A Guide to Collecting Soil Samples for Farms and Gardens, EC 628
- Analytical Laboratories Serving Oregon, EM 8677
- Managing Irrigation Water Quality for Crop Production in the Pacific Northwest, PNW 597
- PNW Plant Weed Management Handbook
- PNW Plant Disease Management Handbook
- PNW Insect Management Handbook
- Preventing Herbicide Drift and Injury to Grapes, EM 8860
- Pruning and Training Kiwifruit, online course
- Soil Test Interpretation Guide, EC 1478
- Trees Against the Wind, PNW 5
About the authors


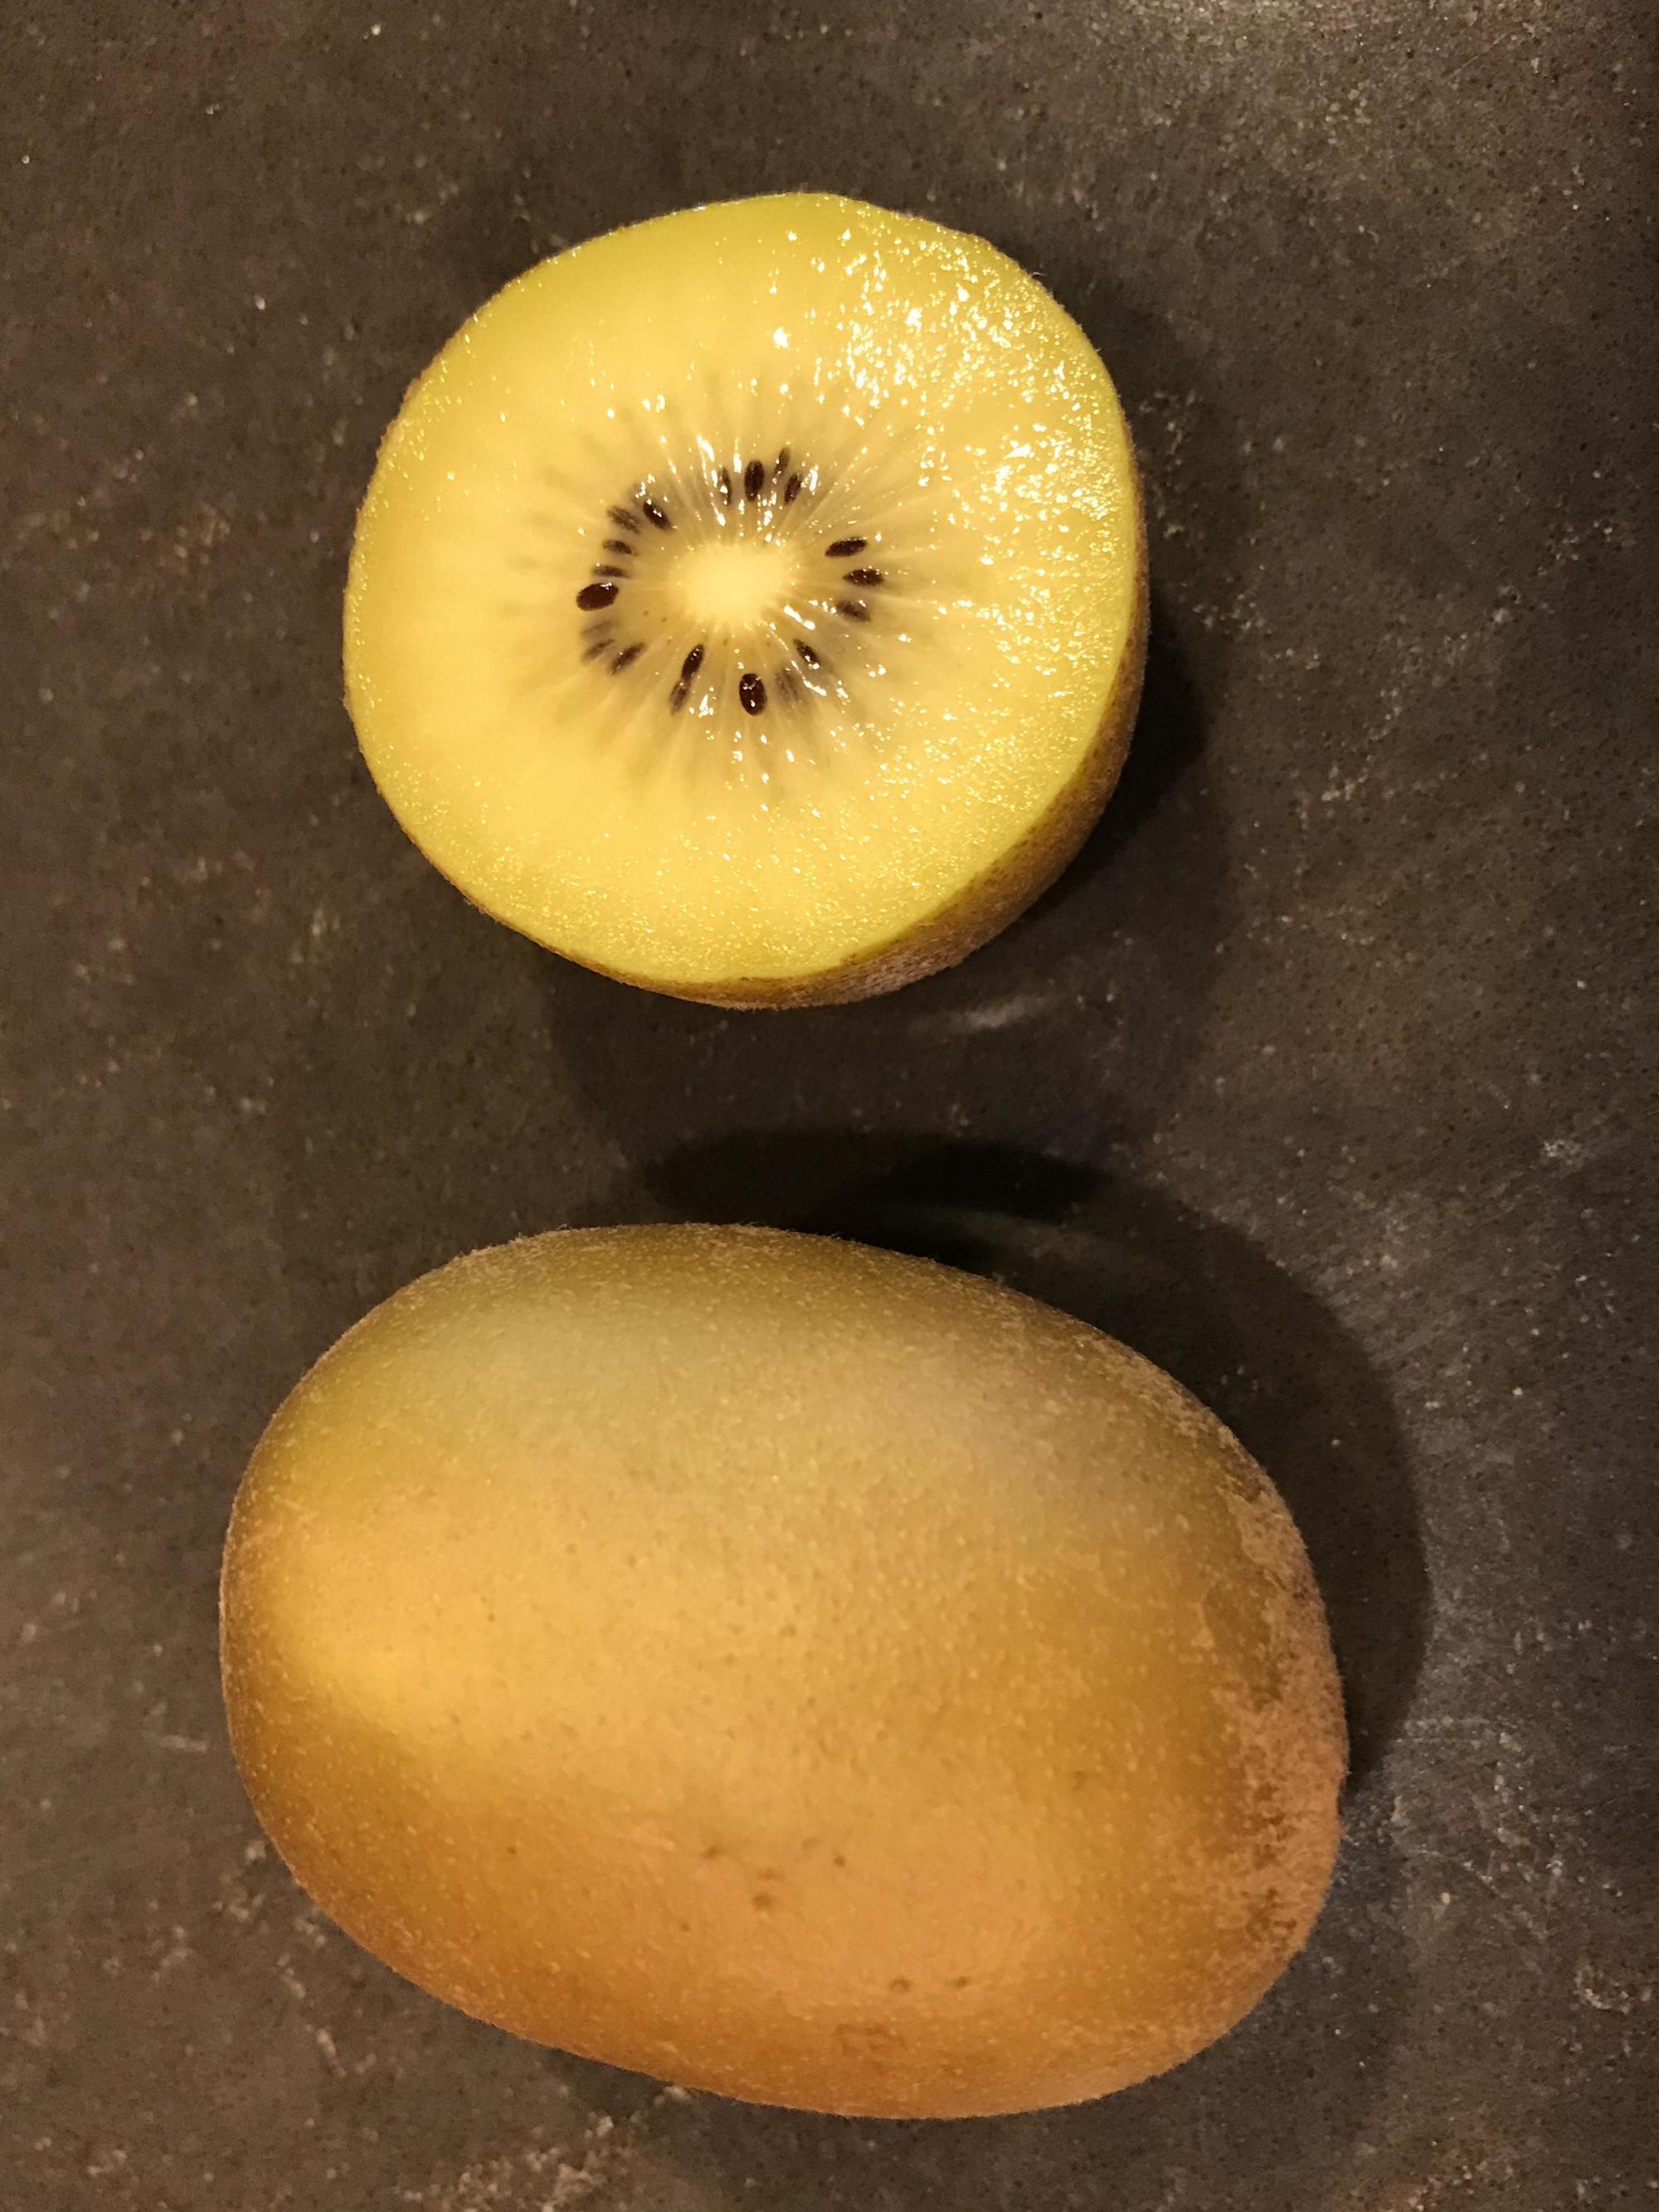


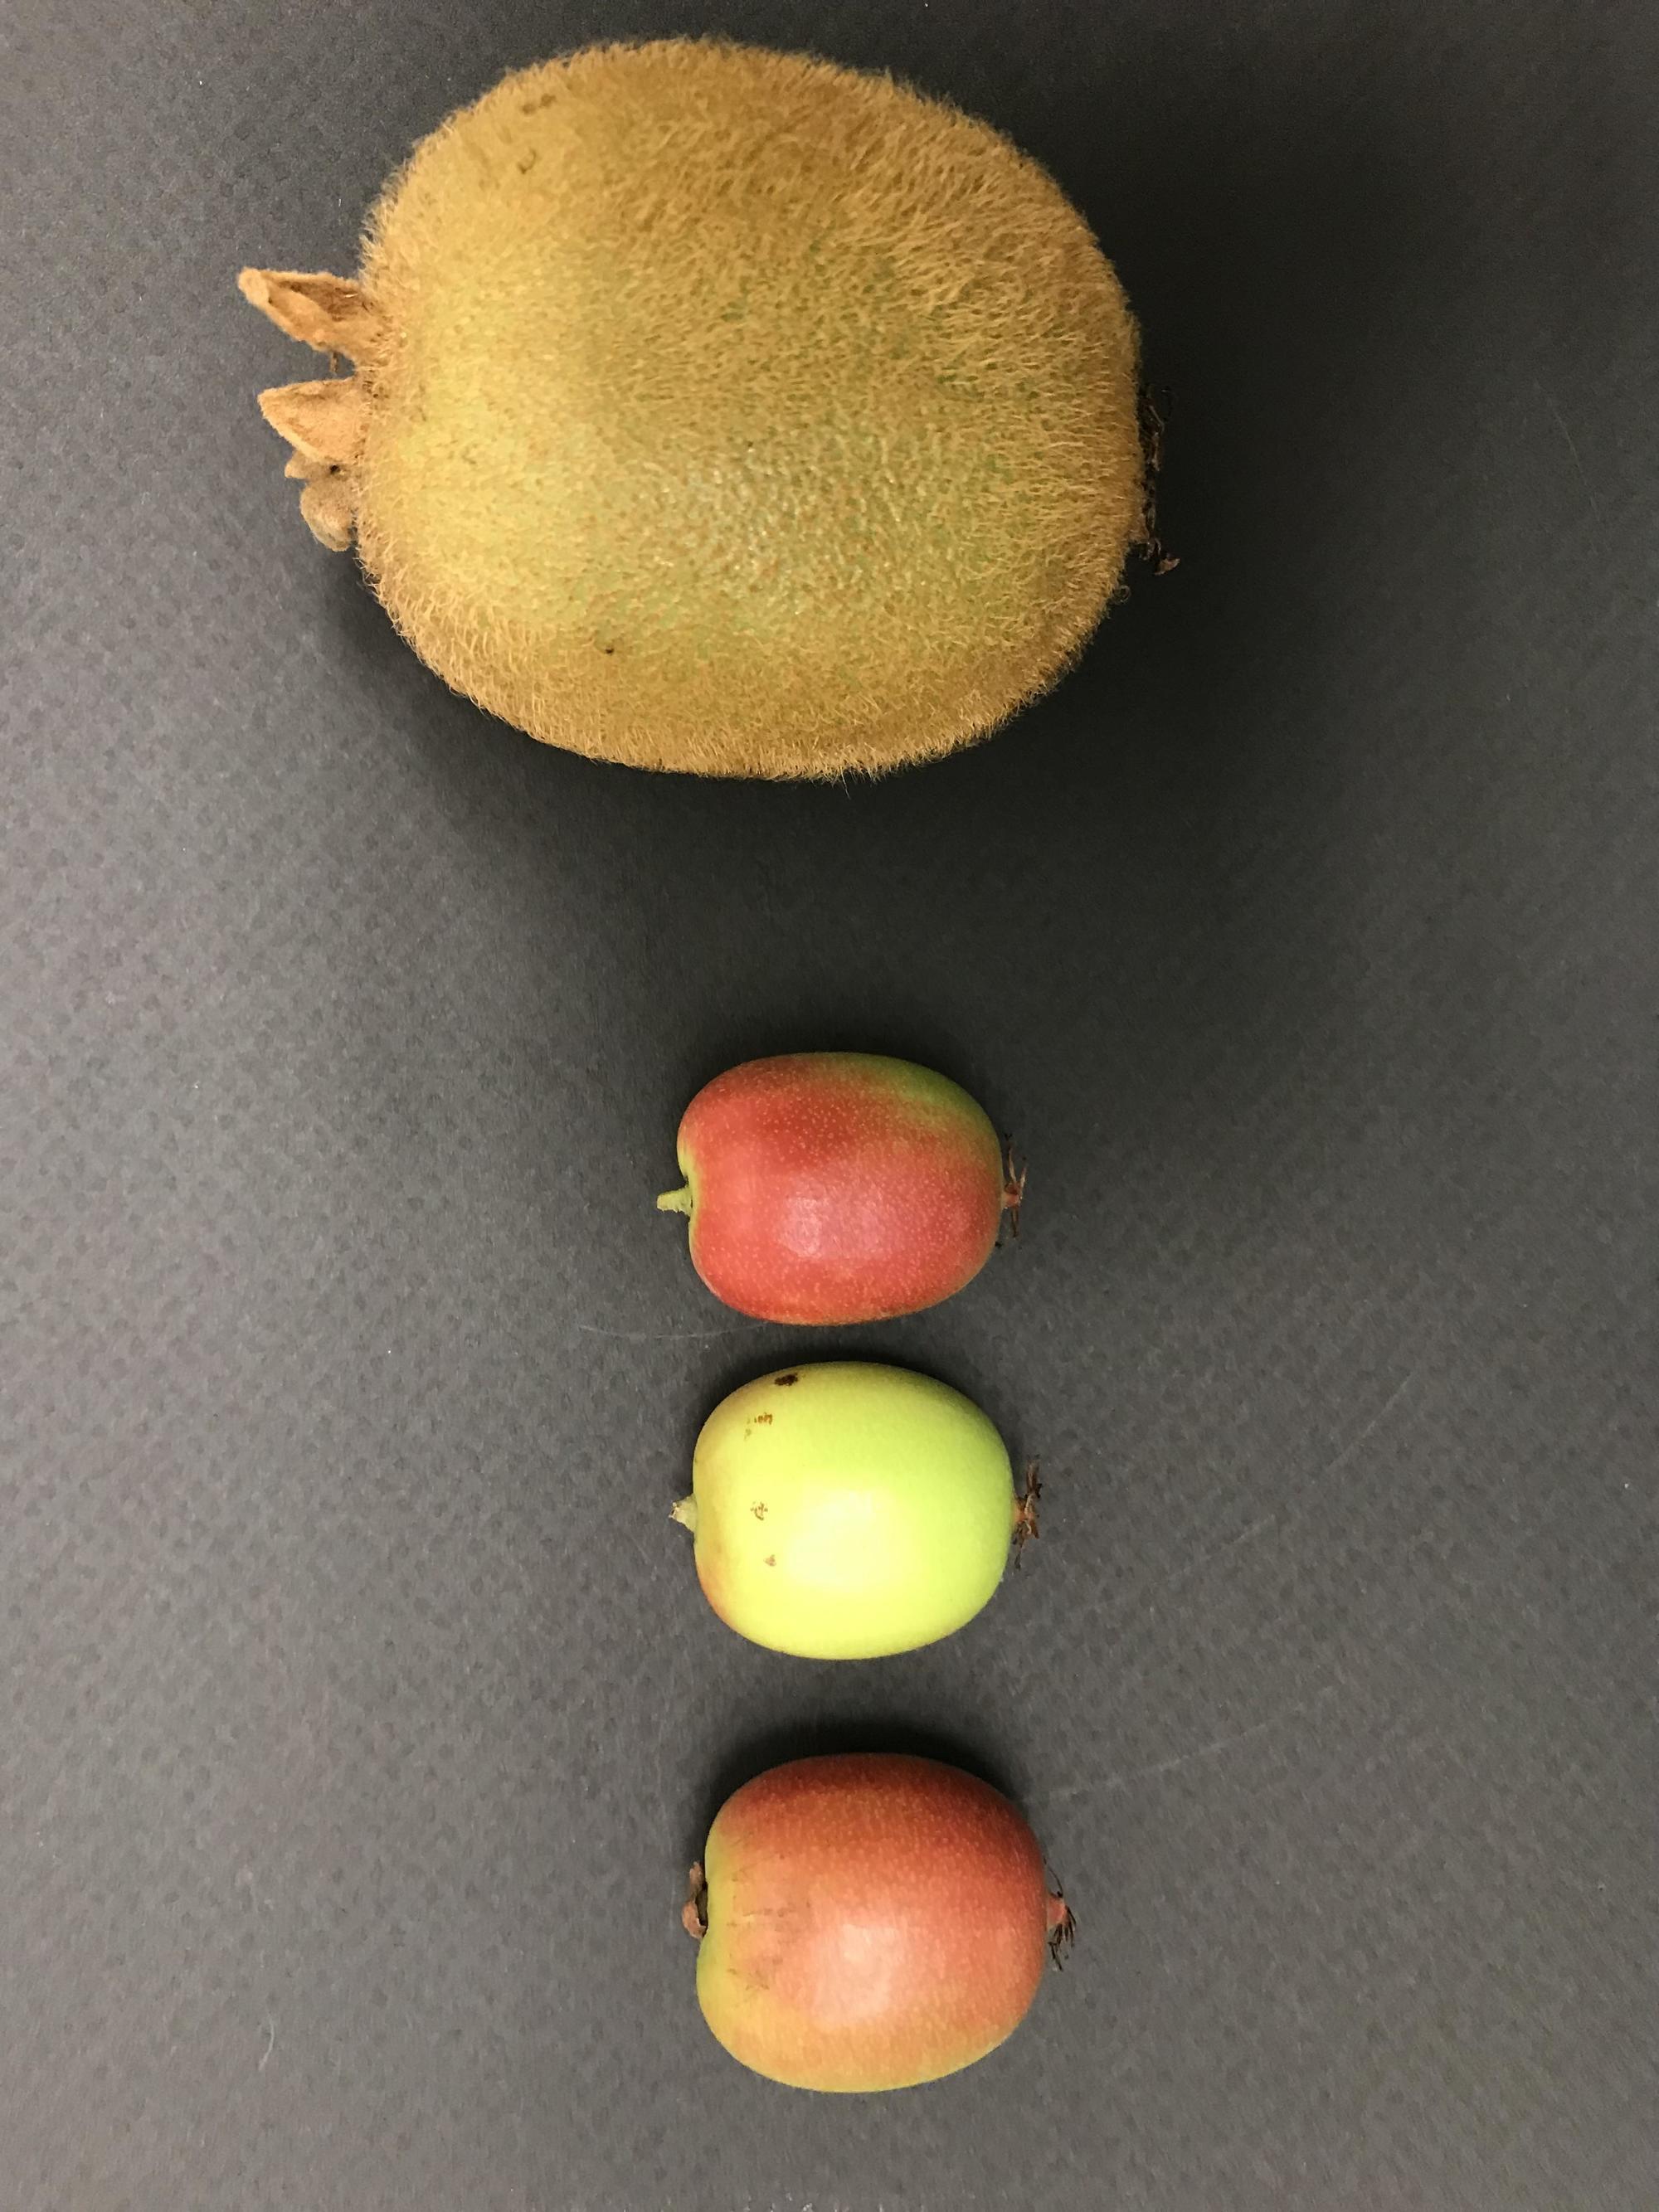

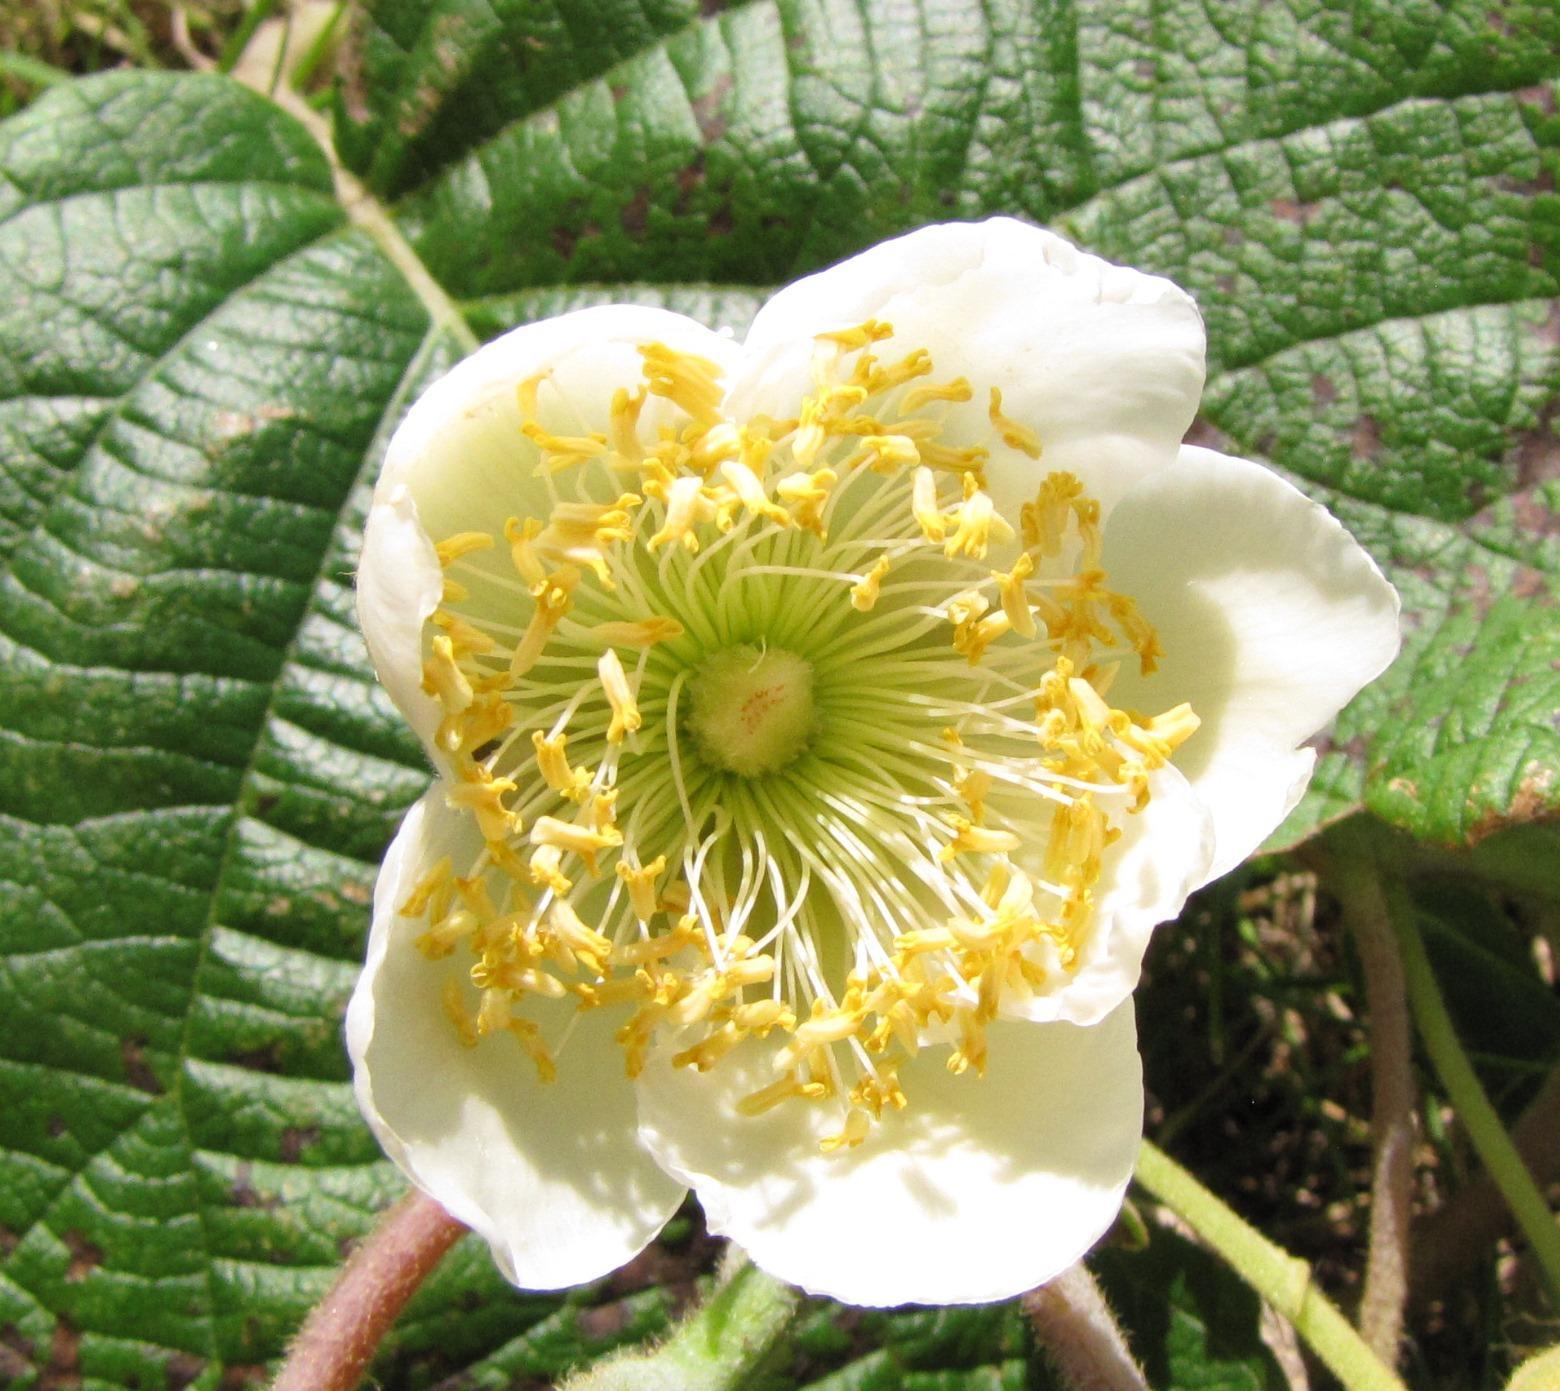
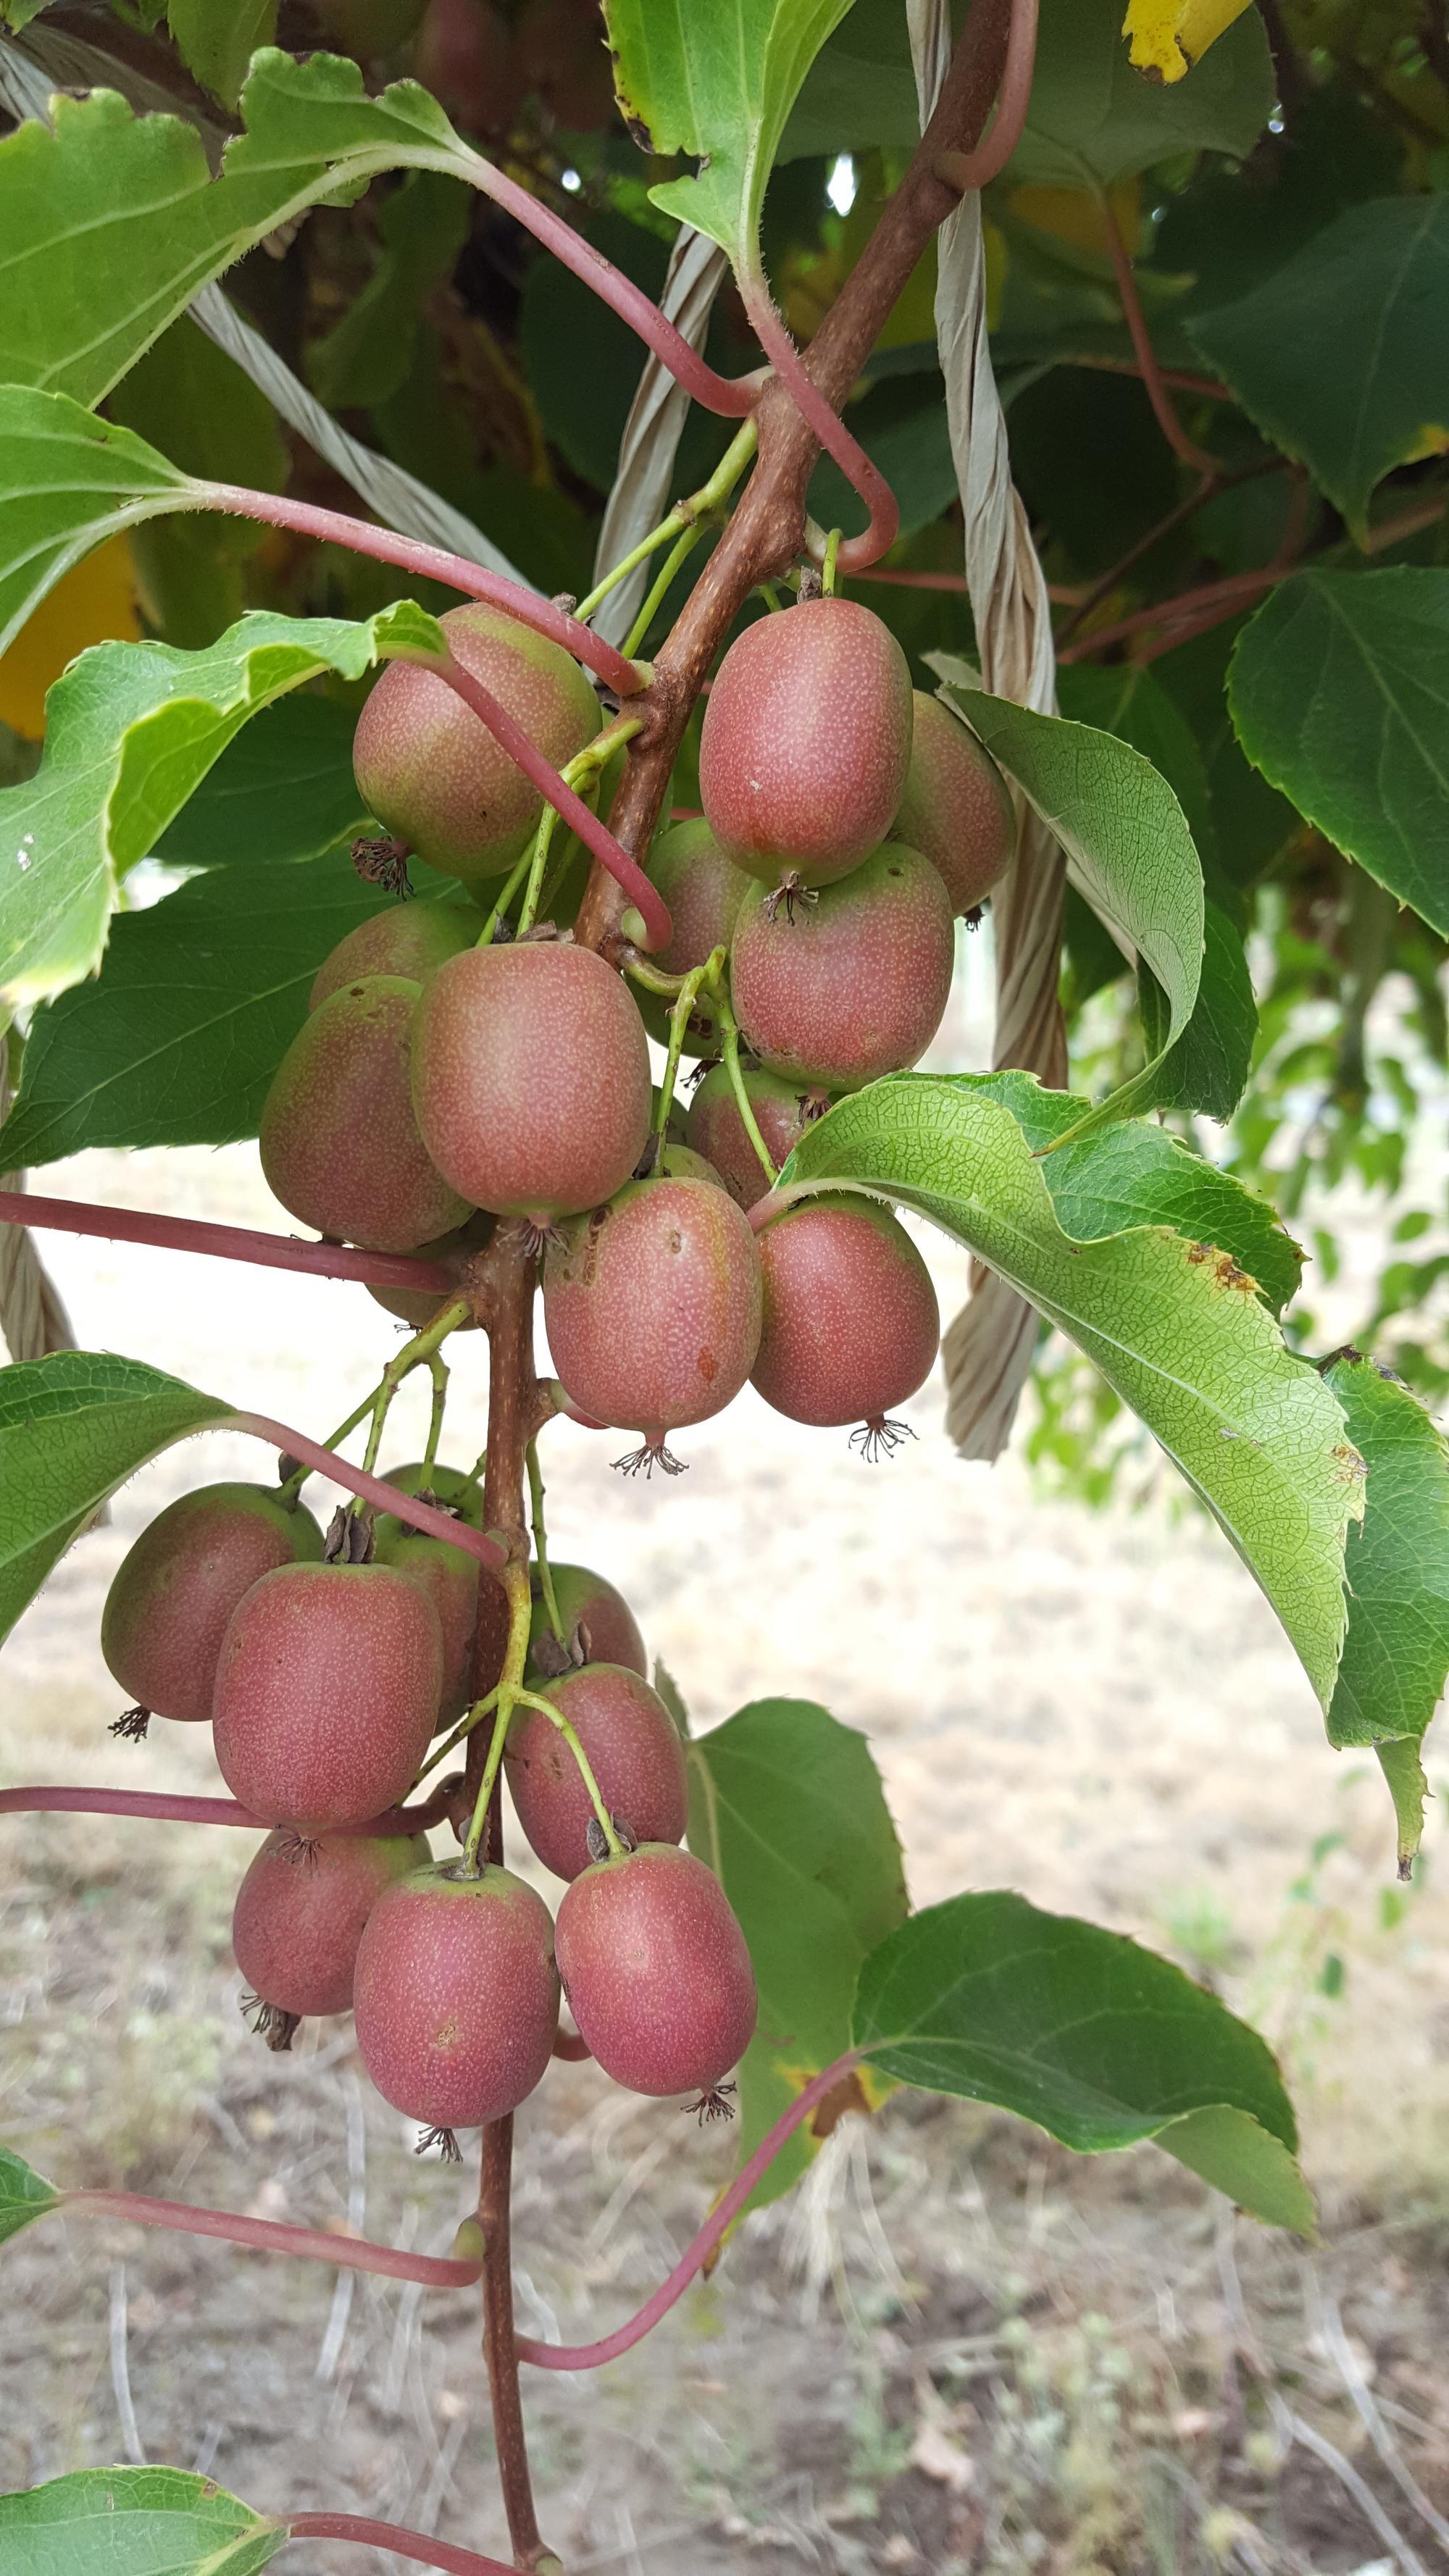
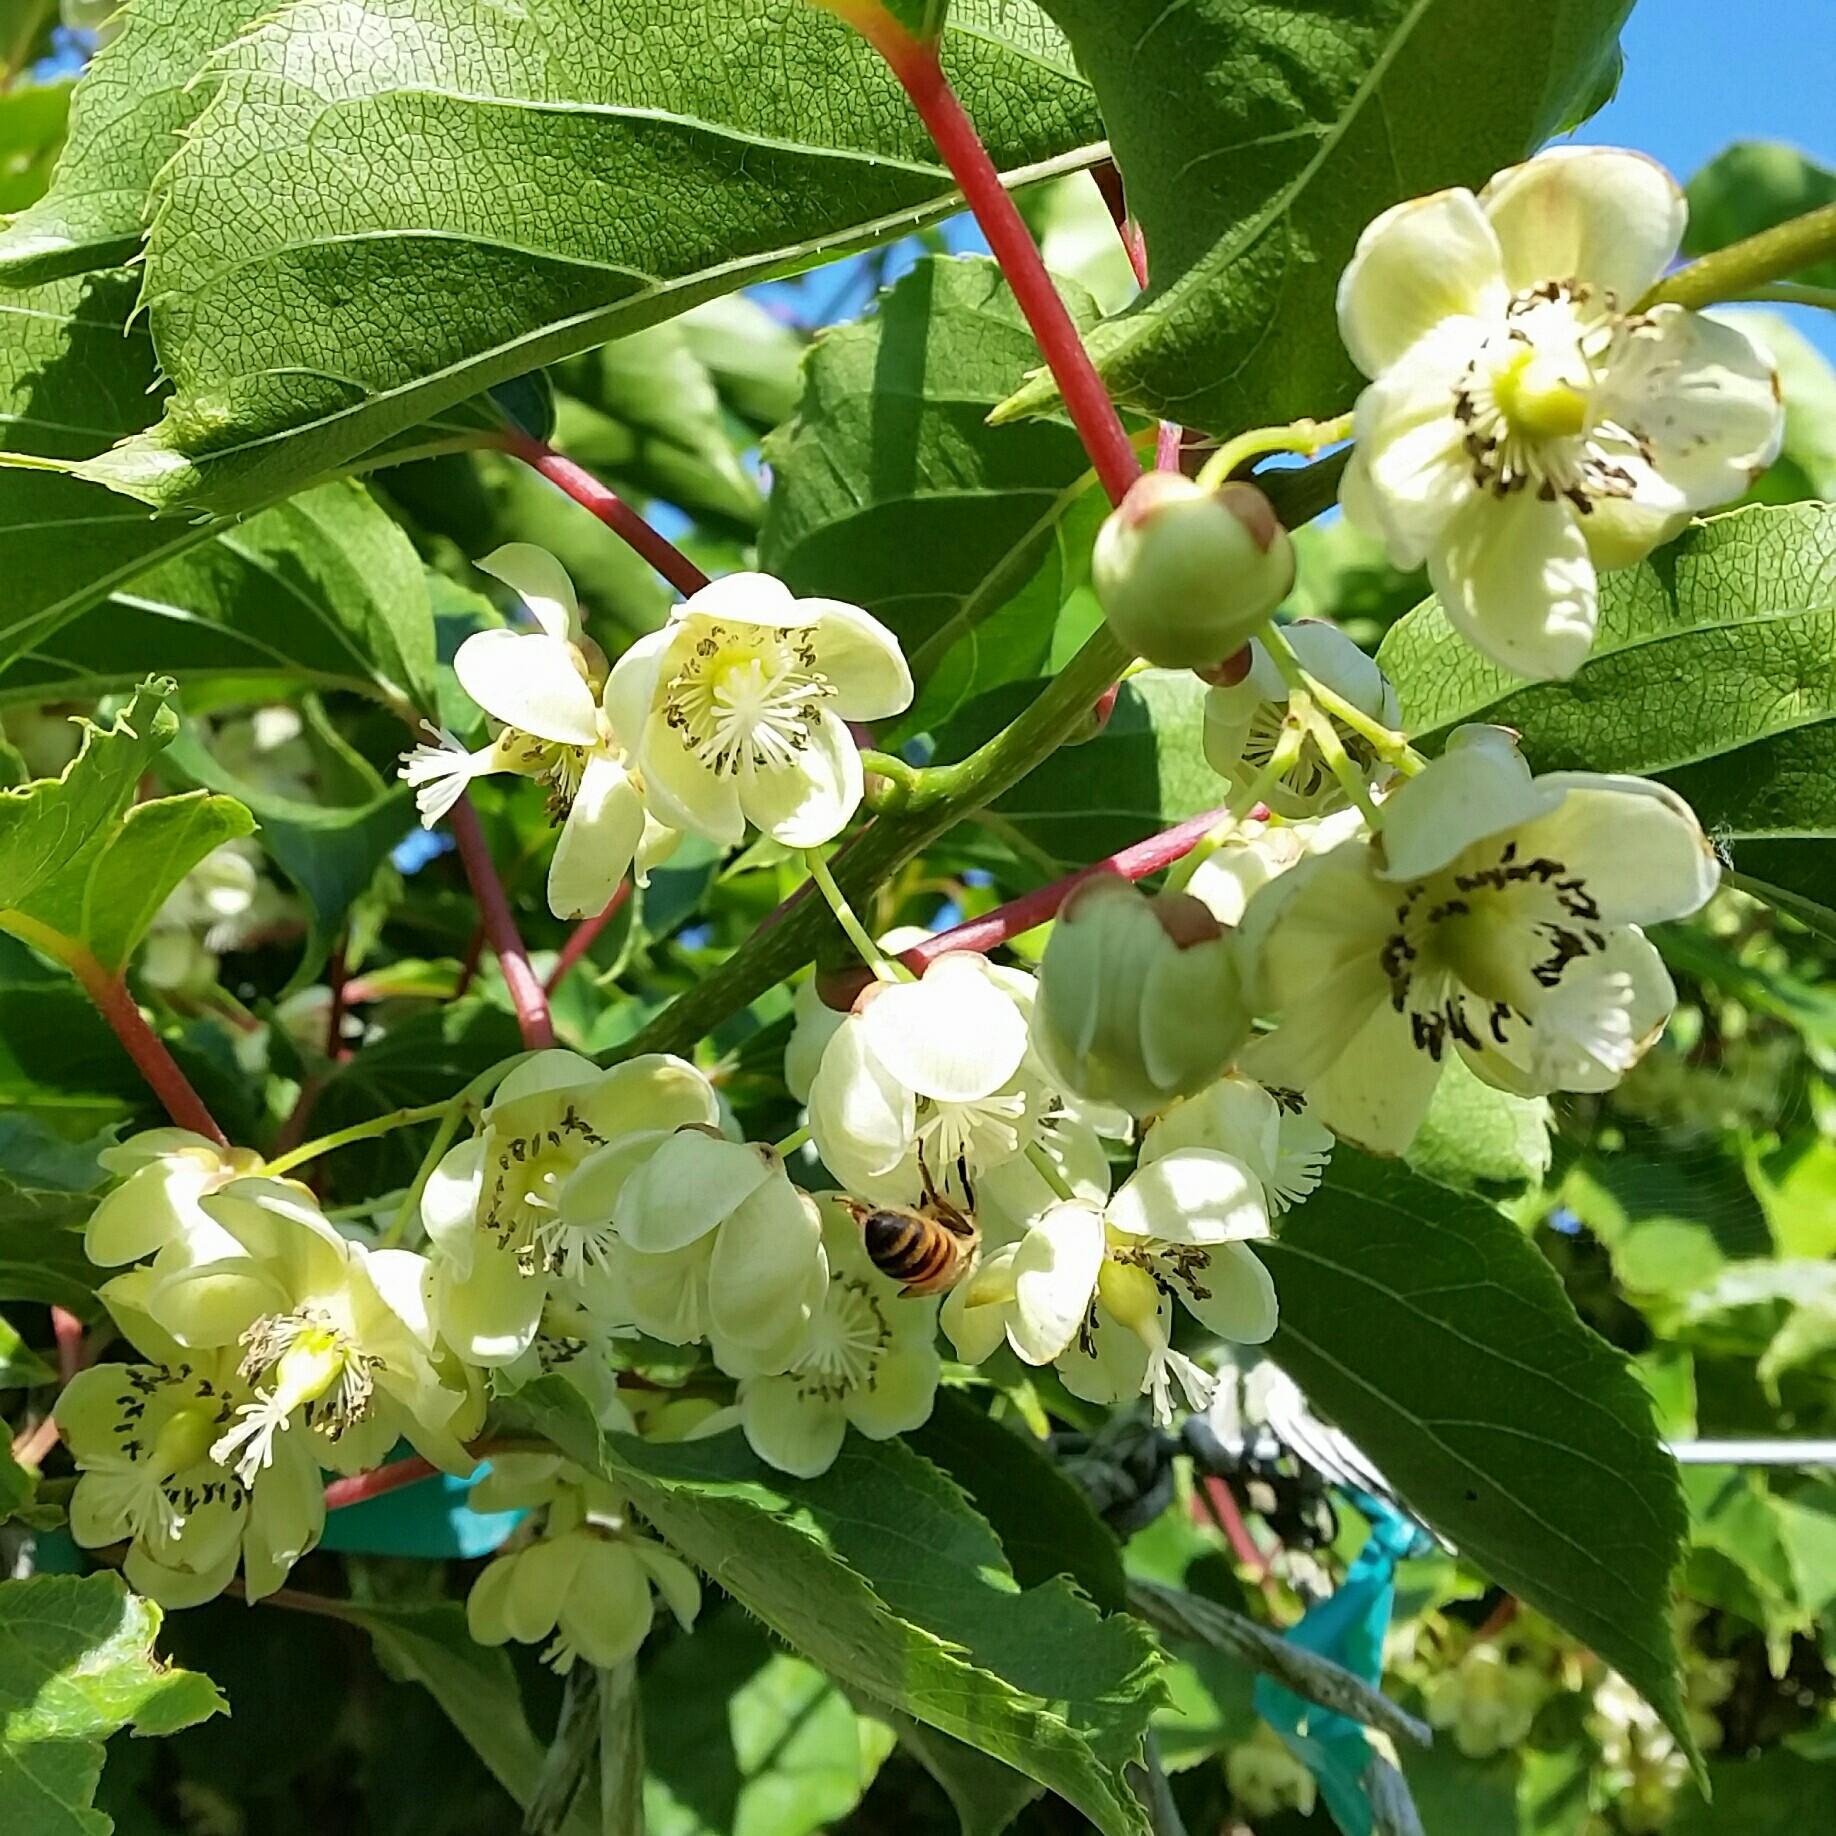
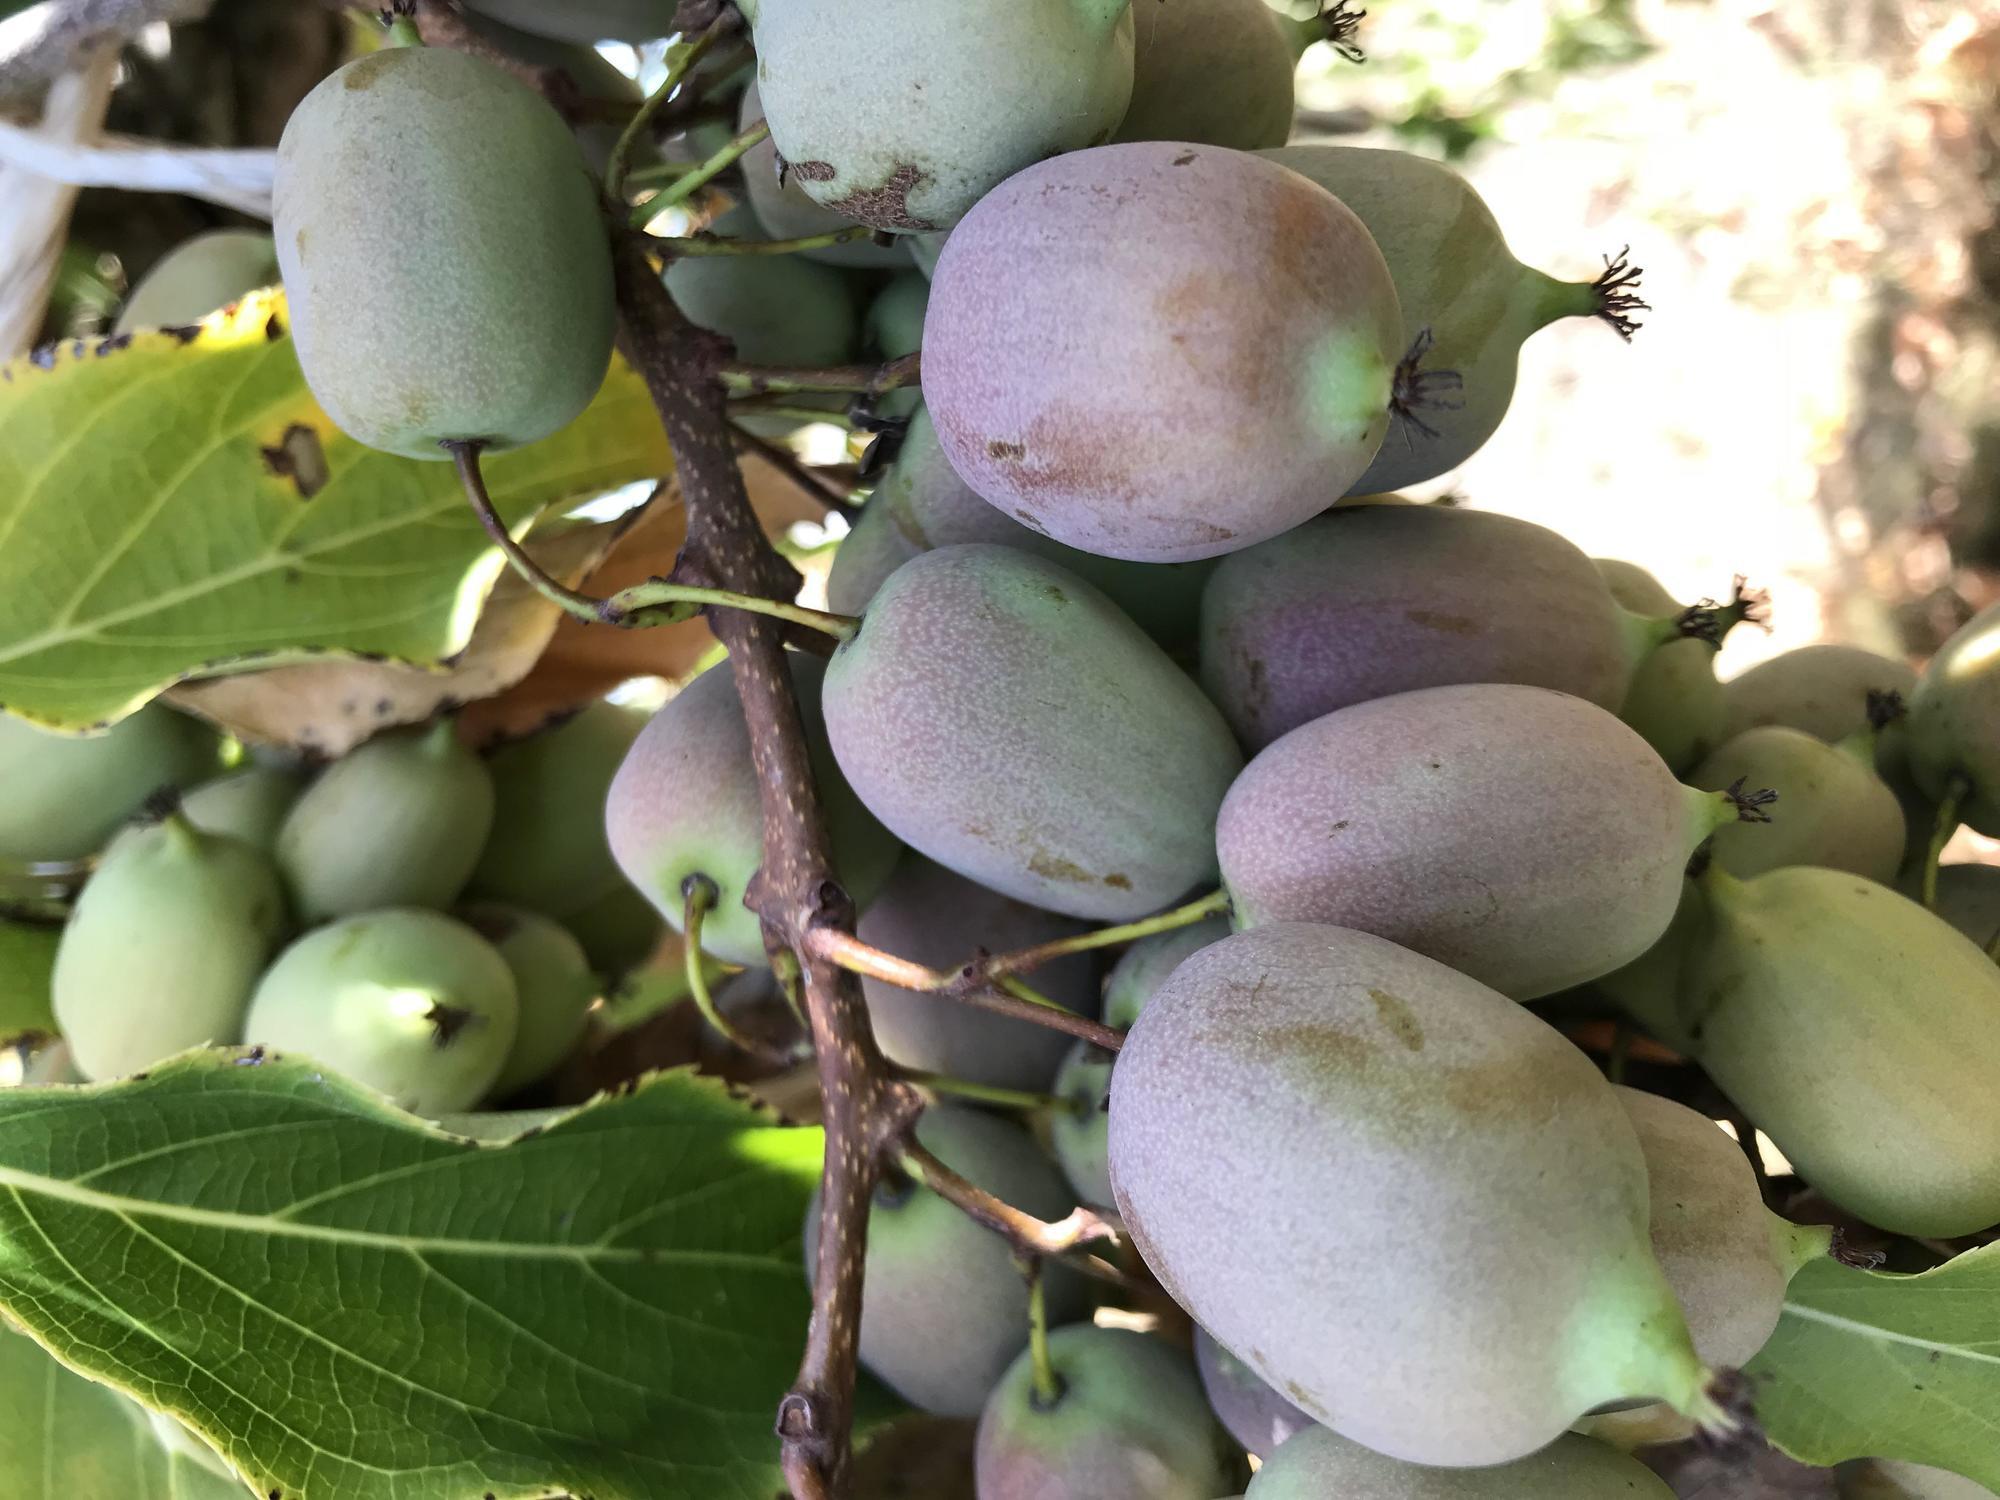


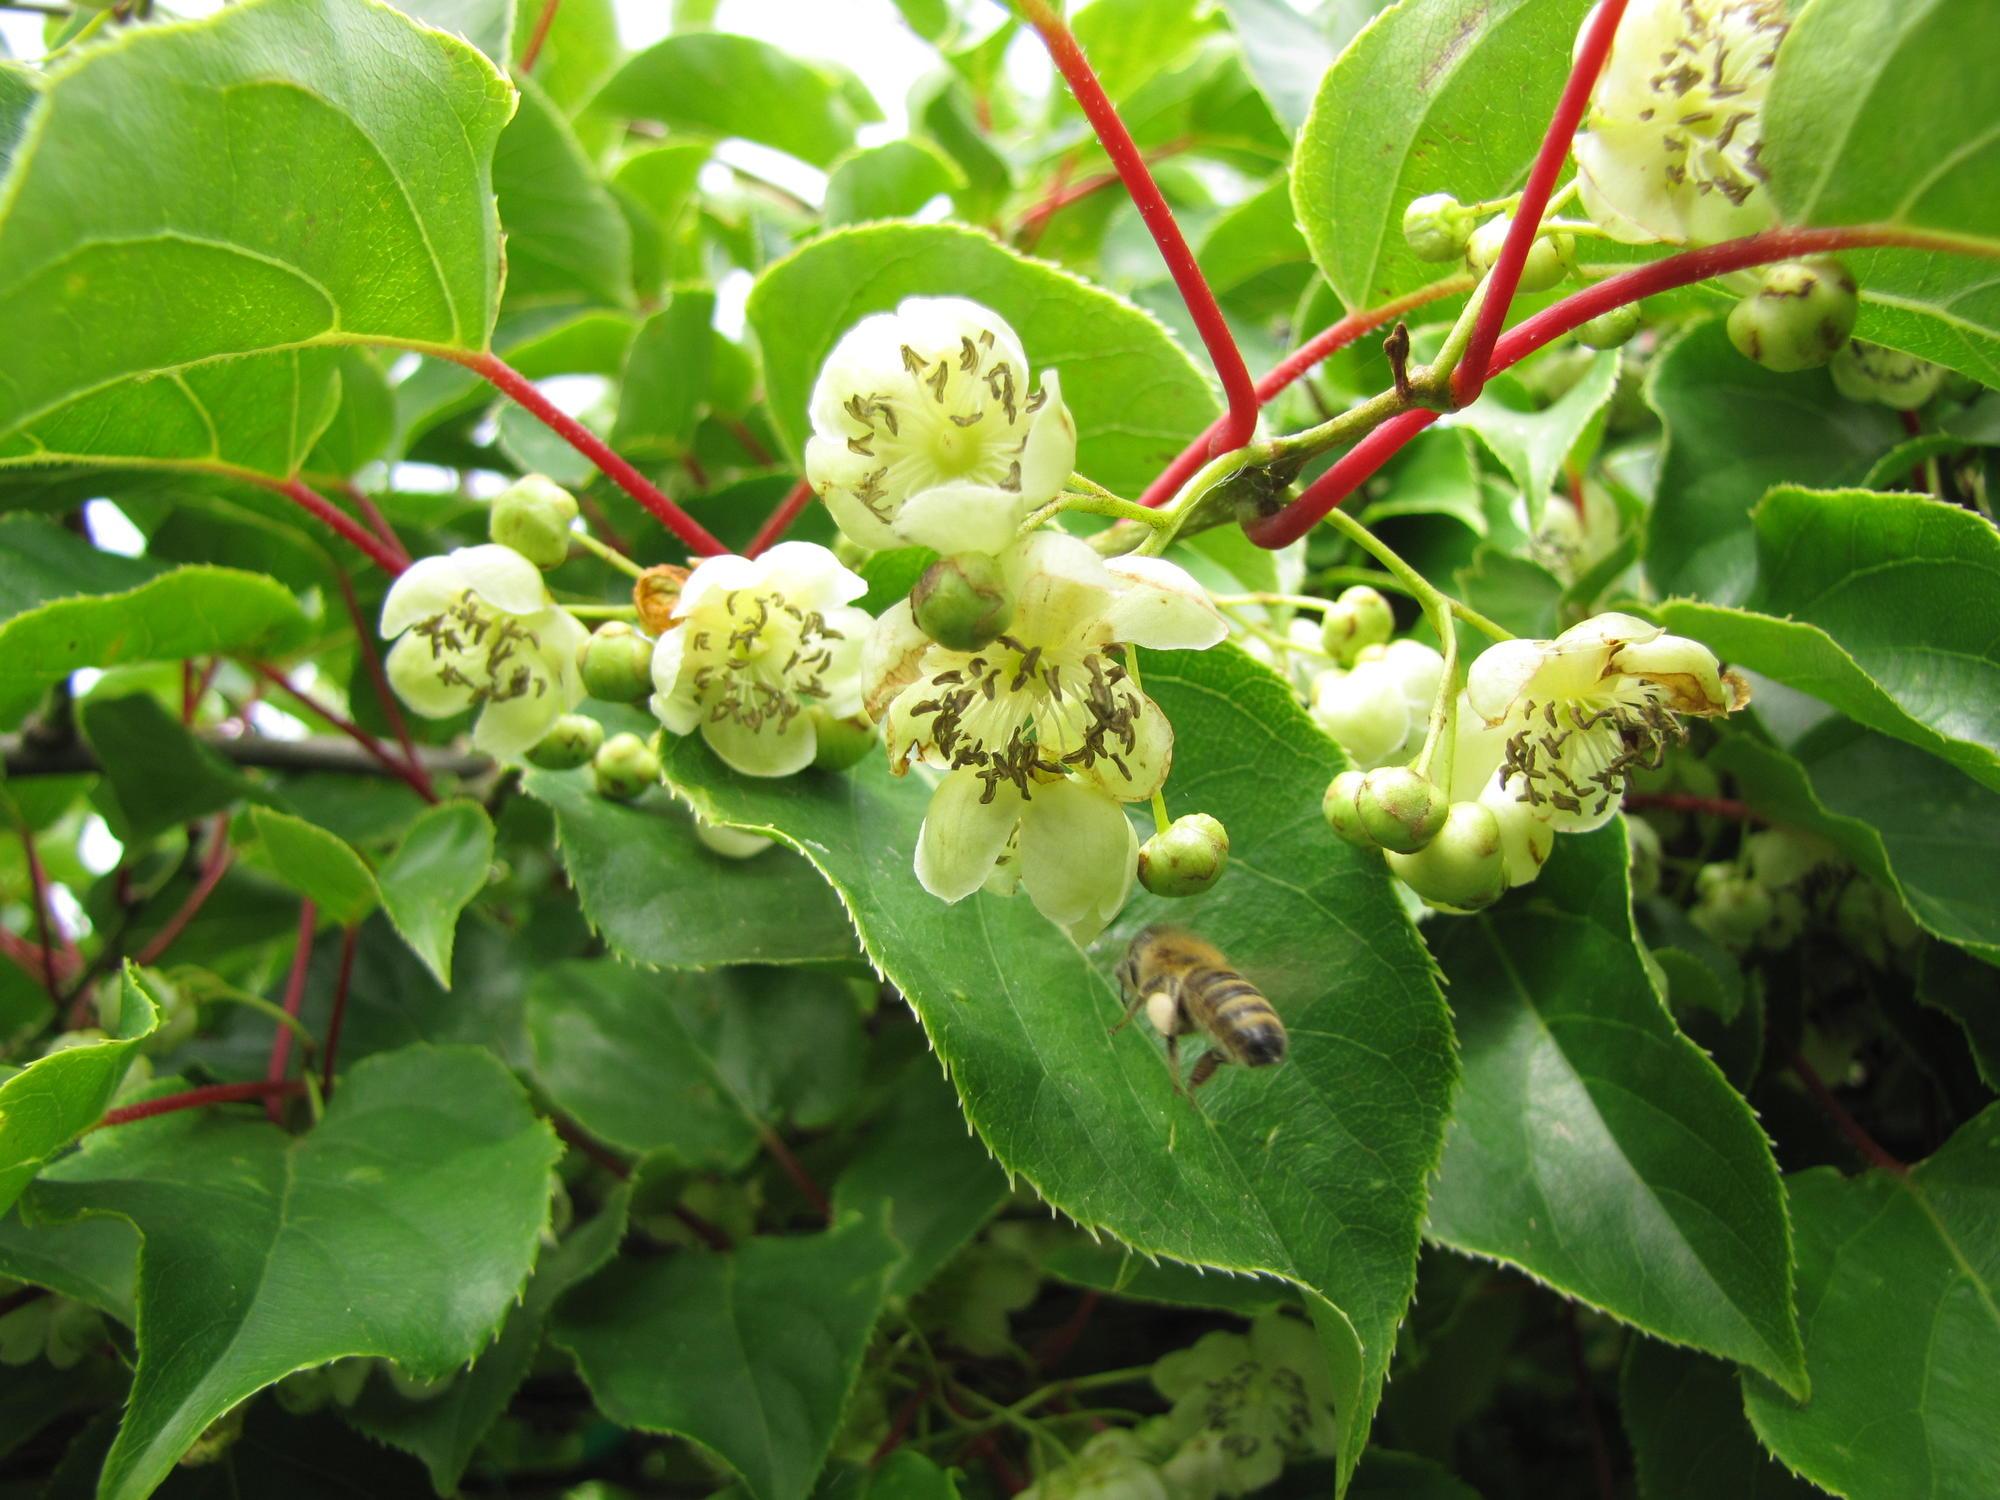


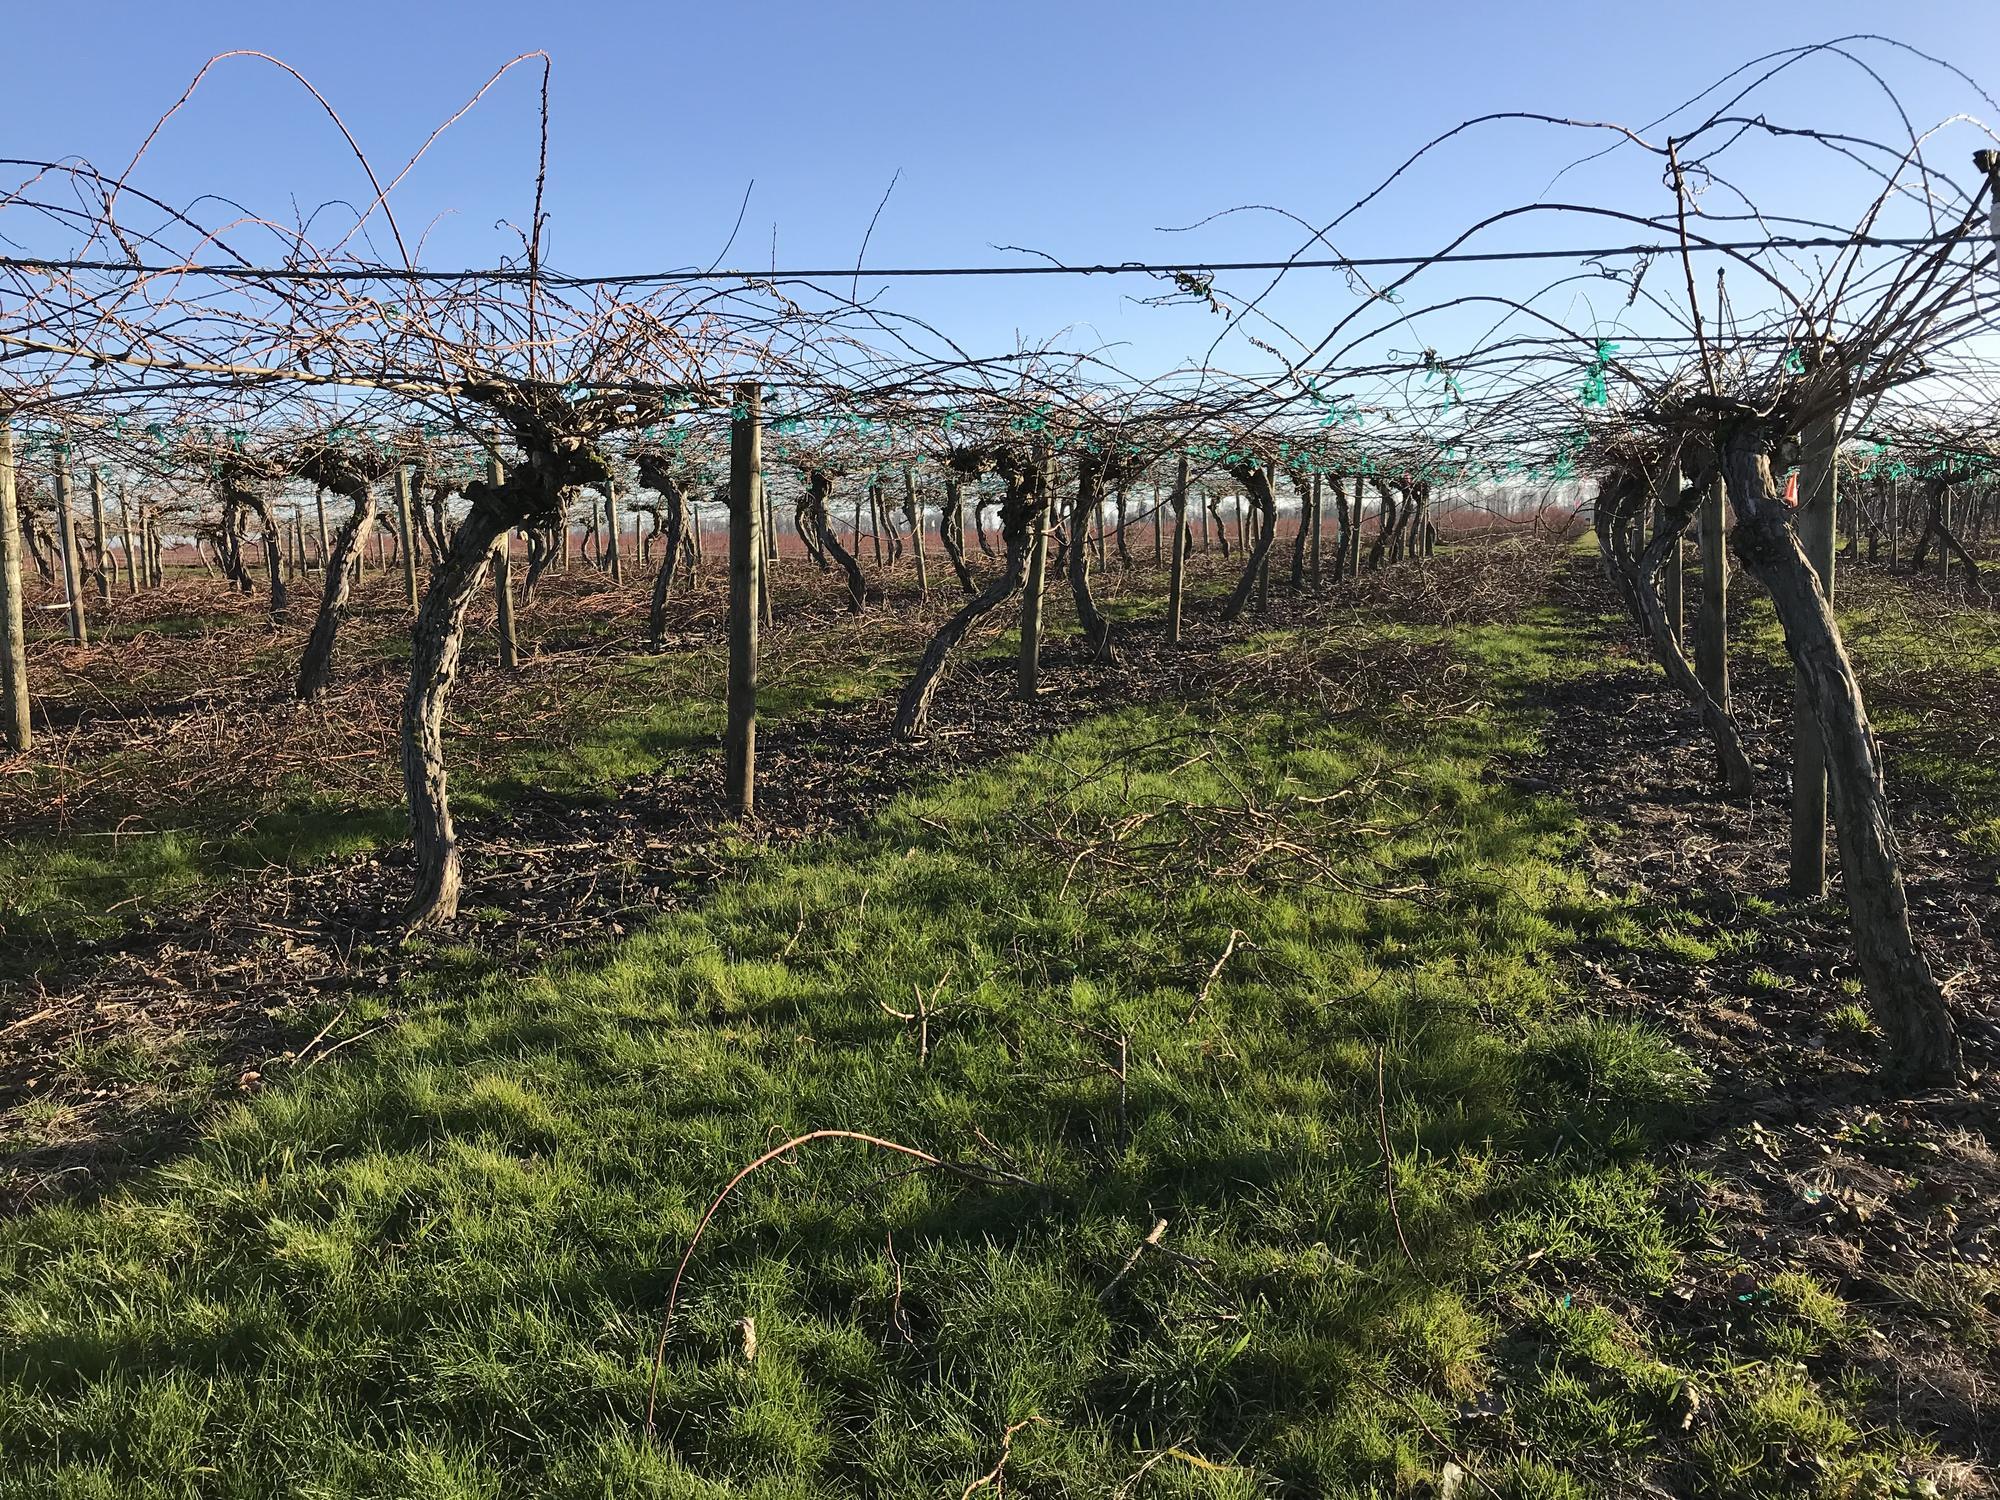


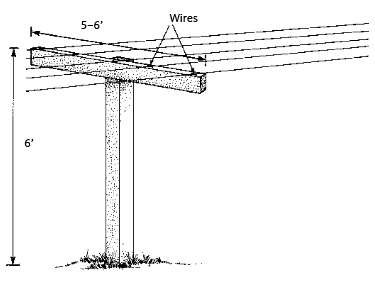


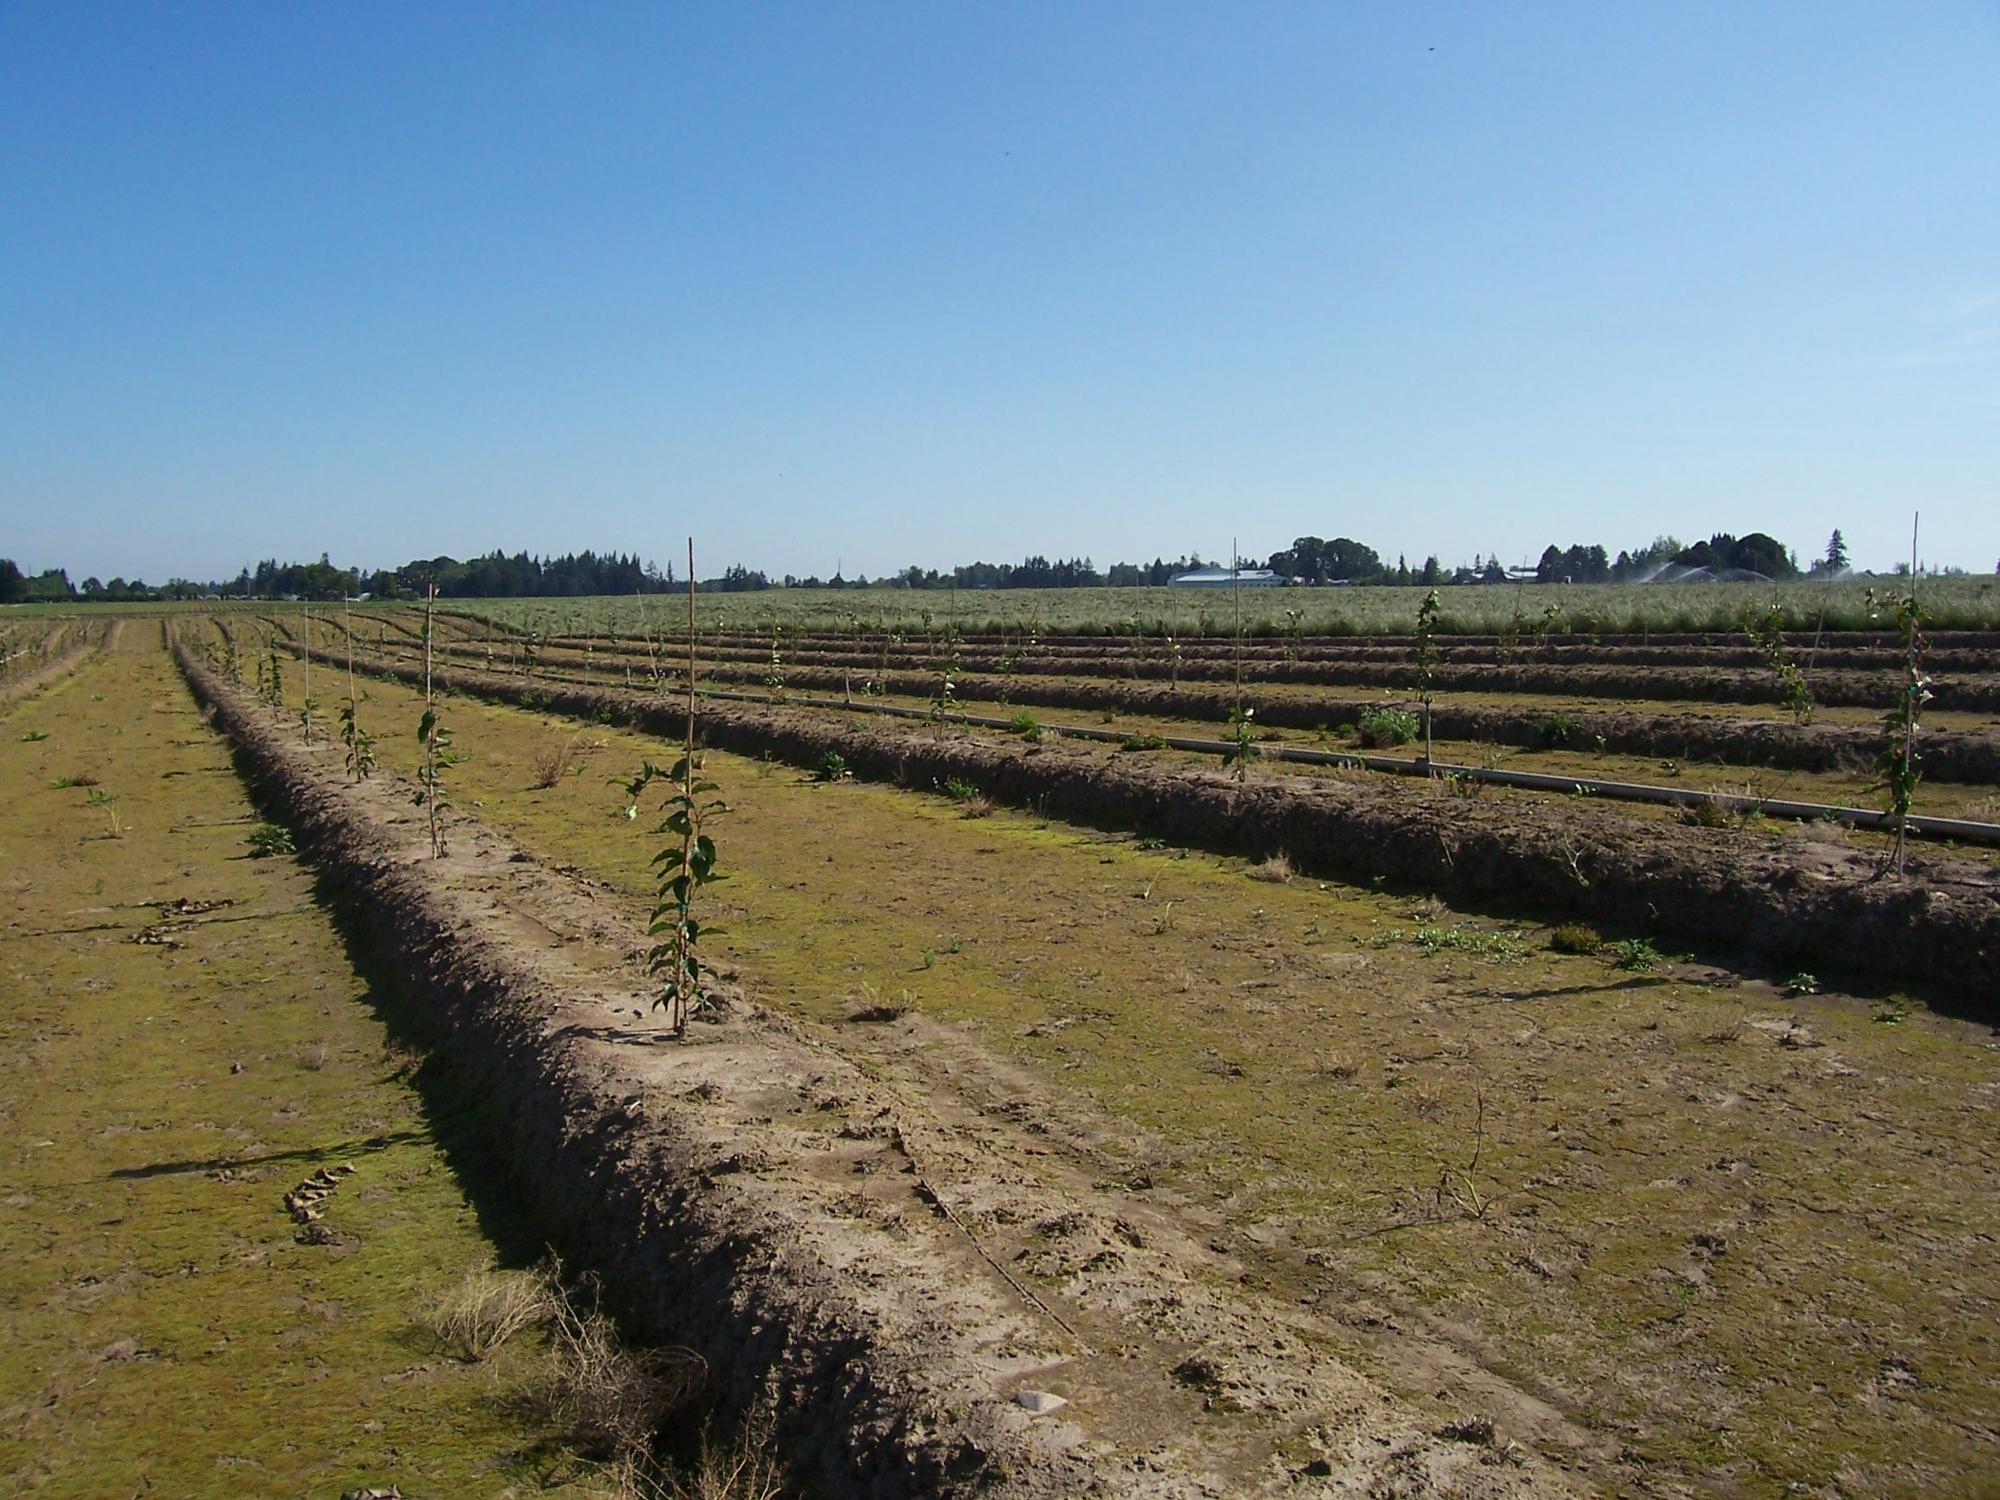

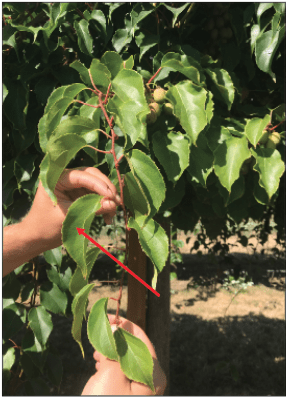


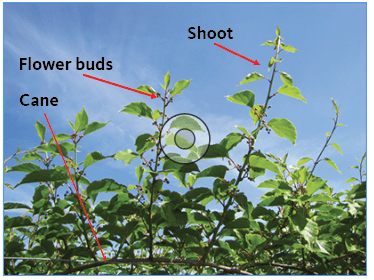

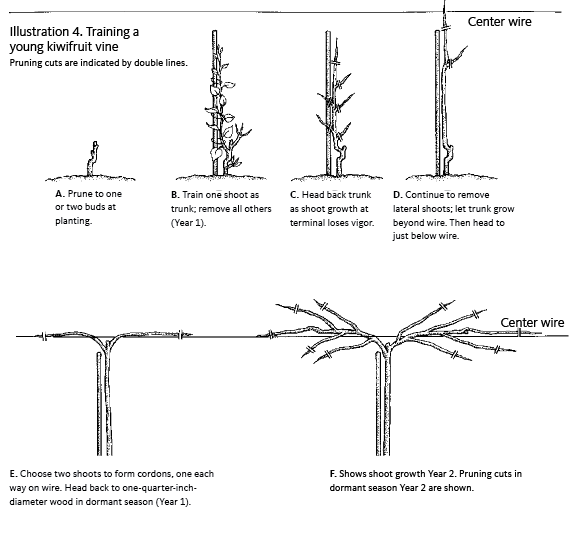
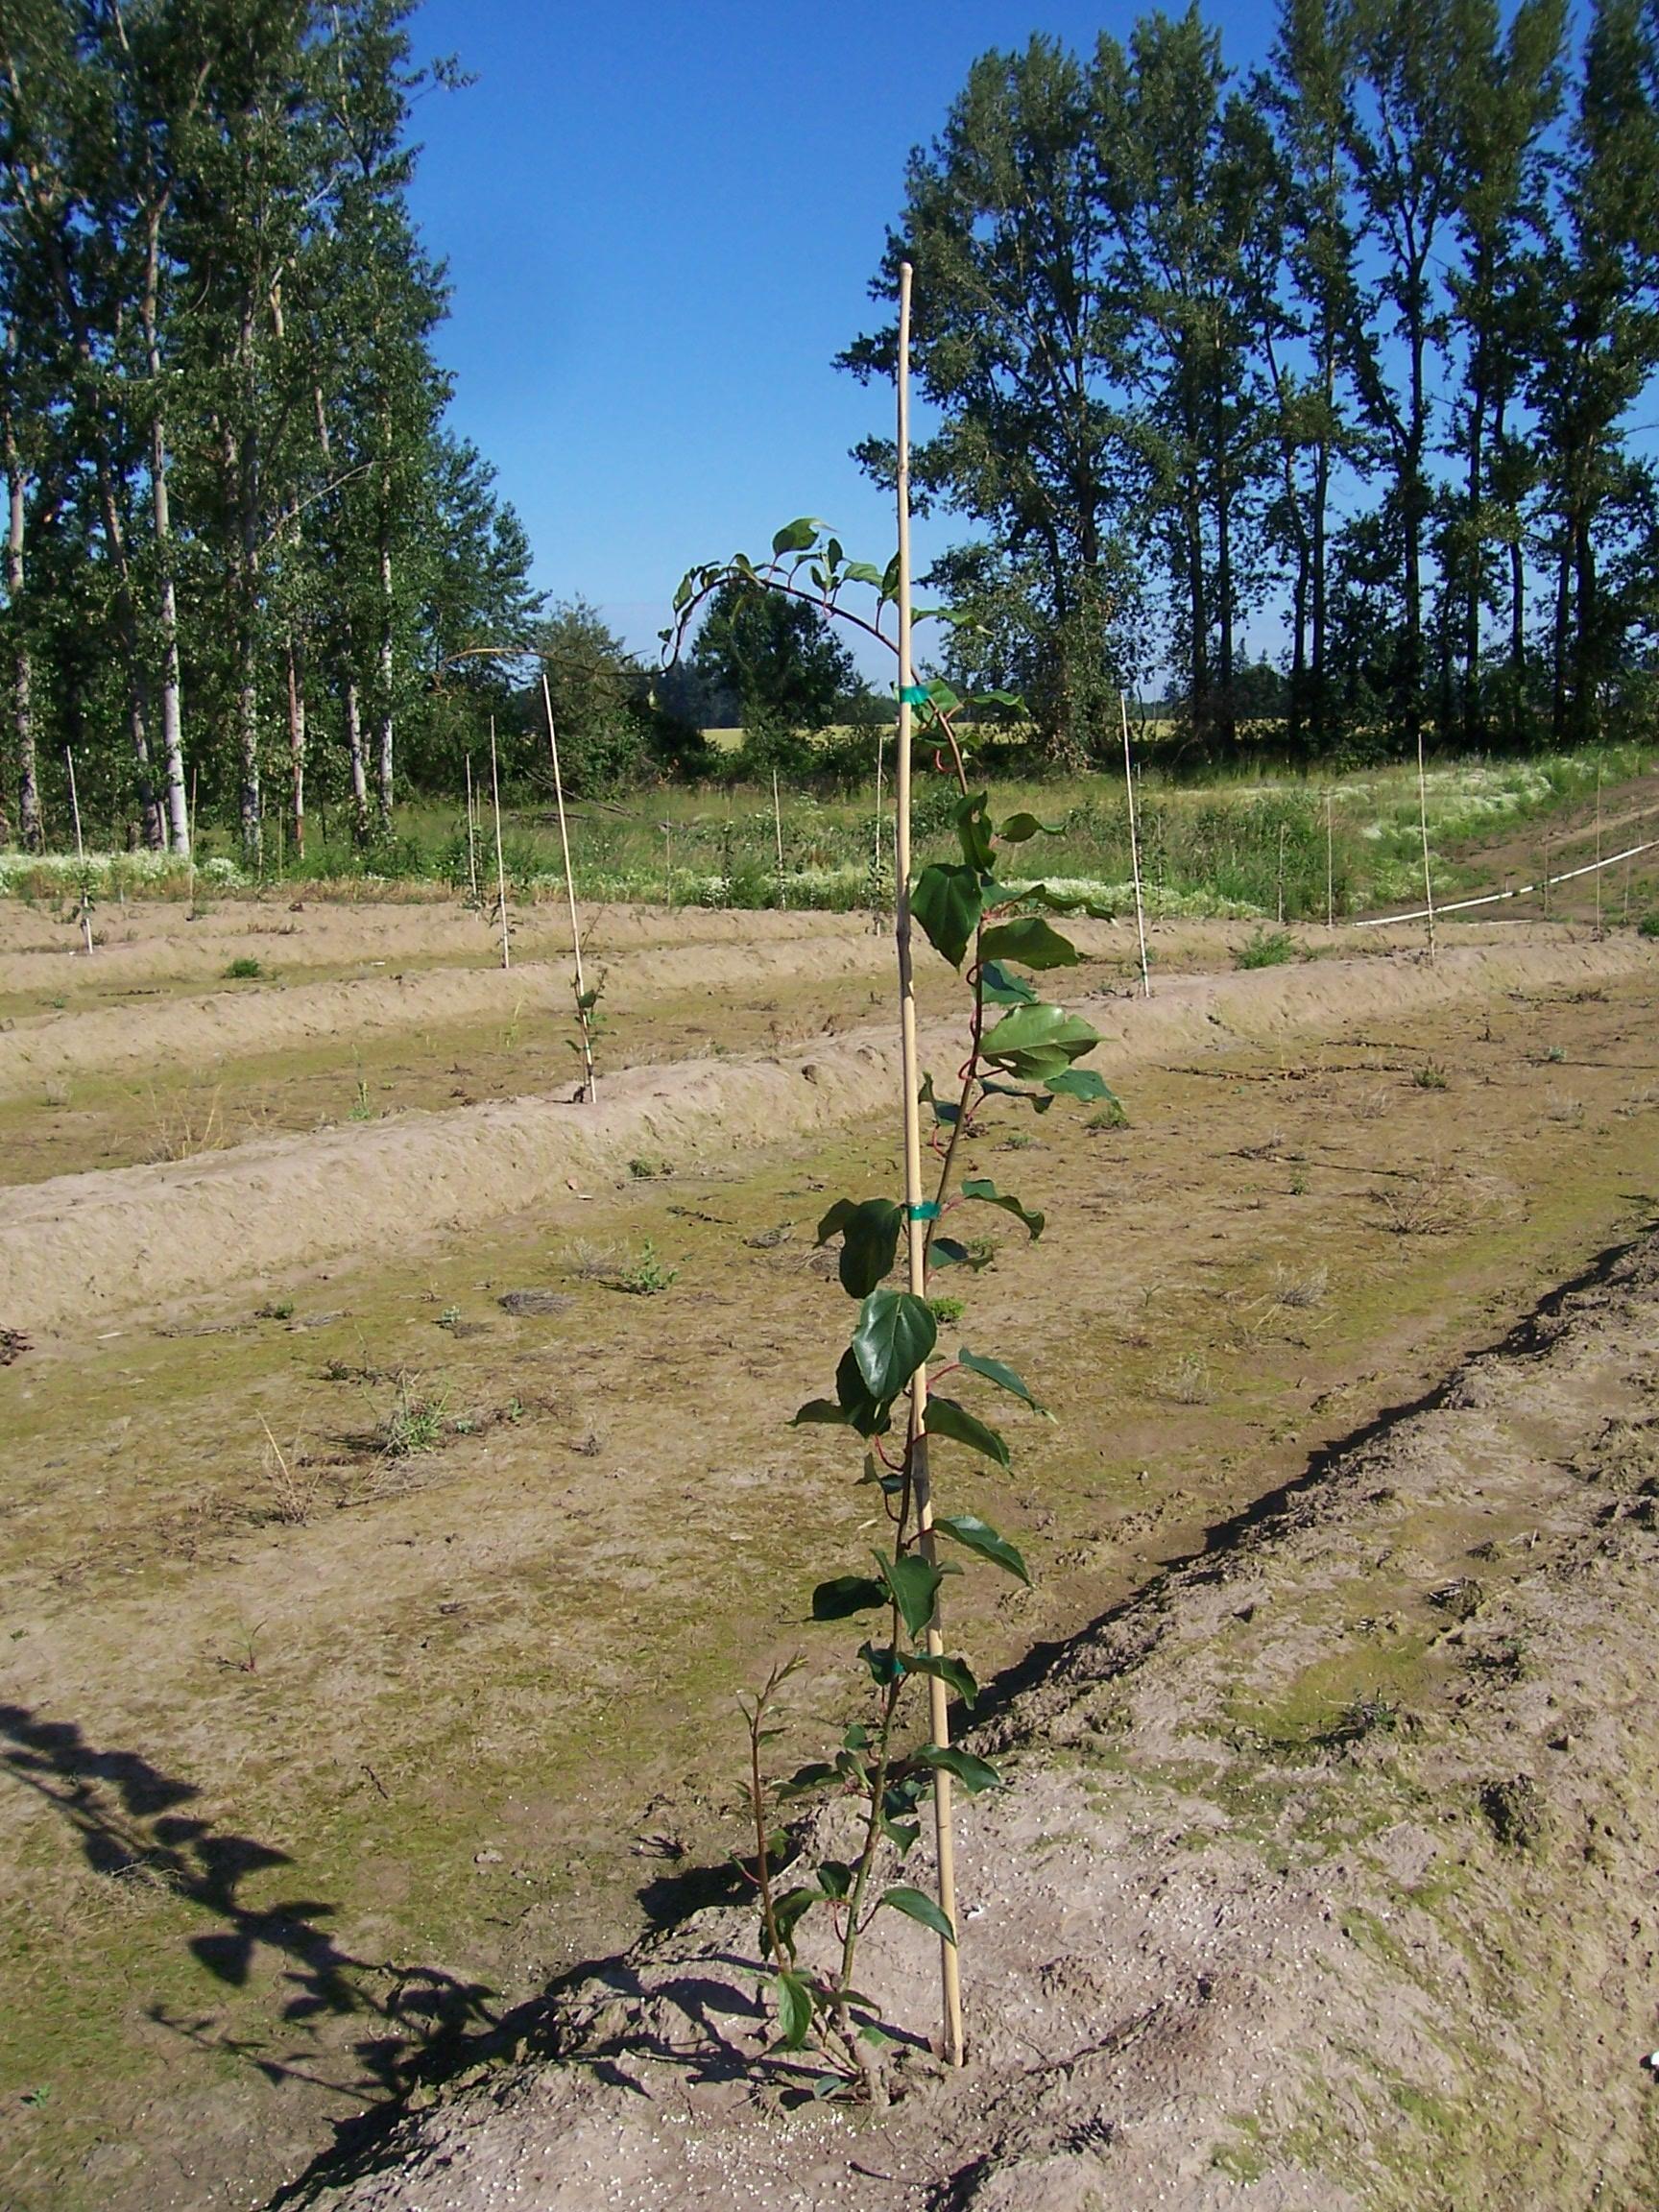

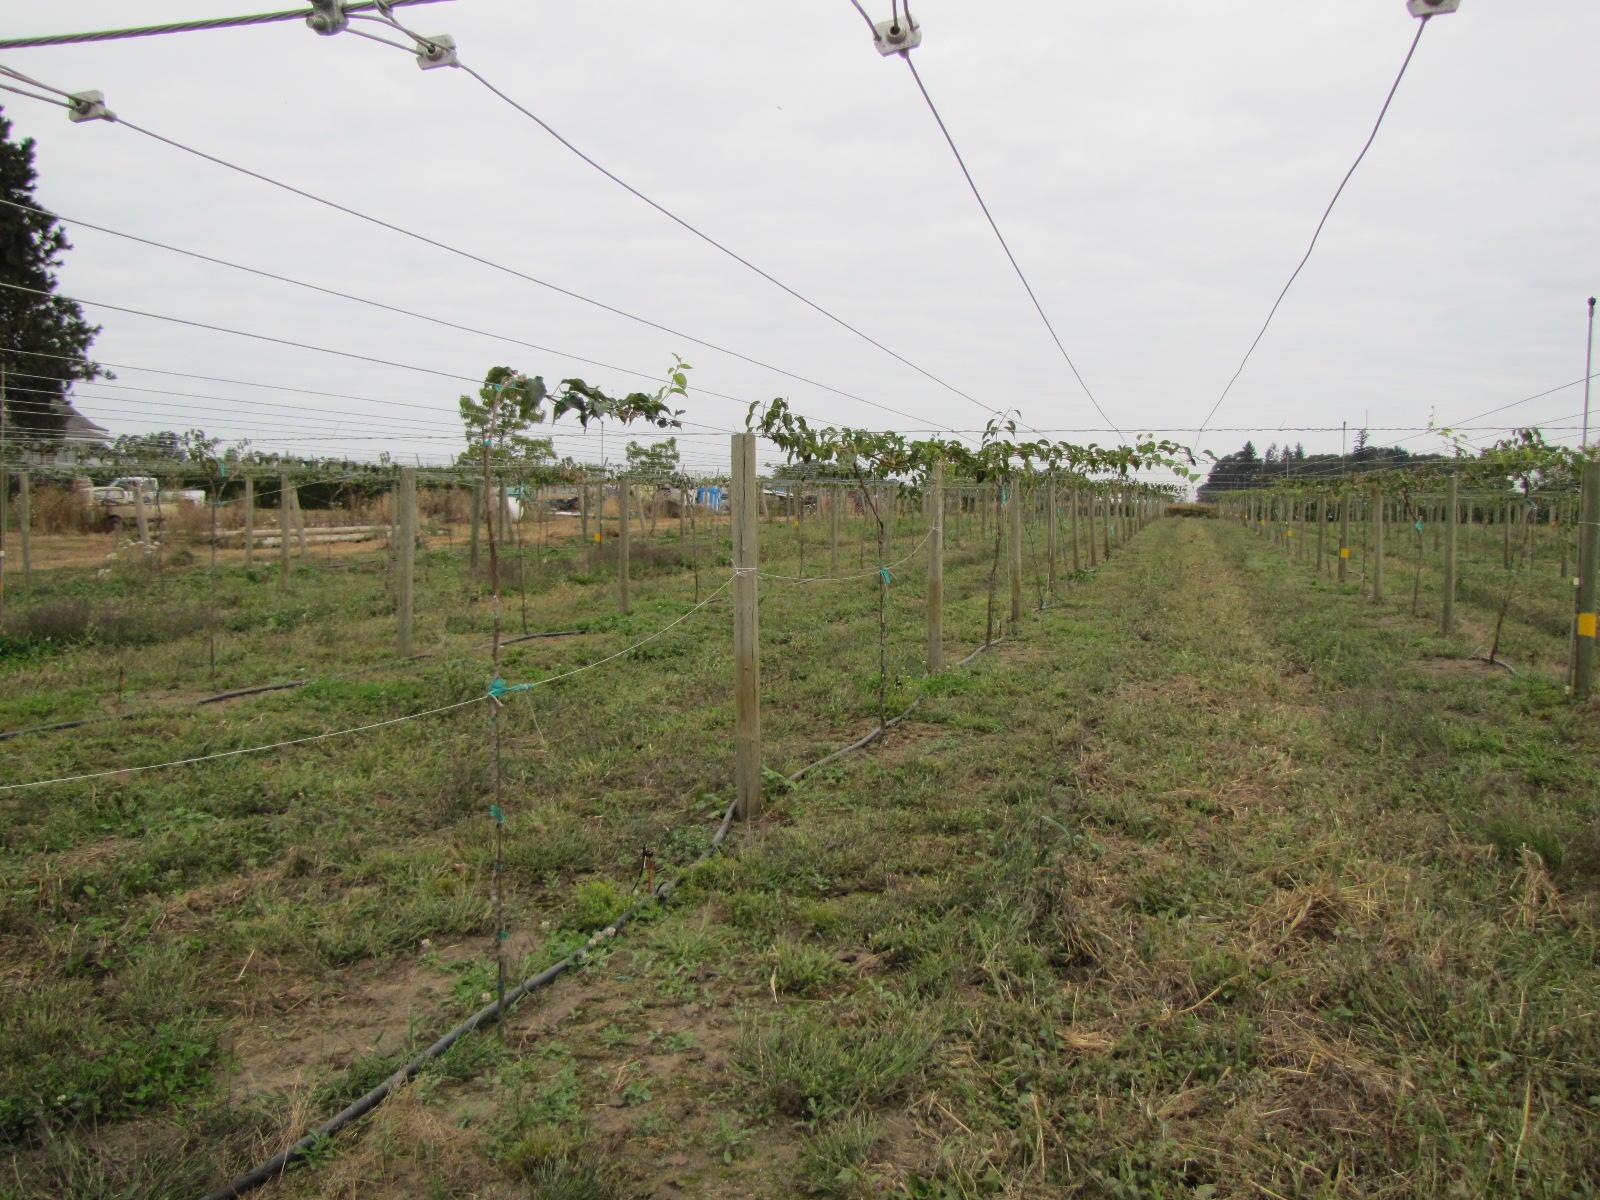
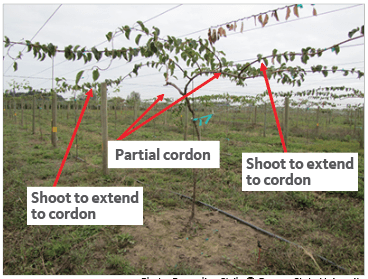
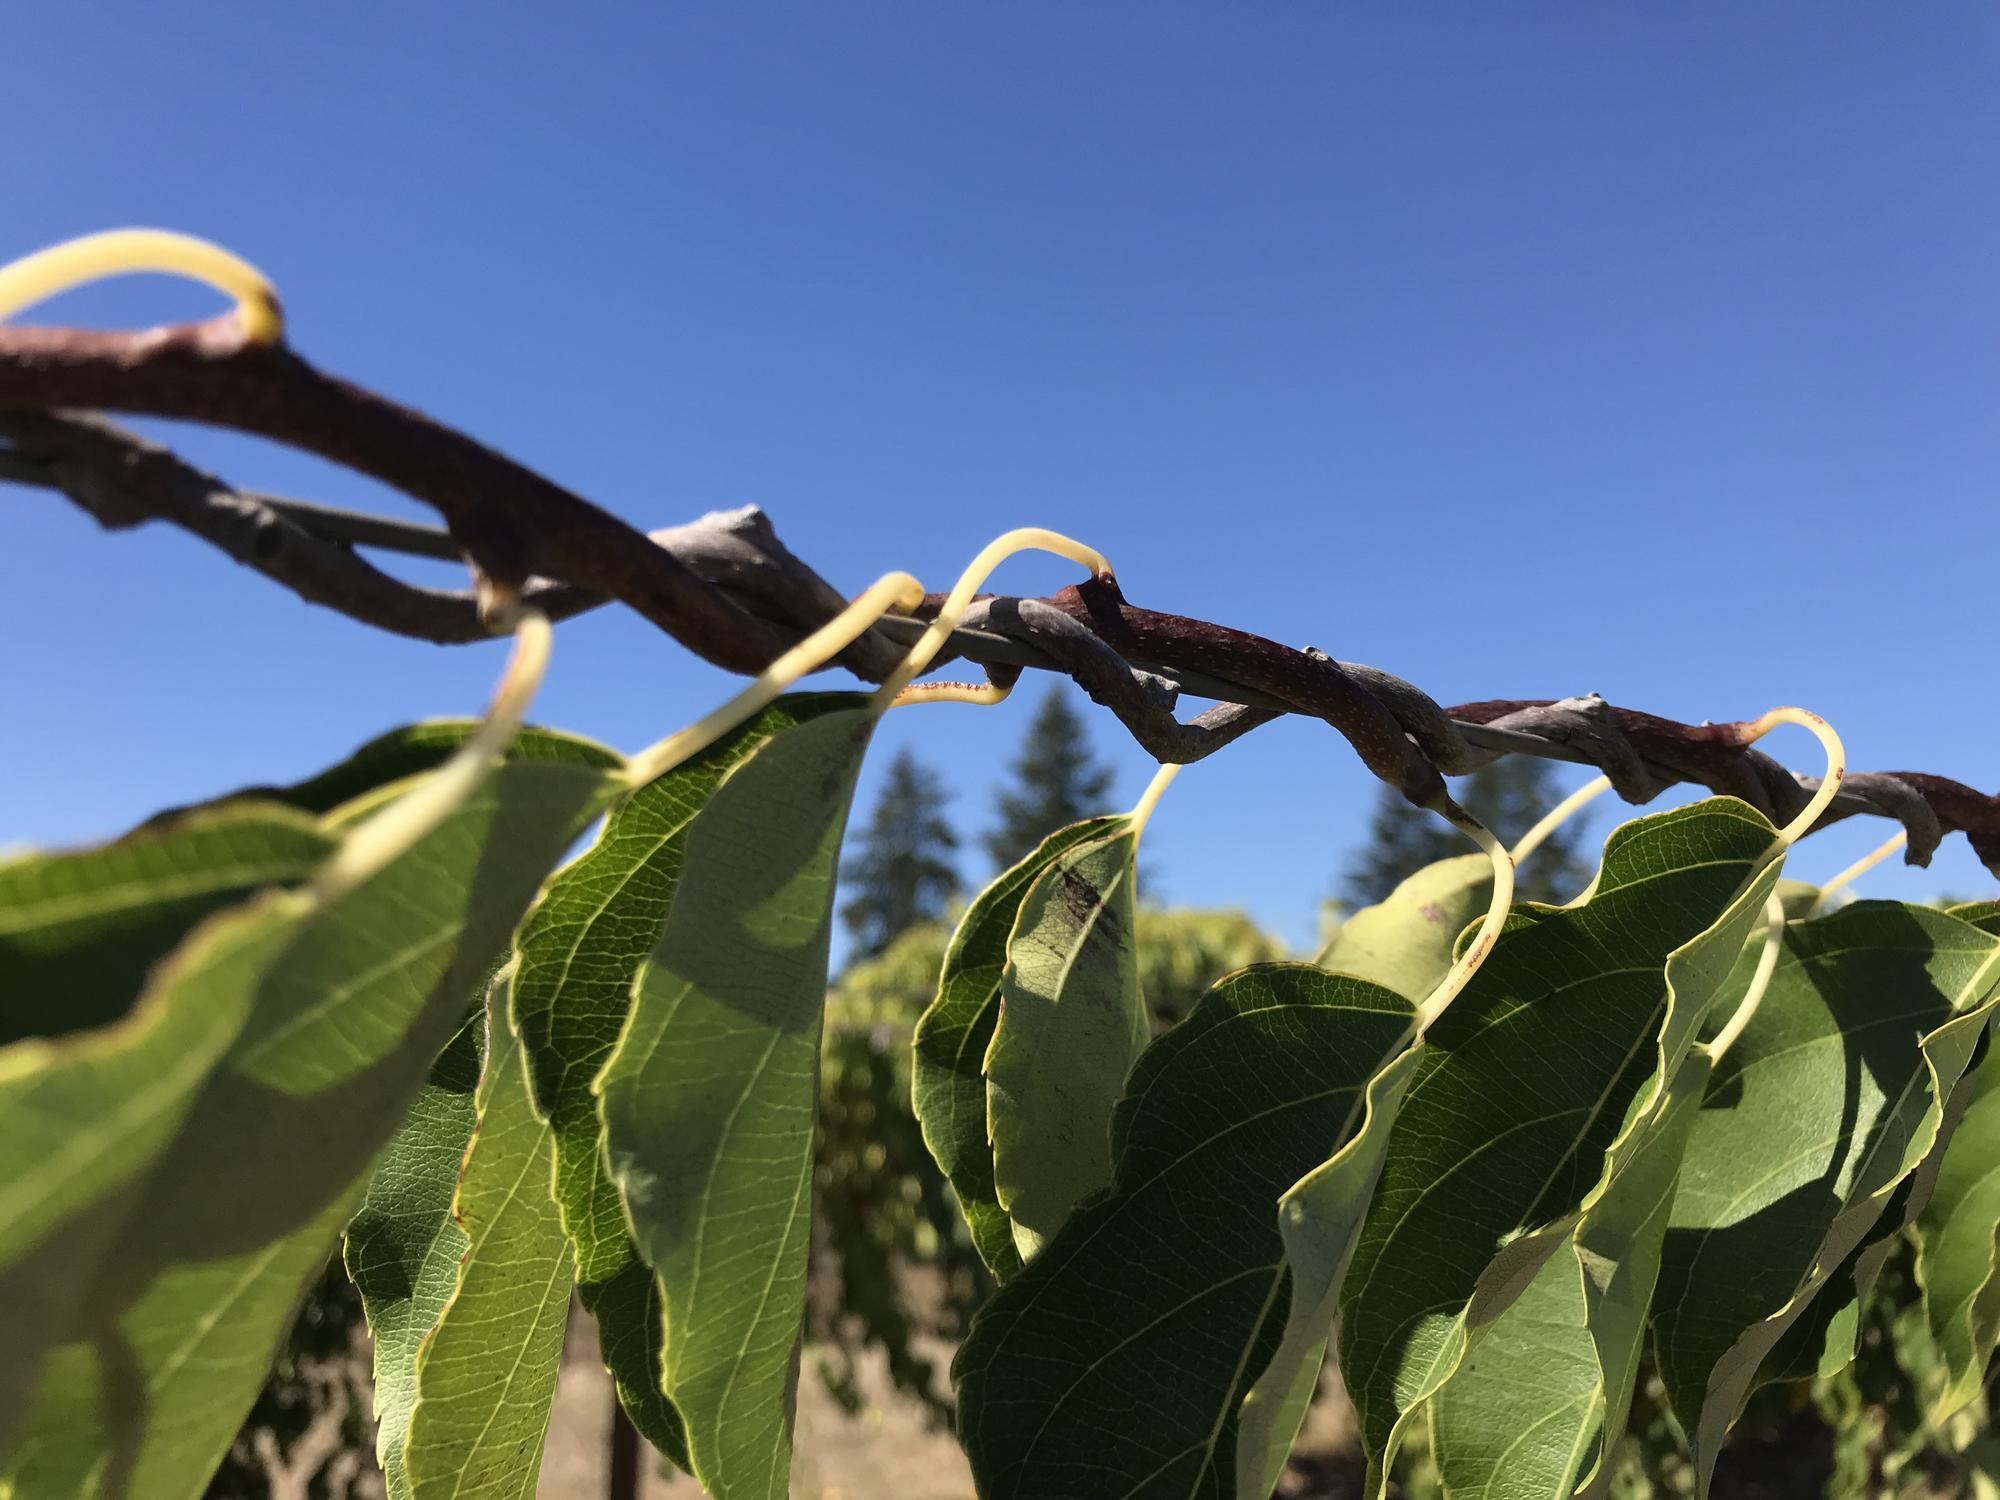
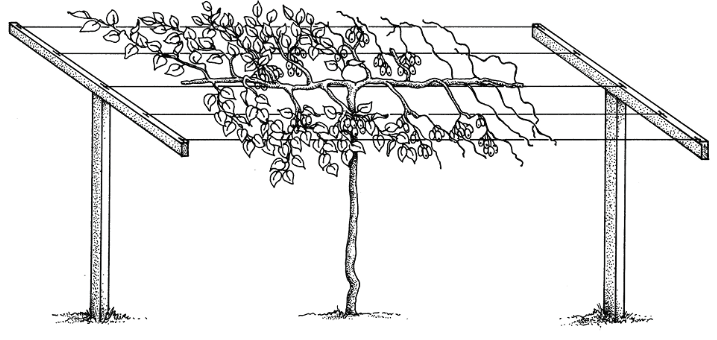
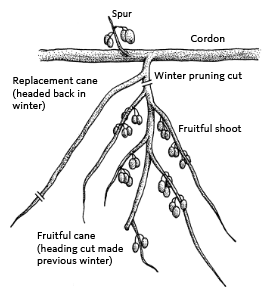


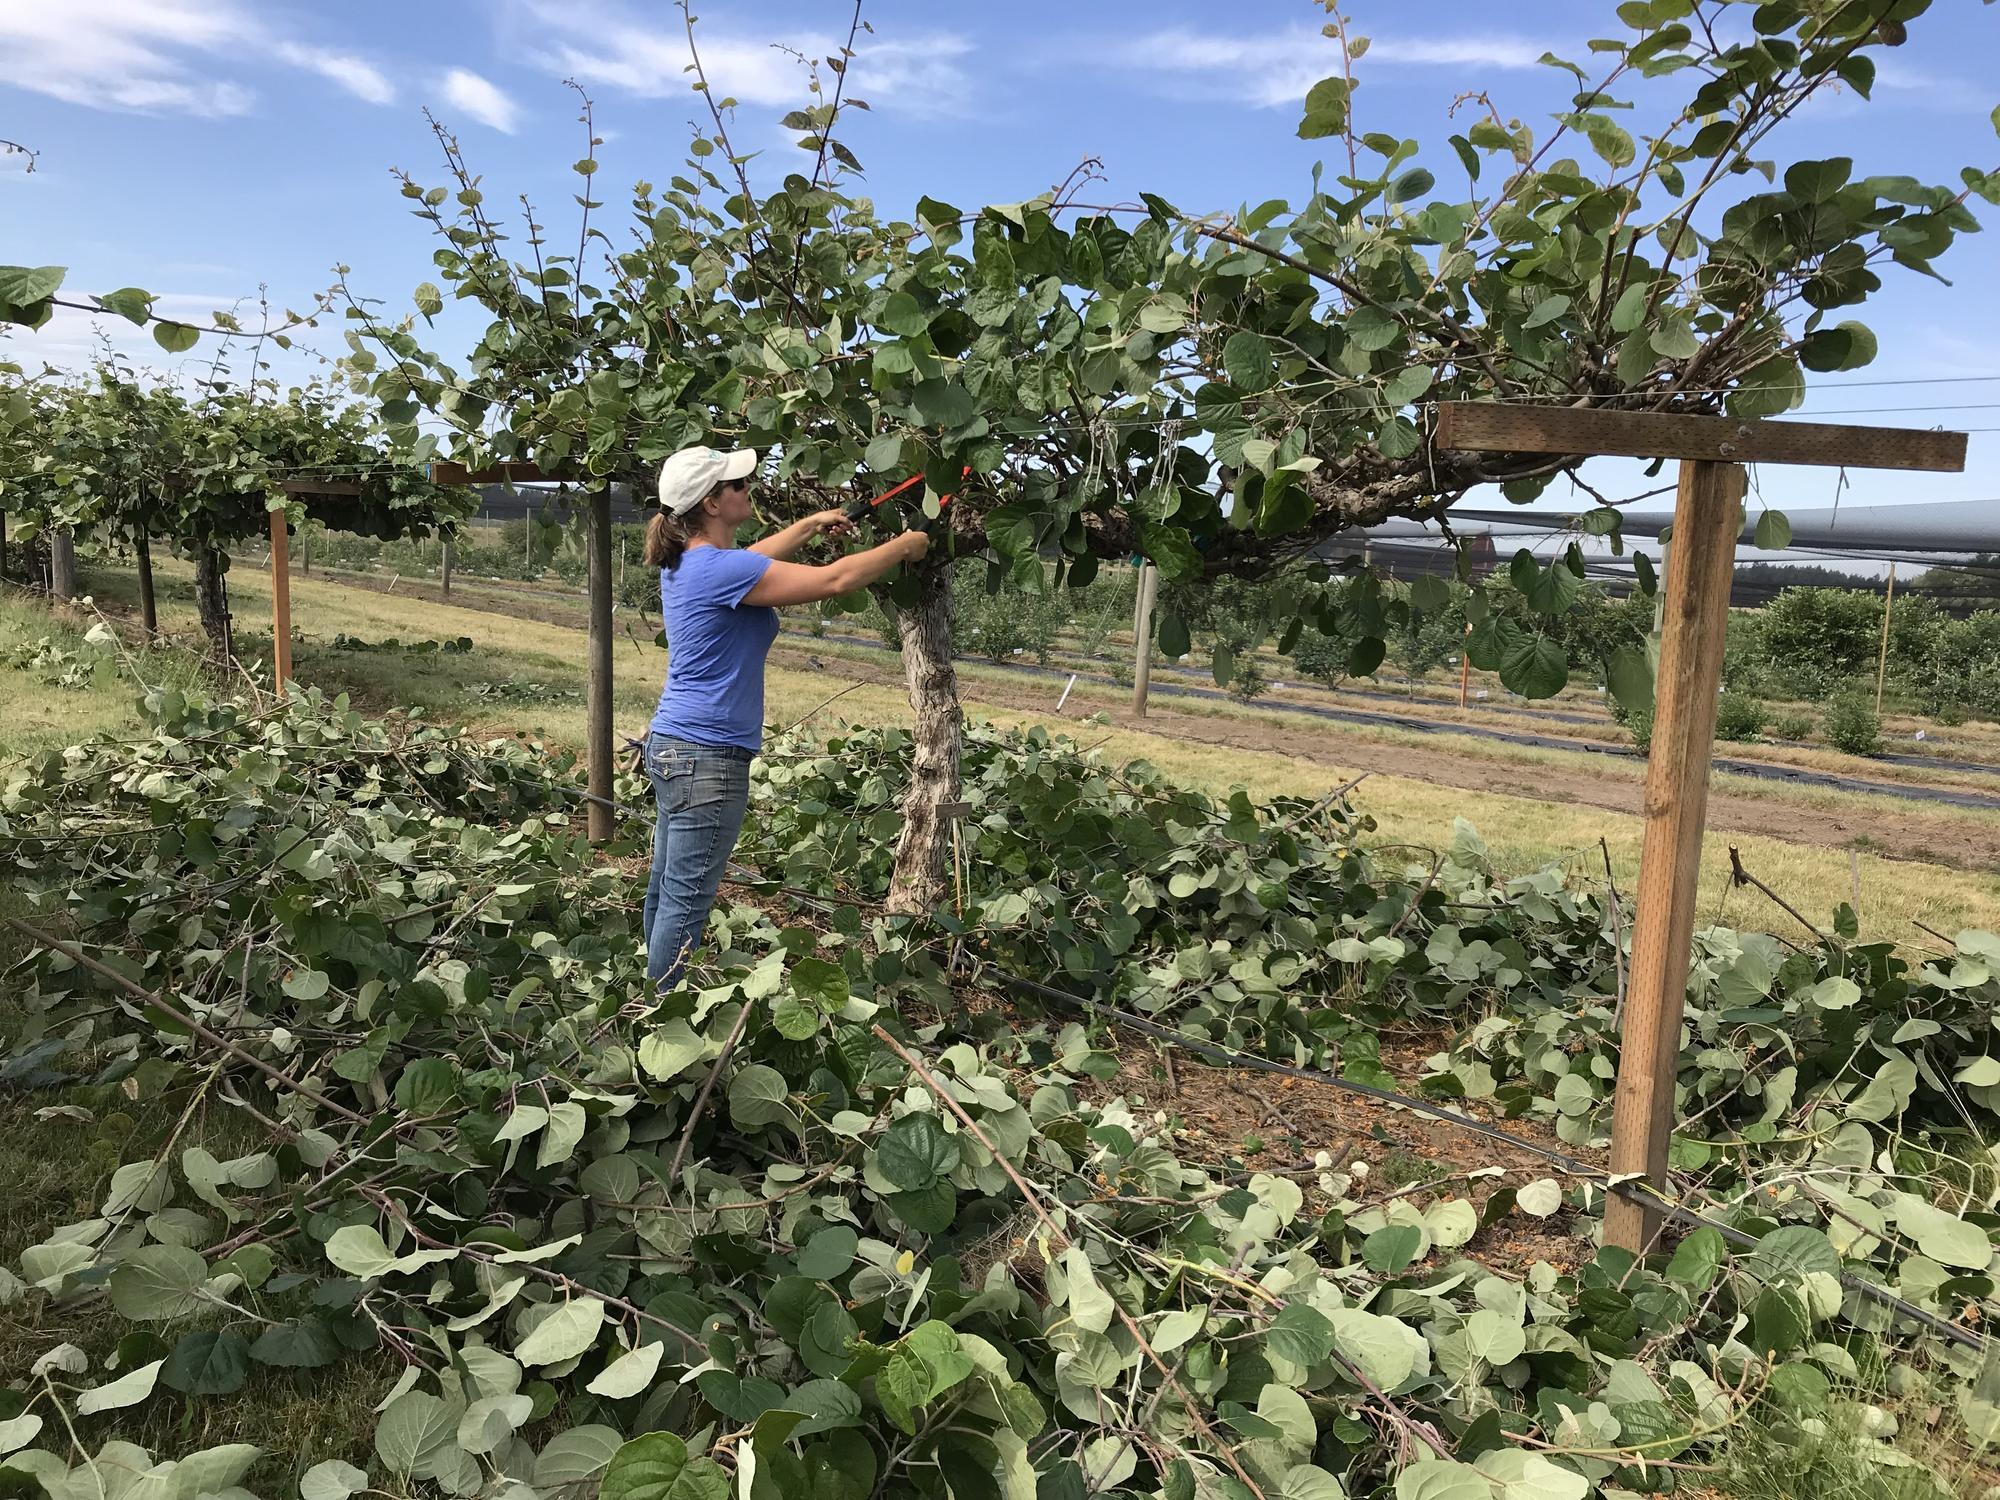


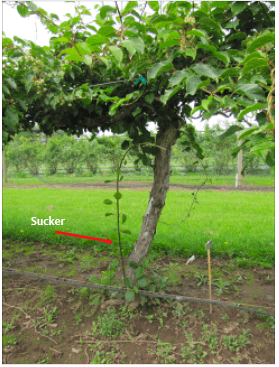

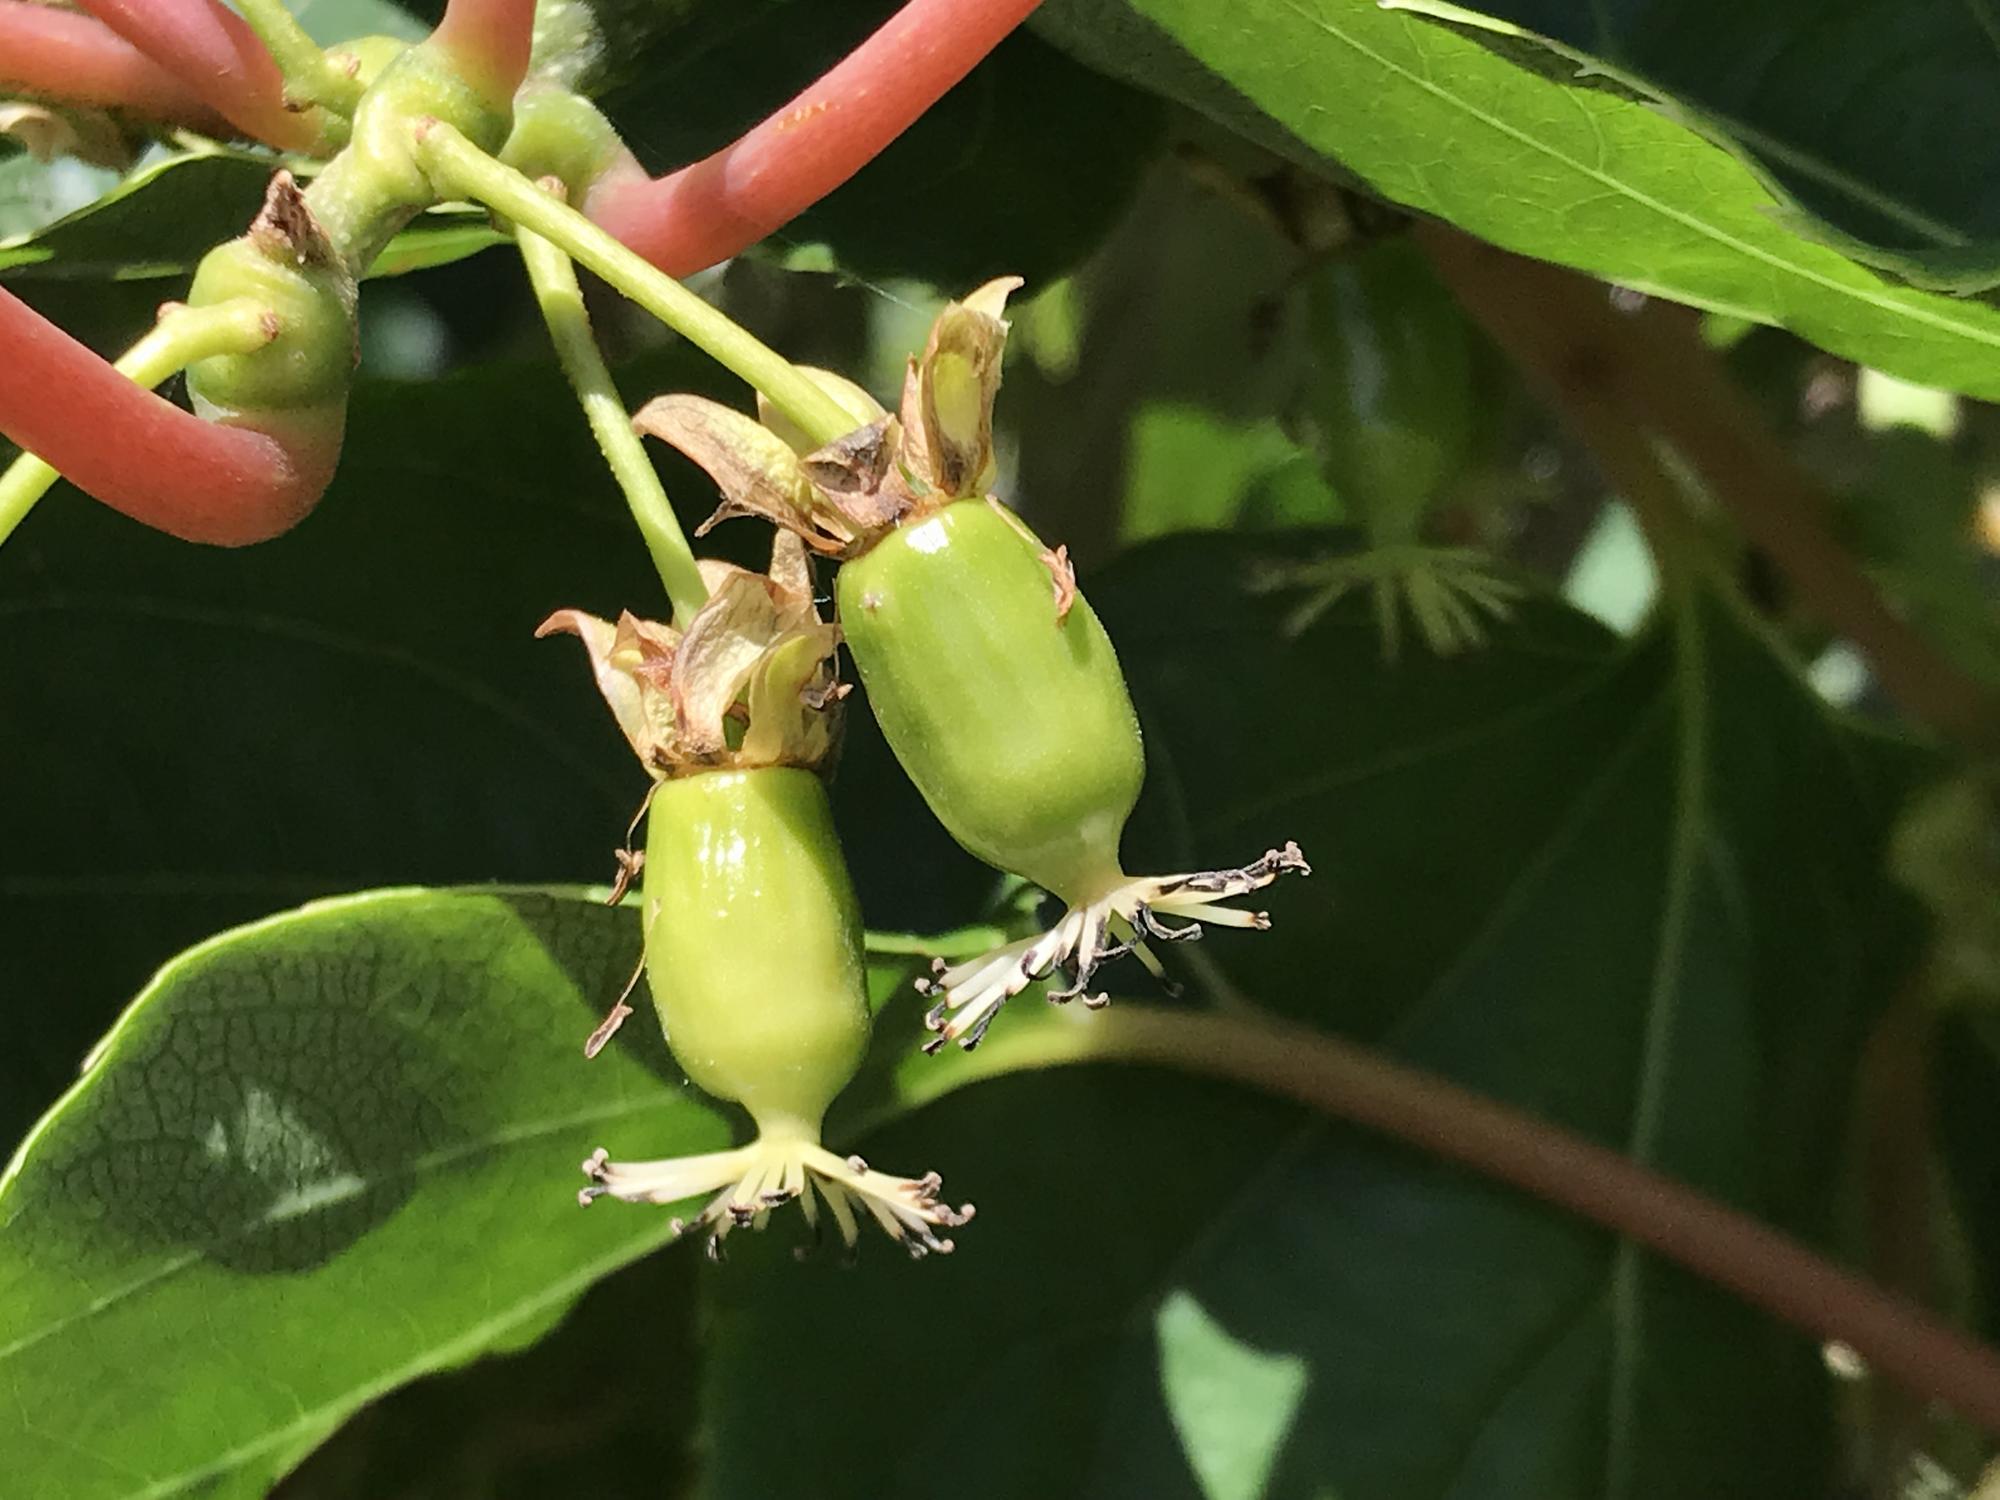
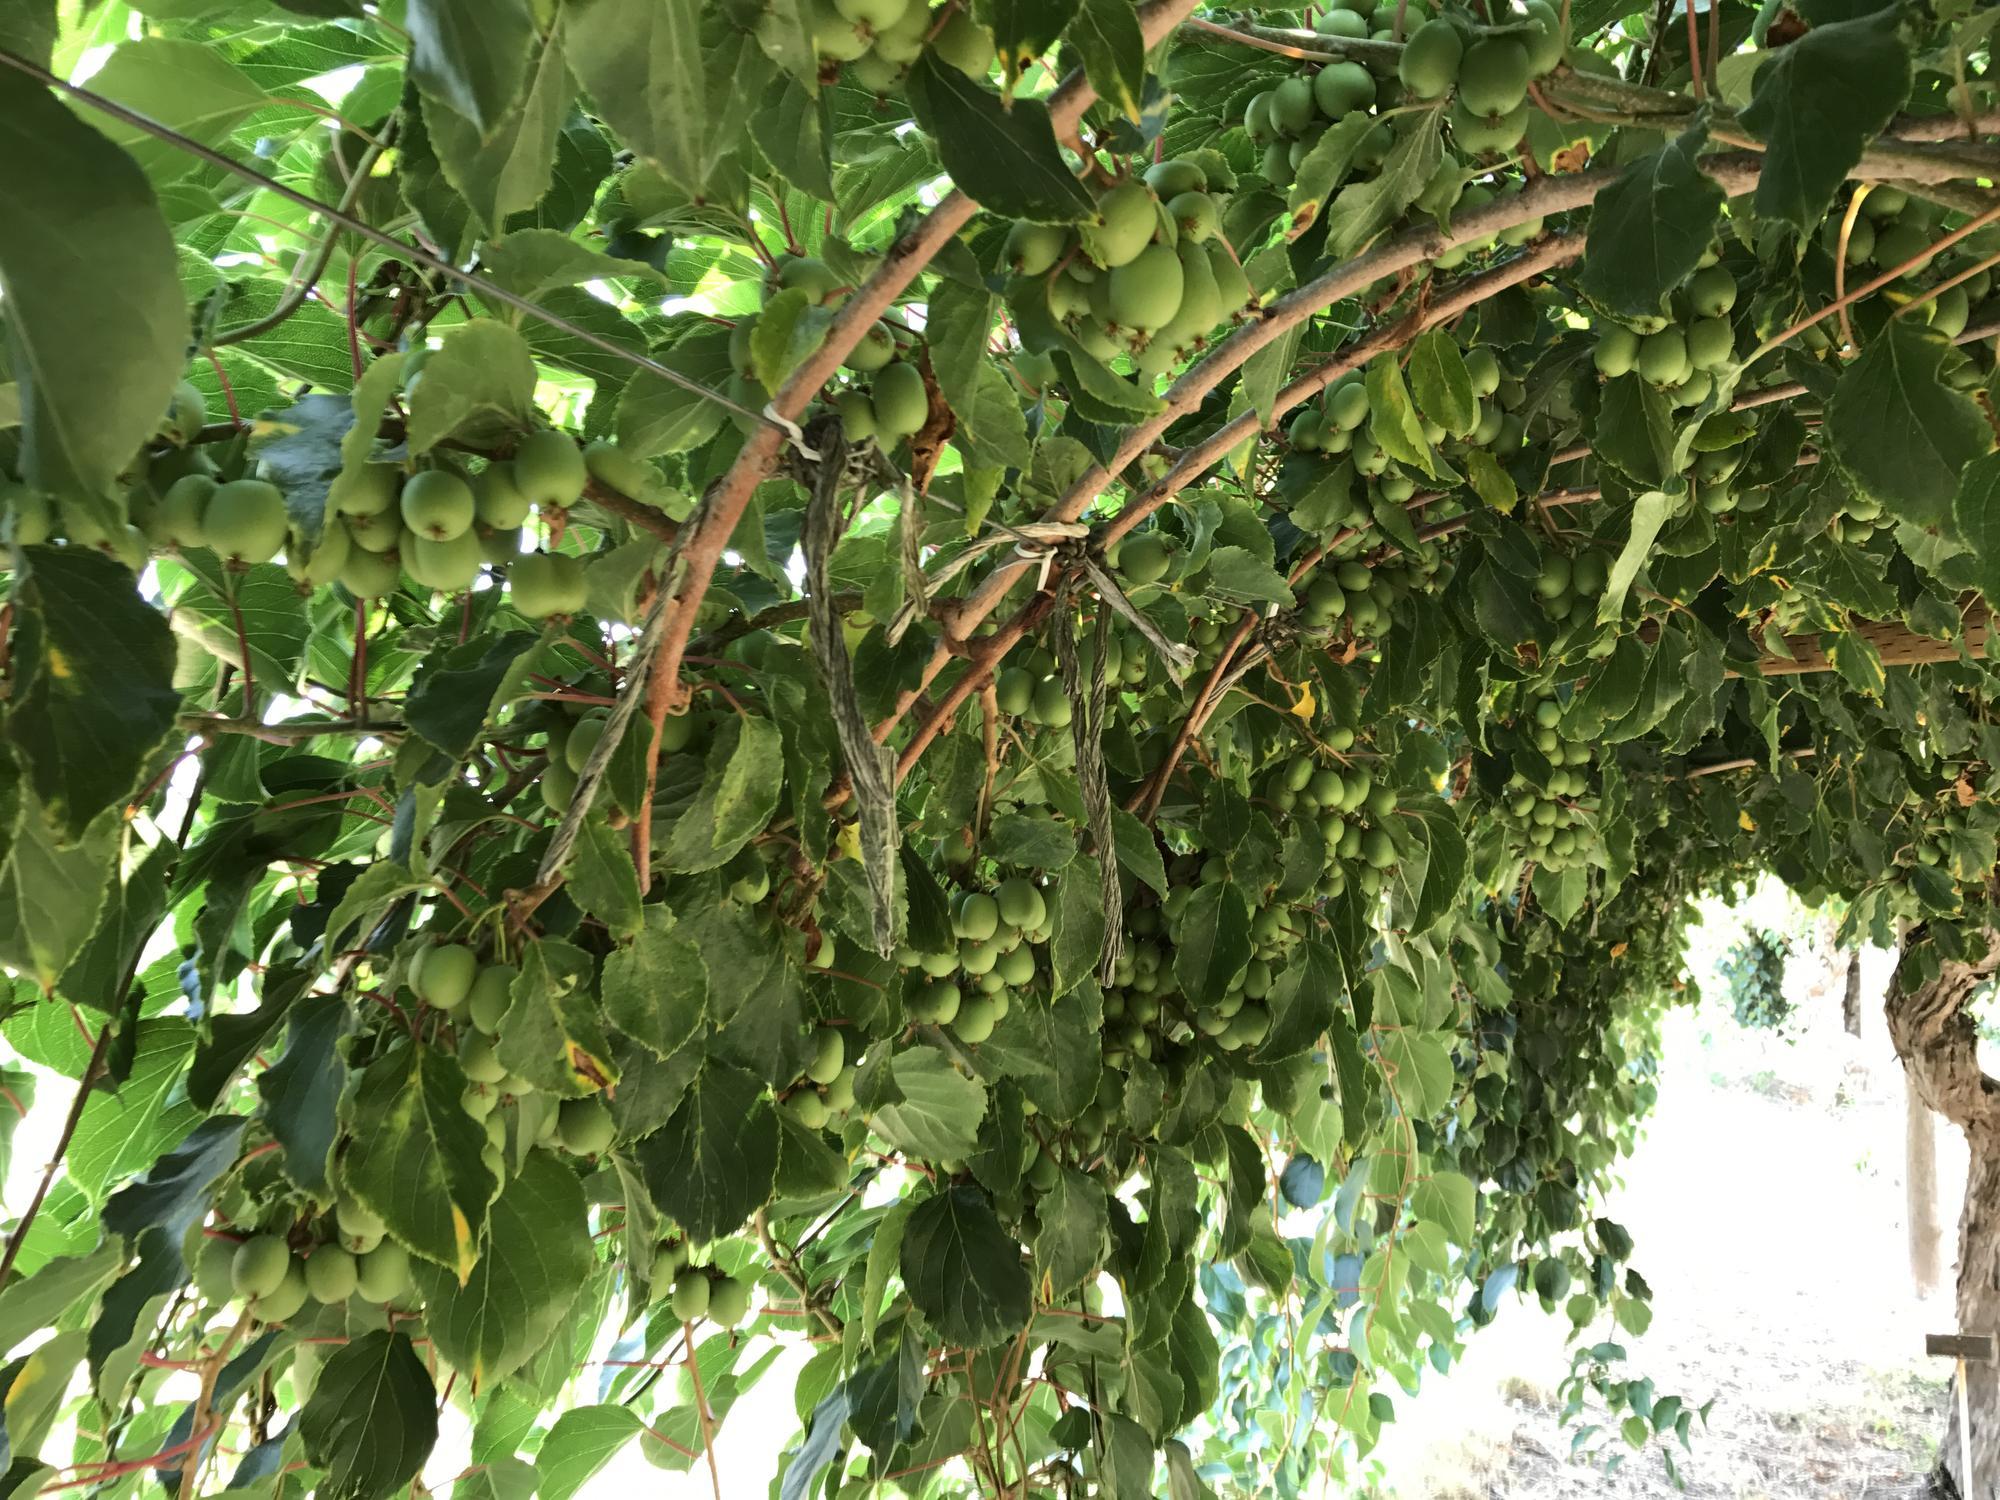
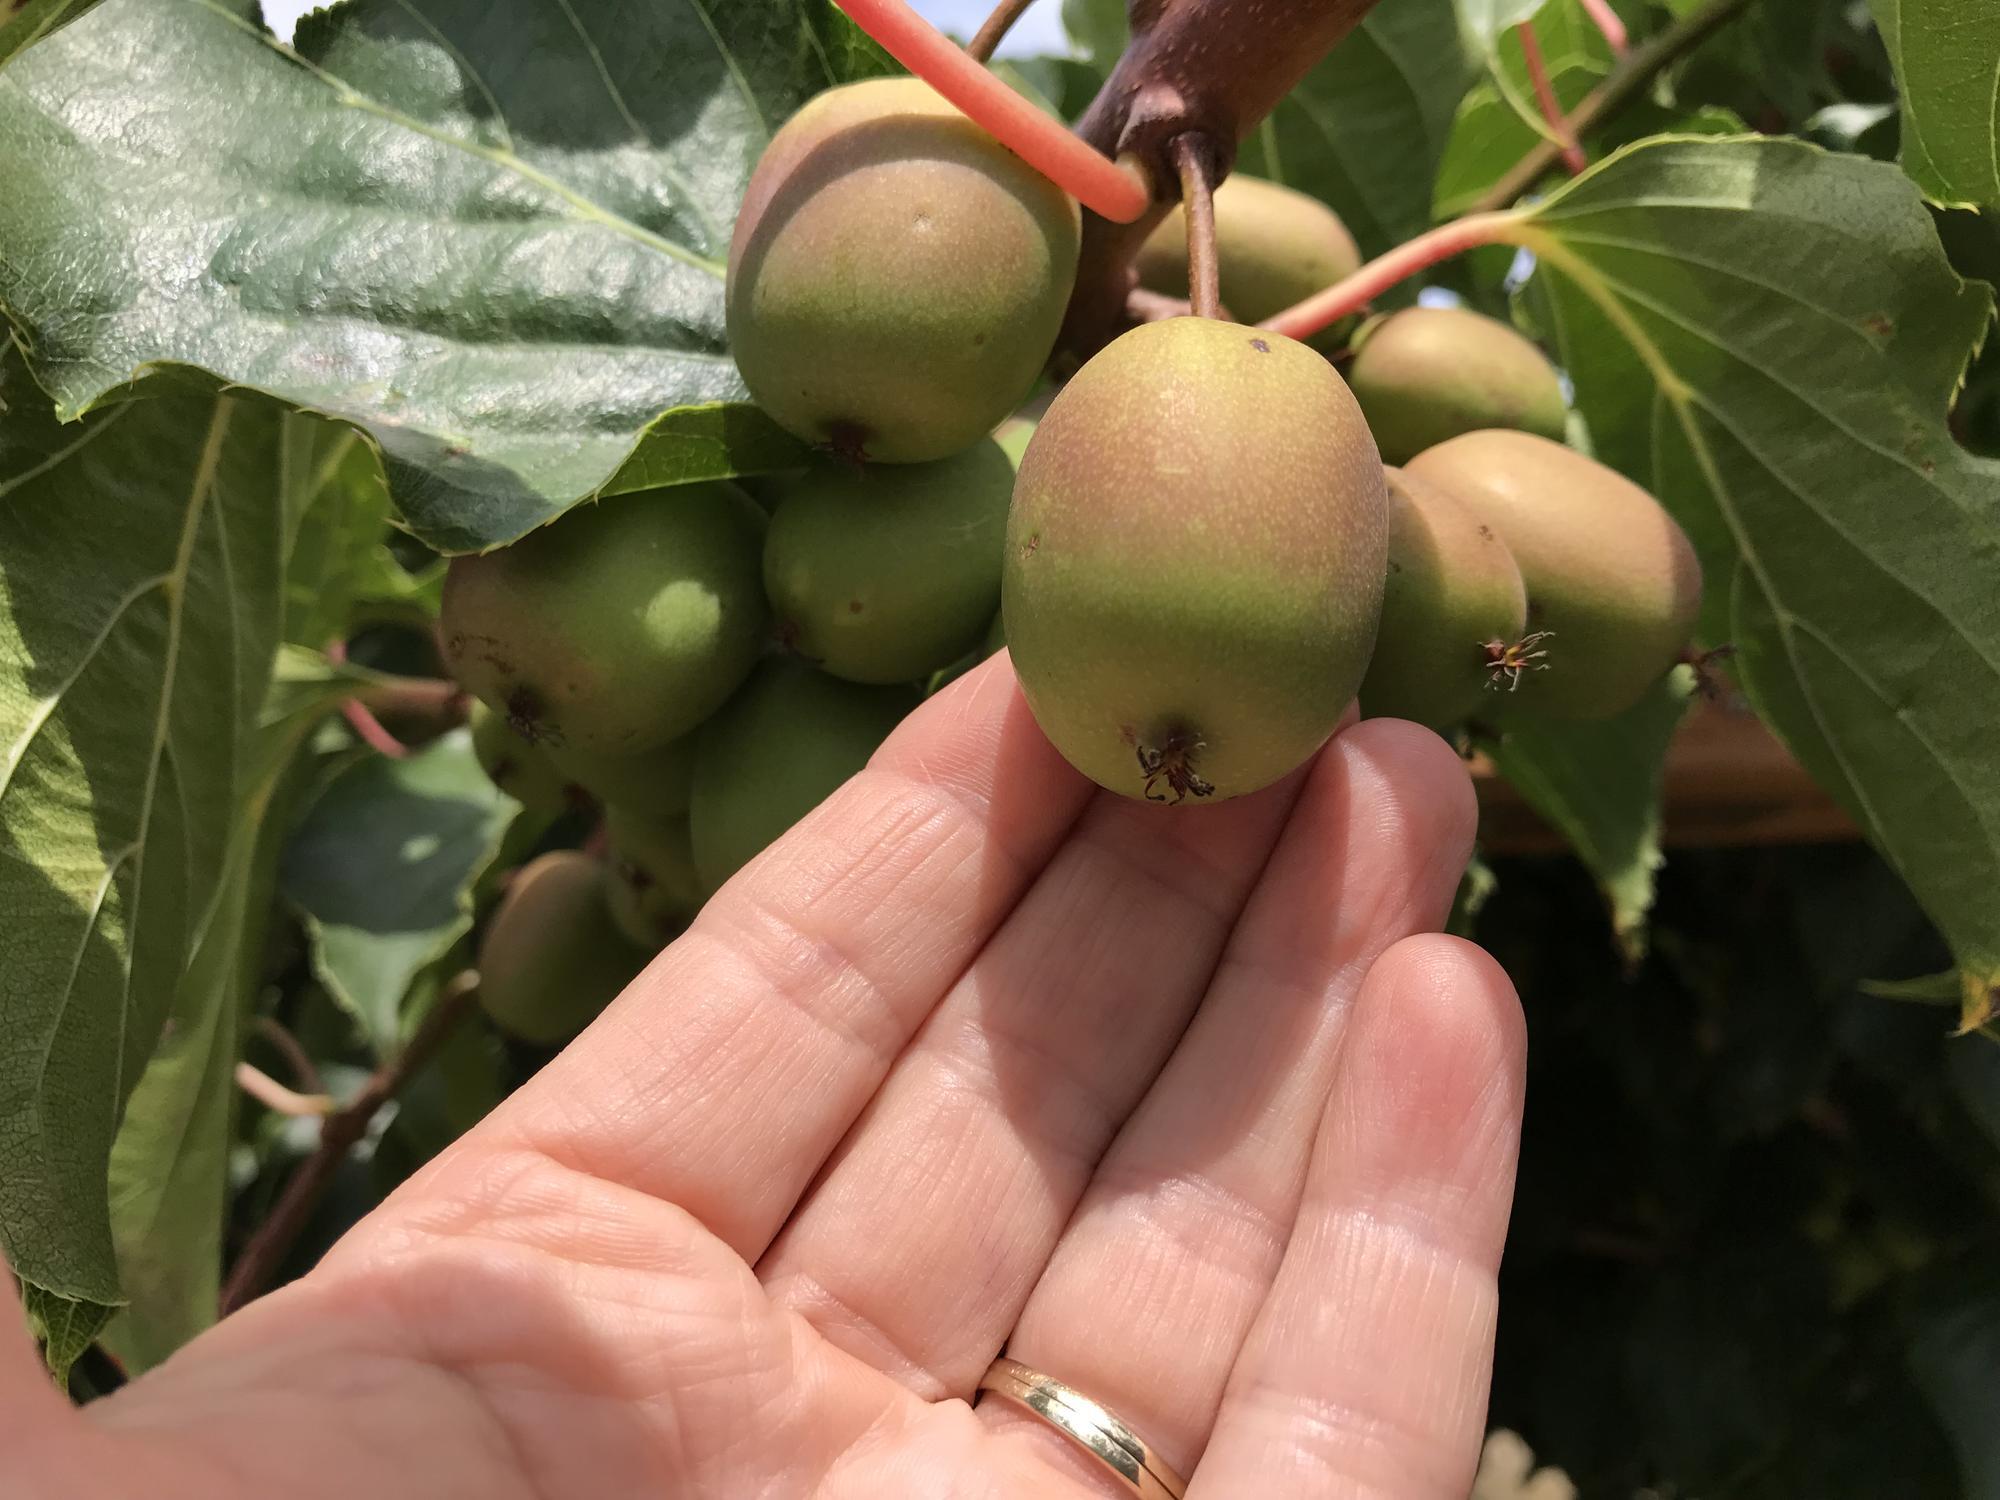


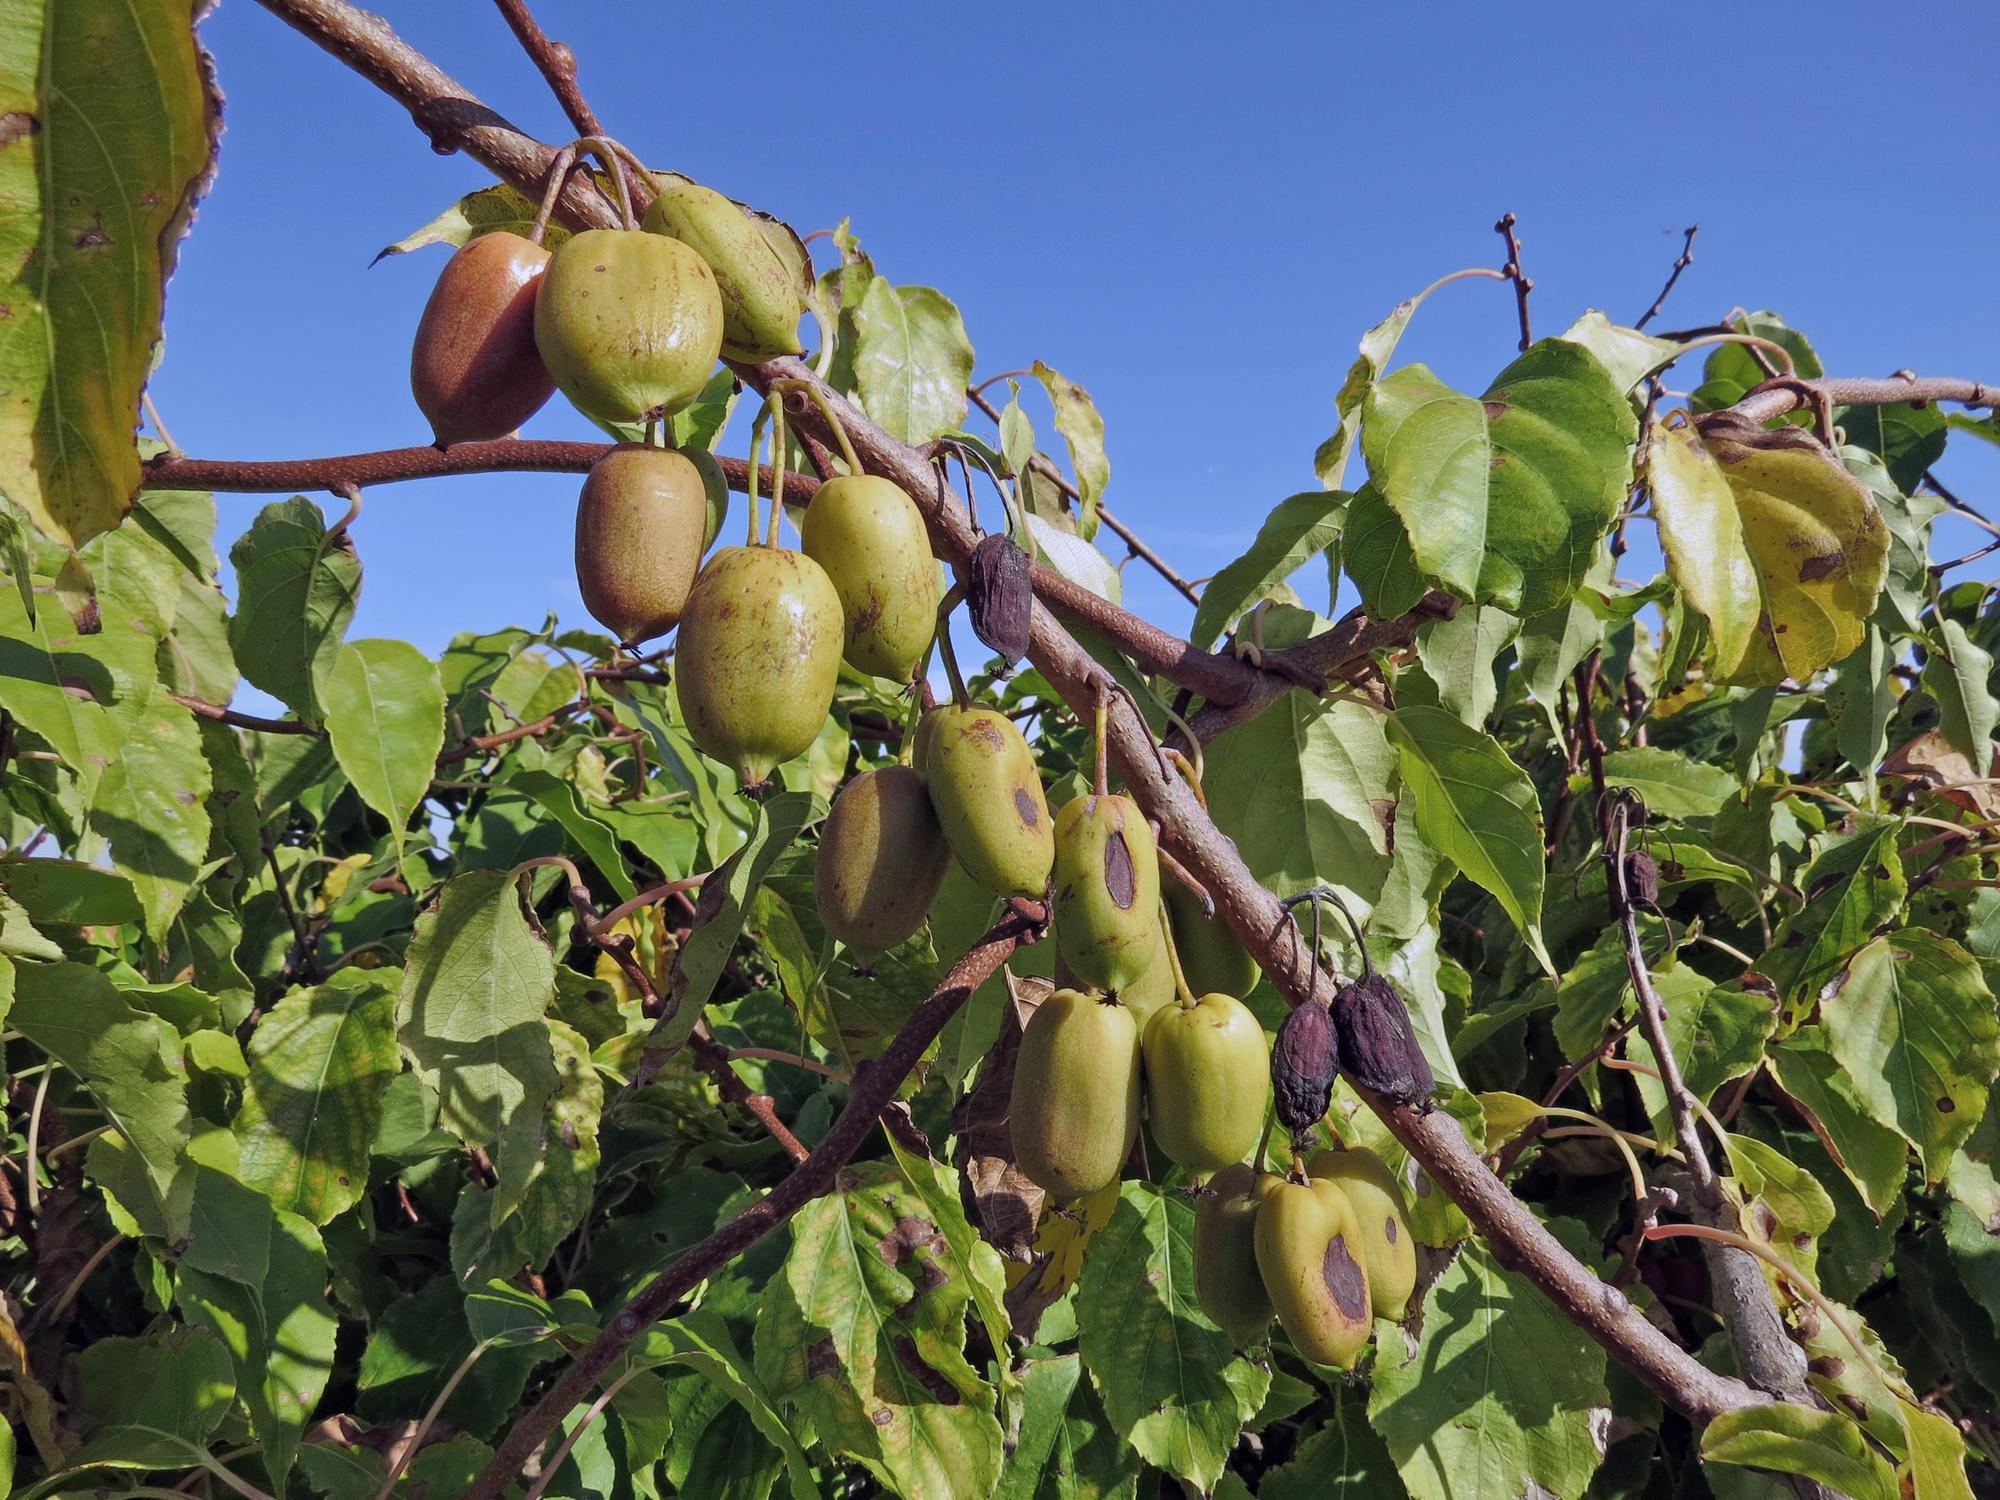


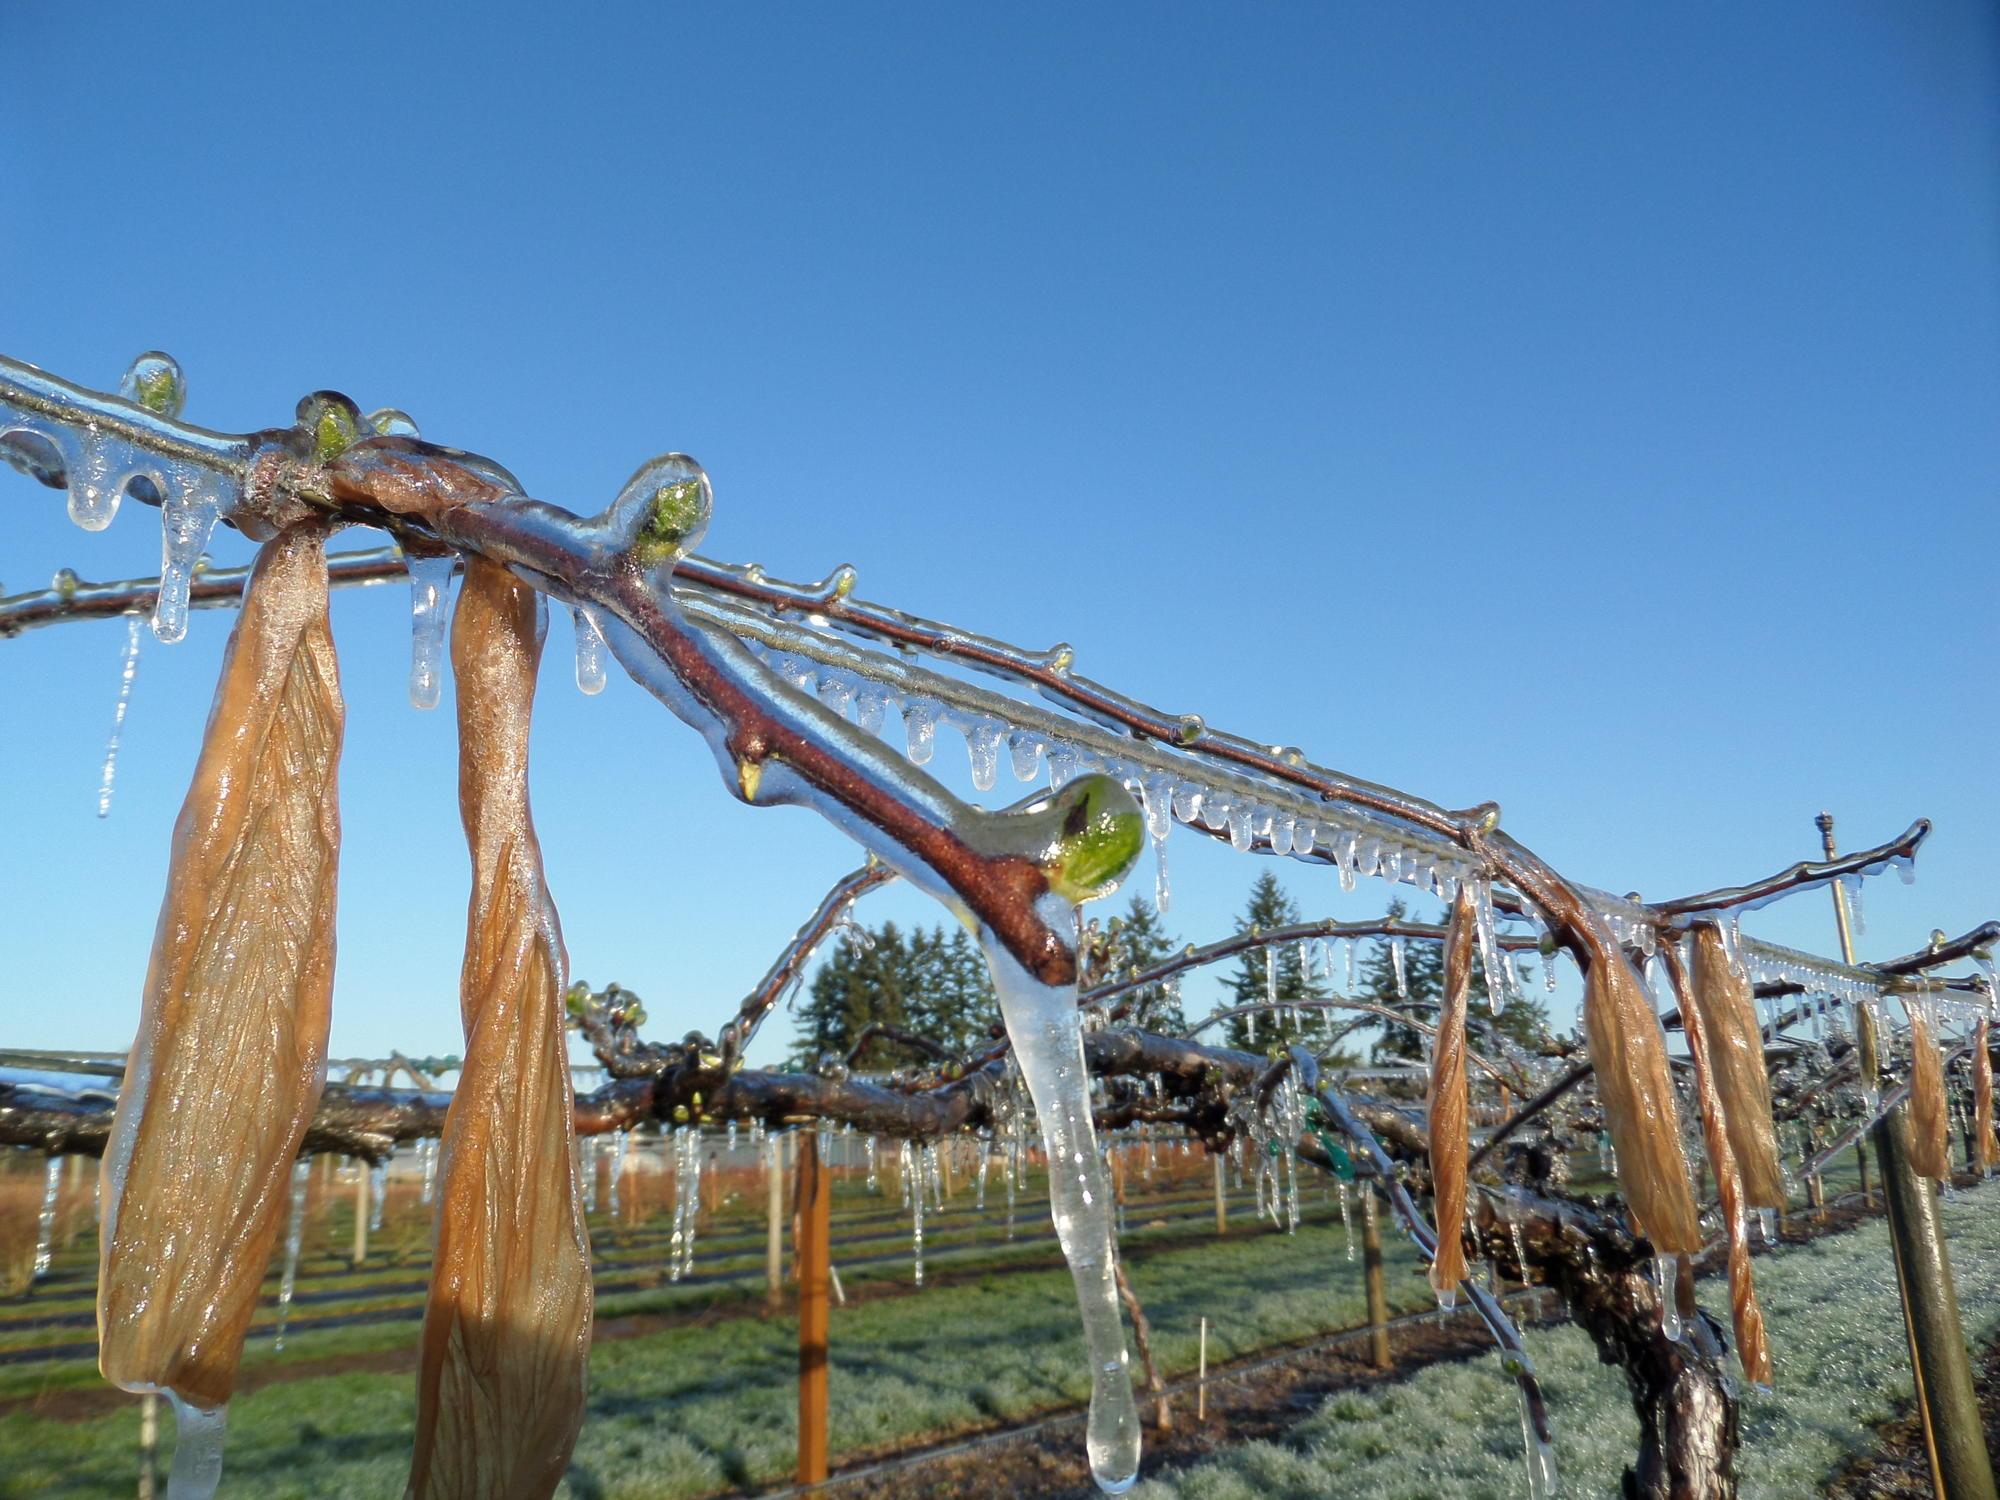


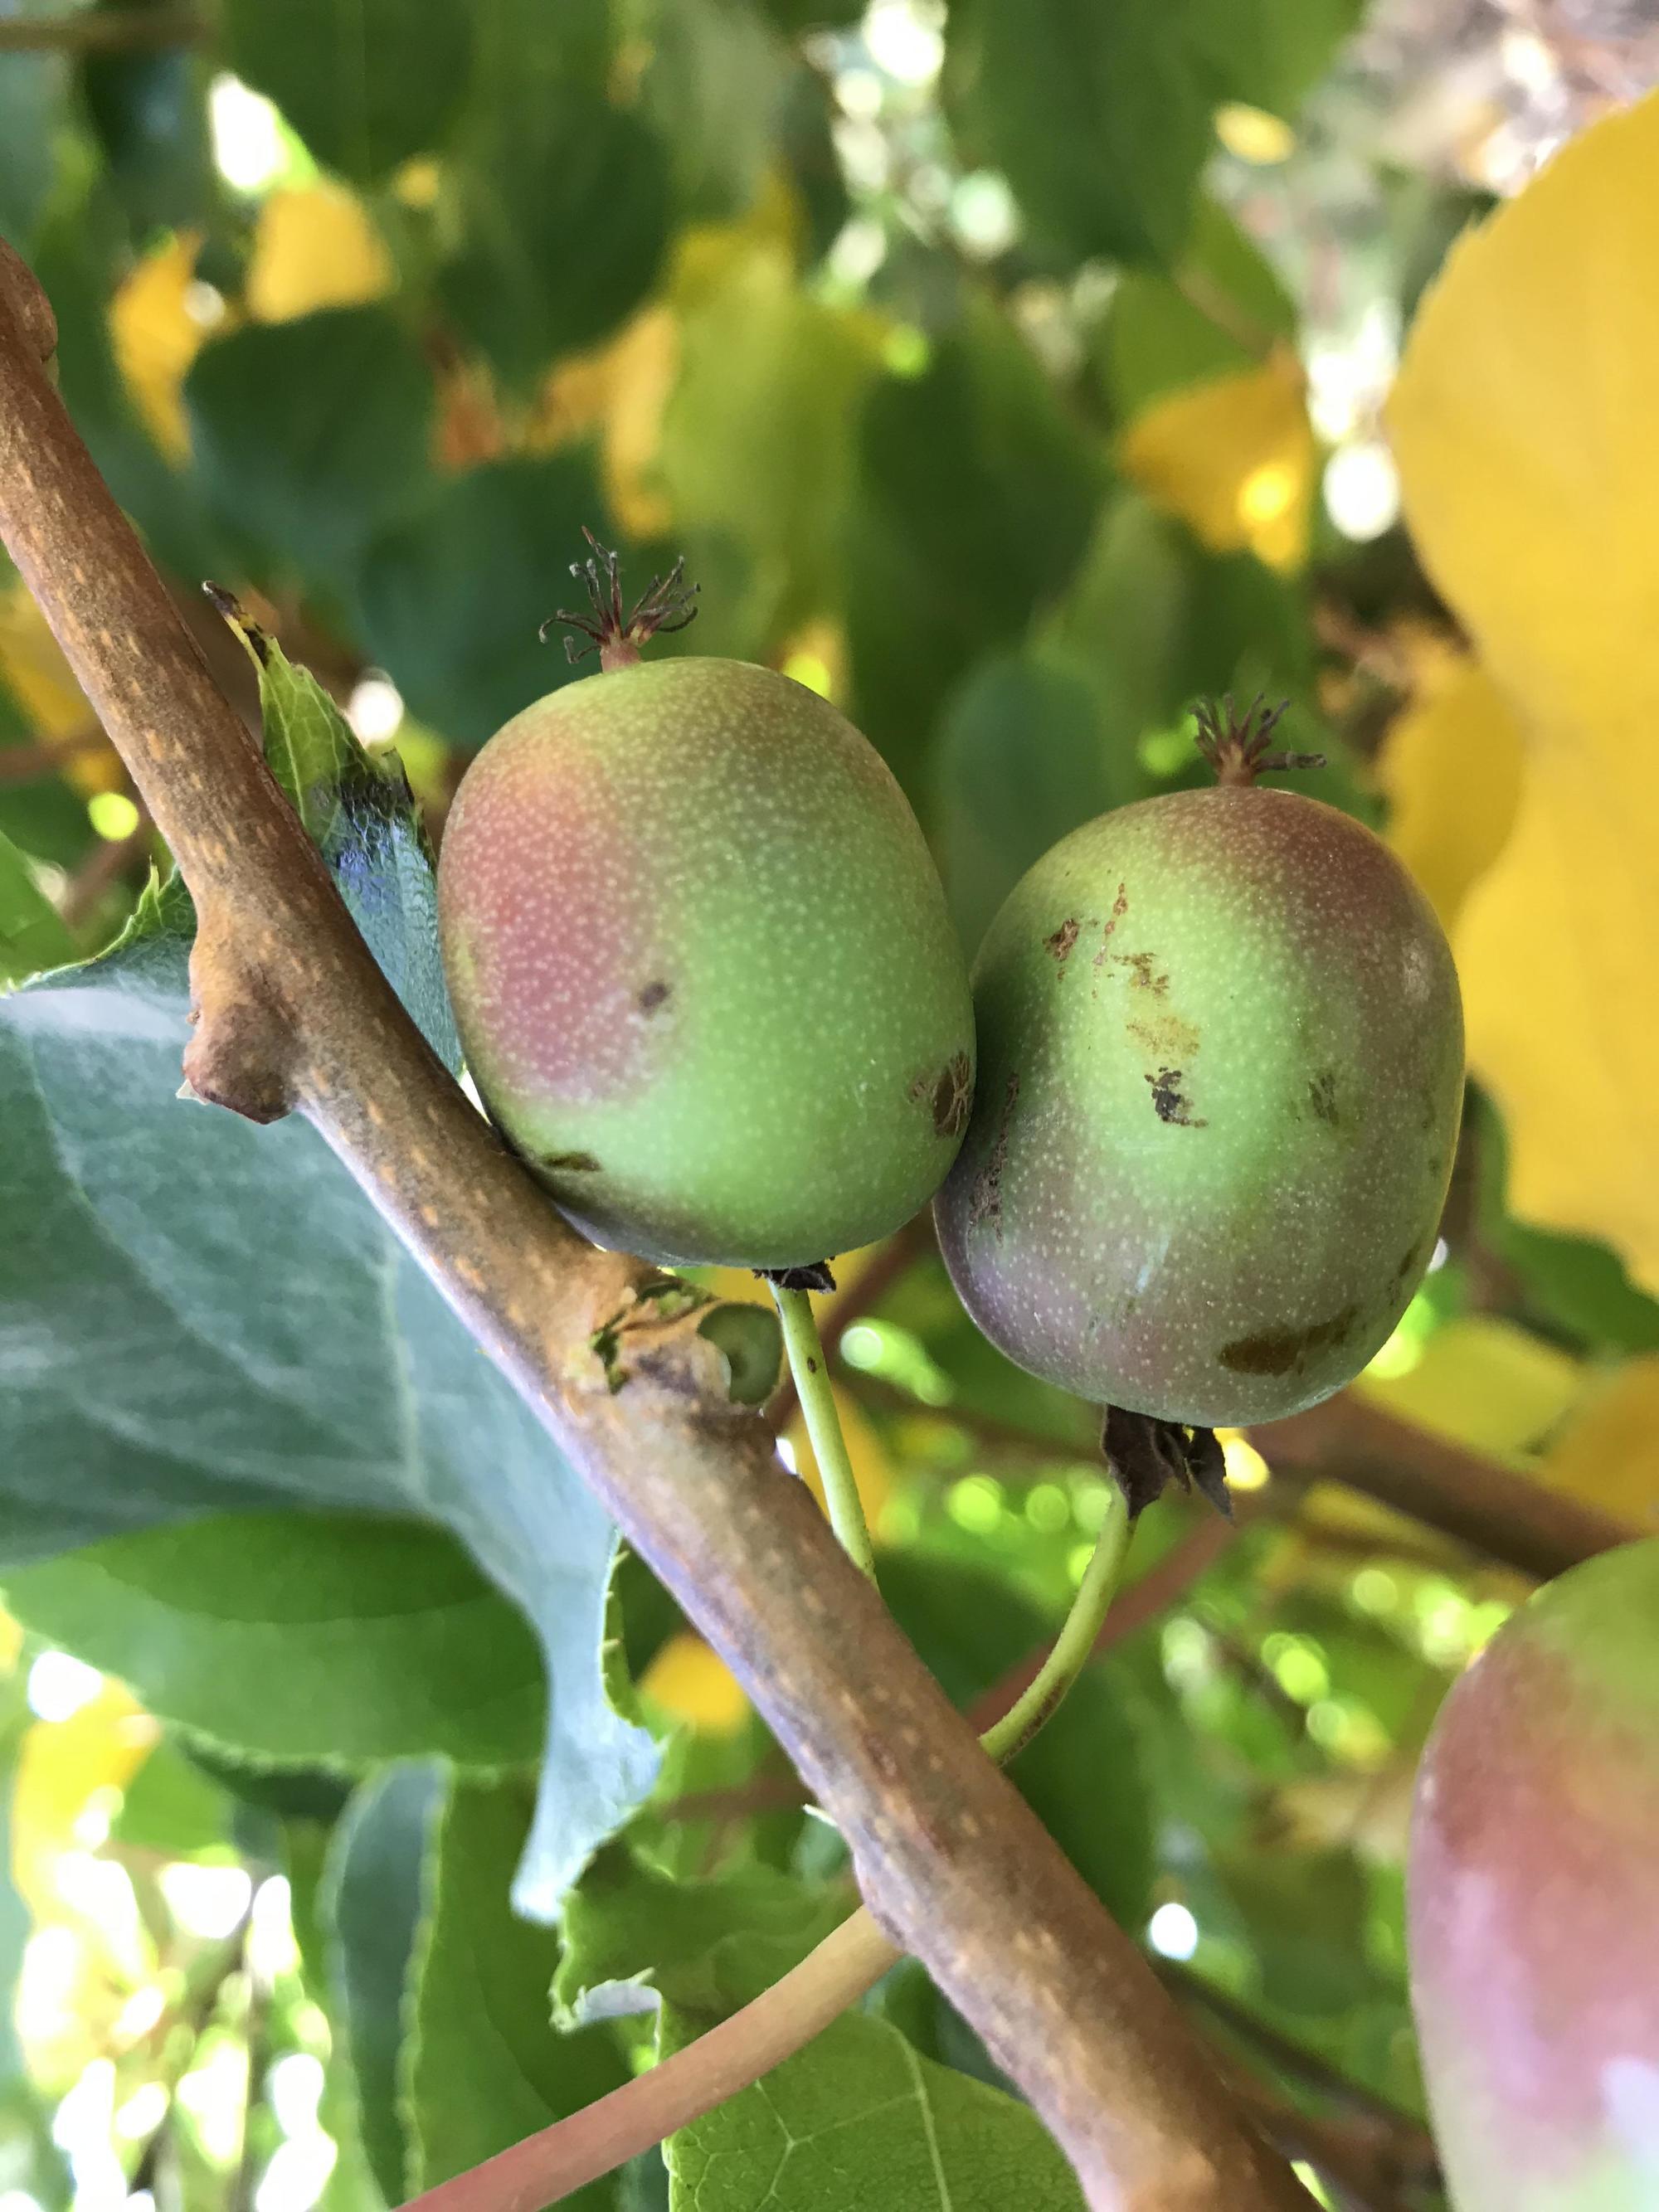


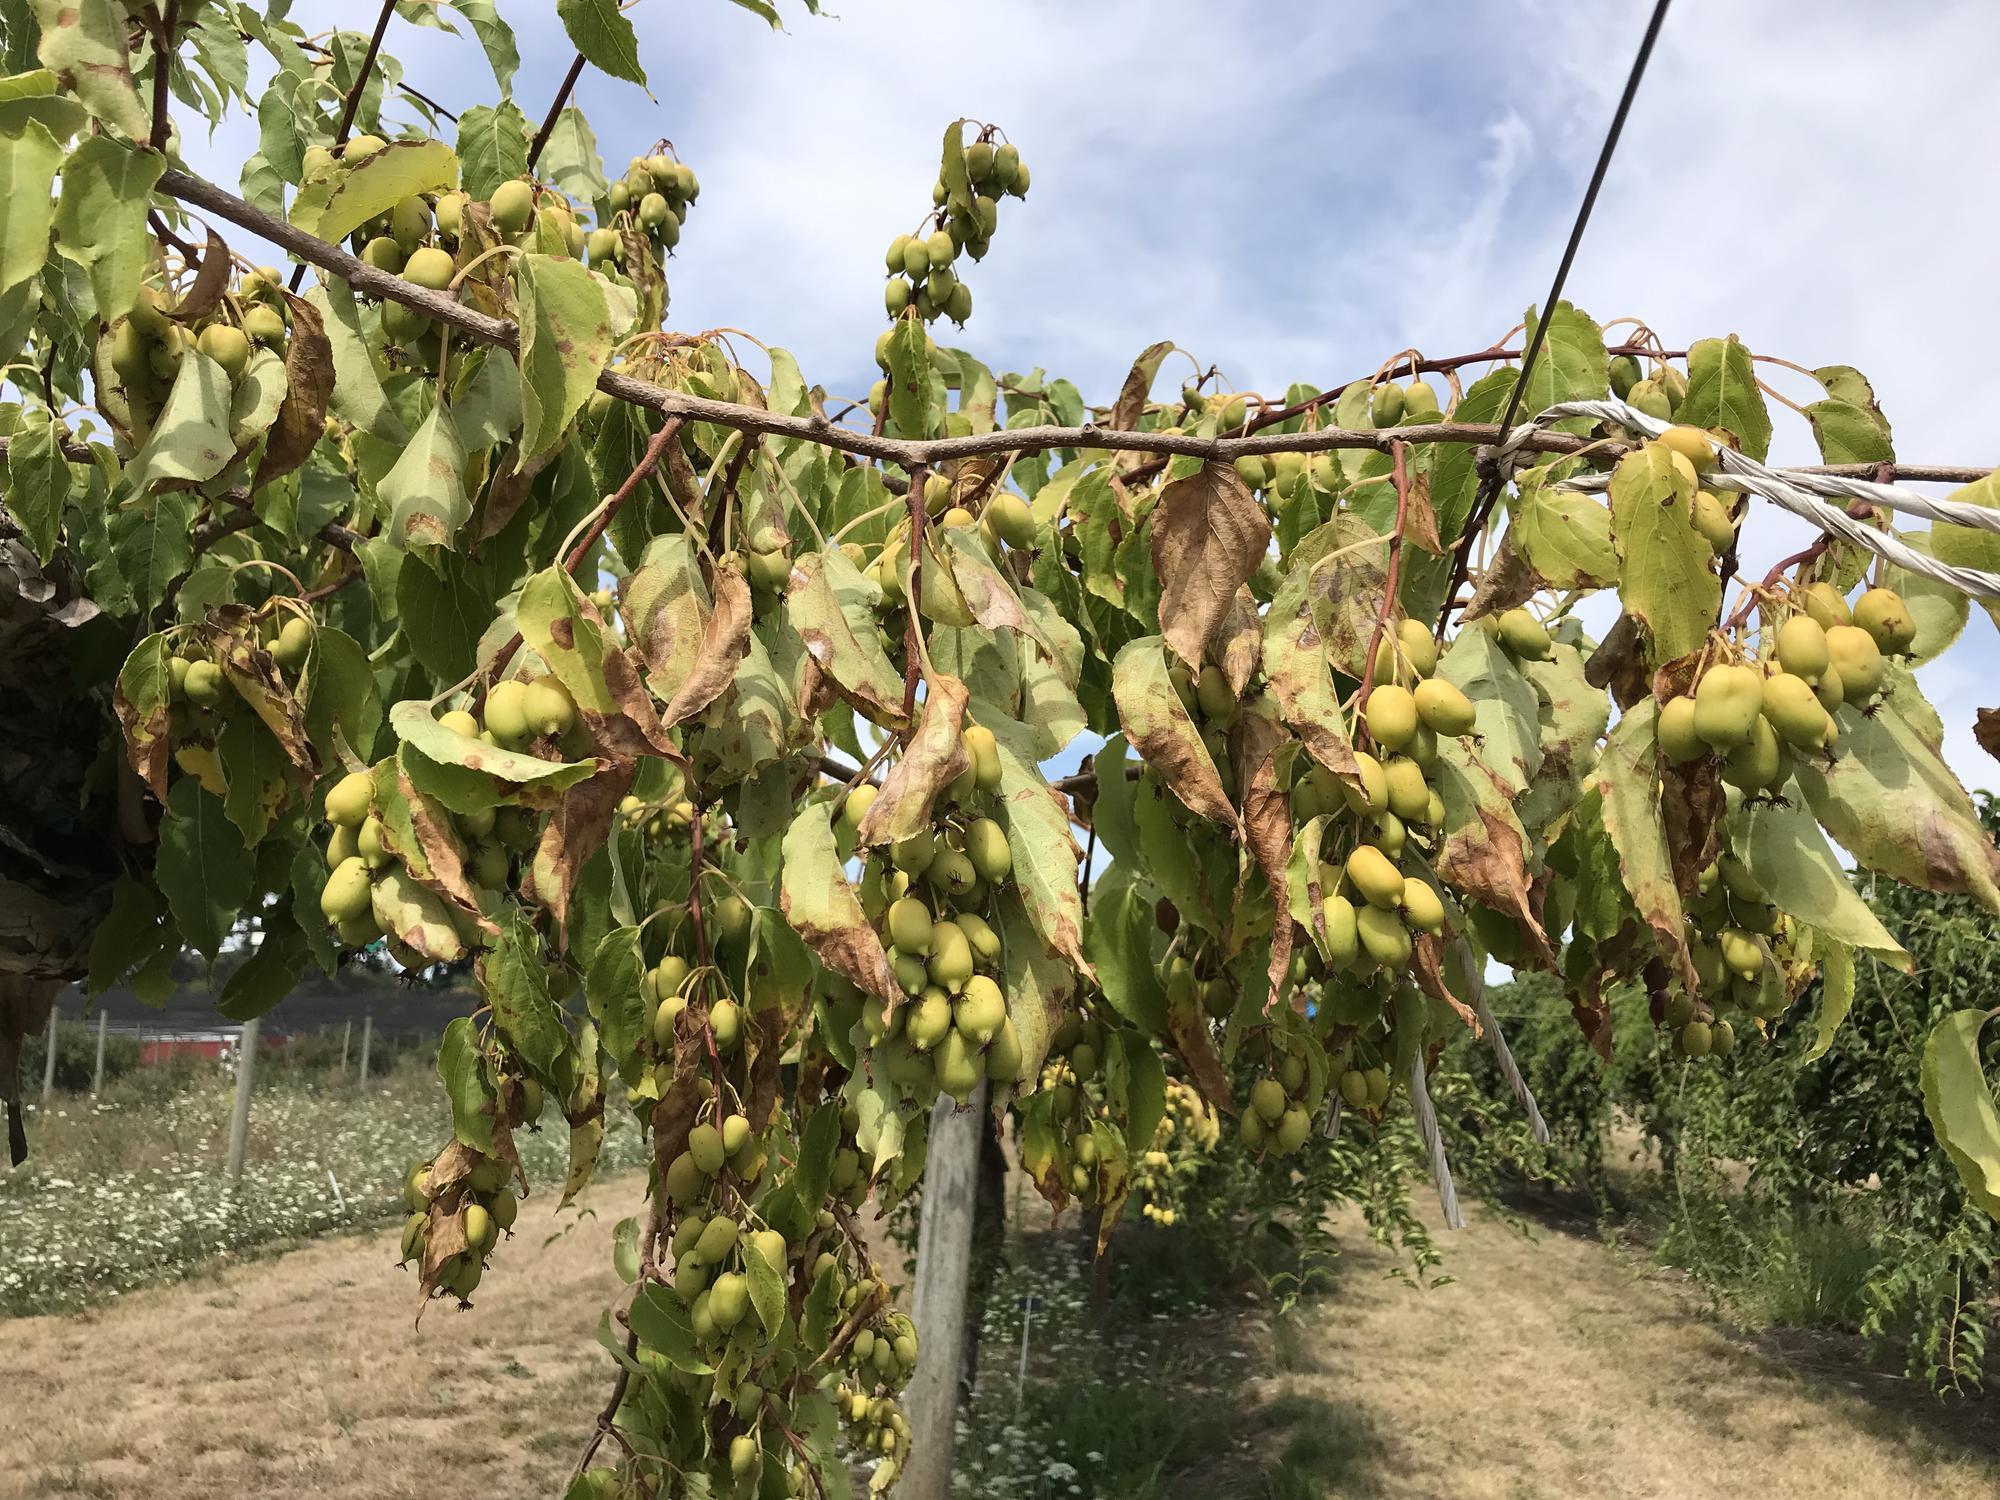
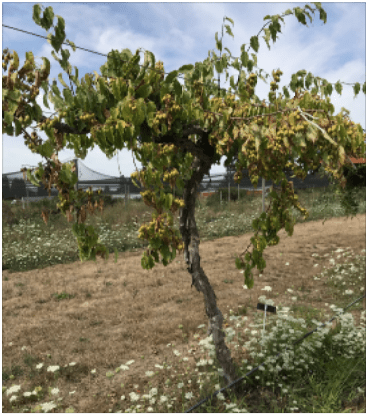
© 2021 Published and distributed in furtherance of the Acts of Congress of May 8 and June 30, 1914, by the Oregon State University Extension Service, Washington State University Extension, University of Idaho Extension and the U.S. Department of Agriculture cooperating. The three participating Extension services offer educational programs, activities and materials without discrimination on the basis of race, color, national origin, religion, sex, gender identity (including gender expression), sexual orientation, disability, age, marital status, familial/ parental status, income derived from a public assistance program, political beliefs, genetic information, veteran’s status, reprisal or retaliation for prior civil rights activity. (Not all prohibited bases apply to all programs.)