Transcript
Hello, I'm Alec Kowalewski, turf grass specialist at Oregon State University. And today, we're talking about integrated pest management
for turfgrass. In IPM for turf, there are five cultural practices.
From the top down, these cultural practices are mowing, fertilization, and irrigation
being the primary cultural practices, as well as cultivation and pest management
being the secondary cultural practices. So regardless if you are a homeowner, athletic field
manager, or golf course superintendent, the most time and money are spent on the primary cultural practices
beginning with mowing, followed by fertilization, then irrigation with the least amount of time and money
spent on cultivation and pest management. As time and budget constraints go into effect,
we remove cultural practices from the bottom up. Removing past management first, followed by cultivation.
Always trying to maintain good primary cultural practices. The mowing, fertilization, and irrigation.
[MUSIC PLAYING]
Mowing, the primary cultural practice. More time and money is spent on mowing
than any other cultural practice. And this is the most important cultural practice when it comes to the successful turfgrass stand.
So we're gonna cover three tips today in relation to mowing. These tips are, first, never cut more than 1/3
of the grass blade in a single mowing. Secondly, raise your mowing height and increase your mowing frequency.
And finally, mulch your grass clippings. Tip one, never mow more than 1/3 of the grass
blade in a single mowing. Very simply put, the 1/3 rule. So mowing more than 1/3 of the grass blade
or violating this 1/3 rule is going to cause a number of detrimental effects. The most noticeable being scalping.
The brown appearance you see after mowing more than 1/3 of the grass blade.
Other detrimental effects are gonna include depletion of carbohydrates. The turfgrass stores its nutrients
above ground in the green, lush growth you see. So when you mow that off, you rob the plant of its nutrients.
It's also gonna decrease rooting depth. It's gonna shock the plant making it more susceptible to environmental stresses.
Drought stress, heat stress, and then this is only further amplified by root feeding insects, which
even further compromising the rooting and stress tolerance of the plant. So as we talk specifically about the 1/3 rule,
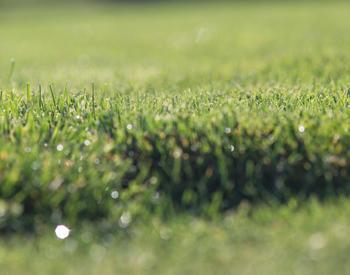
we're gonna take a look down at this research here at the Lewis brown horticulture farm at Oregon State
University. We see a number of different heights here. The grass here in front of me is maintained at a two inch
mowing eight. The grass here that I'm standing on is maintained at a 1/2 inch mowing height.
And these are the extreme ranges for perennial ryegrass. And if I were to suggest a preferred mowing
height, as we'll talk about later, higher is better, in my opinion. And as you look at these different heights,
the two inch grass here is gonna have to be mowed once a week
to keep it within that 1/3 rule. Never mowing more than 1/3 of the grass blade in a single mowing.
The grass here that I'm standing on that's maintained at a 1/2 of an inch, it's gonna require very frequent mowing, maybe
two or three times a week, to prevent it from scalping off or mowing more than 1/3 of the grass blade in a single mowing.
Tip two in relation to successful mowing is raising your mowing height and increasing your mowing
frequency. Raising your mowing height is directly correlated to deeper routing.
The higher the grass is mowed, the deeper the plant roots into the ground. This is illustrated very well with these two samples.
The sample on the left here is maintained at a two inch height. And you can see very deep roots down to about a 4
inch depth into the soil. And then, if we compare that to this sample on the right
here, which is maintained at a 1/10 of an inch, you see rooting depth down to only about an inch
and a half into the soil. Not only will increasing your mowing height increase
your rooting depth, but it'll also decrease weed encroachment.
So weed seeds fly in from all over the place existing or surrounding areas, such as ag fields, unmaintained areas
where the weeds are high in populations. That weed seeds flowed in, and they land on the turfgrass.
And the weeds then make it down through the grass to the soil surface building the weed seed bank.
And in the low mowed grass where the weeds make it down to the soil surface, sunlight
can then penetrate down through the turf canopy, germinating the weeds, allowing them to establish.
And then, as you move over into higher maintained grass, the grass catches the sunlight as it comes down, uses it
for carbohydrate production, and prevents the weed seeds from germinating that are down at the soil surface
there at the bottom of the turfgrass canopy. So as we take a close look at these two different mowing
heights, we see a lot of annual blue grass encroachment here at the low maintained mowing height.
And then, as we move over here to the higher maintained mowing height, we see much less annual blue grass encroachment.
And again, that's a direct correlation to the mowing height. The higher height being correlated to the less
annual bluegrass encroachment. So the two dominant grasses in the state
of Oregon and Washington are gonna be perennial ryegrass along the coast and Kentucky bluegrass as you move
inland across the mountains. Both of these grasses are gonna do very well at a three inch
mowing height. As you take this mowing height down lower approaching an inch
or lower than that, you start to get more and more weed encroachment, as well as more and more environmental stresses
that the grasses cannot grow out of.
So the second half of tip two is increasing your mowing frequency. And to illustrate this point, we're
gonna use the example of the highway roadside. So the highway is maintained at a very low mowing height.
Probably once a month. And it's some of the worst turf you see across this state. This time of year, it becomes very brown, very thin,
tons of weeds in there, and it's all related to the low mowing height and the low mowing frequency.
You need to increase your mowing height and increase your frequency. And the height is also relative to the frequency.
If we go back down to this grass here, we see the higher maintained grass at 2 inches needing about an average mowing of once
a week to maintain it at that height but not violate the 1/3 rule. This is gonna provide a very healthy grass stand that
tolerates a lot of environmental stresses and is resistant to weed seed encroachment.
Then, as we move over to the lower cut grass, because of the low mowing height, this grass is gonna require very frequent mowing,
as much as three times a week, to prevent you from scalping the grass when it's maintained at this height.
Again, if we go back to the grasses used in Washington and Oregon, the dominant grasses are perennial ryegrass
on the coast, and then Kentucky bluegrass as you move inland. And again, these grasses should be maintained, in my opinion,
around a three inch height. The higher the height you go, the more stress, environmental tolerances you're
gonna have from the grass.
So weed encroachment associated with a low mowing height include annual bluegrass, common dandelion, and crab grass.
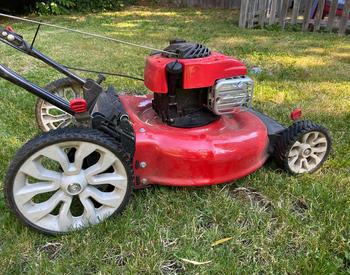
So tip three for successful mowing is mulching your grass clippings by removing
the bag from your mower, and using mulching blades
like this double set of blades here, we can return as much as two pounds of nitrogen per year
into the turfgrass stand, which is a considerable amount of fertilizer when we're trying to achieve
annual rates of three to five pounds of nitrogen, which are suggested for Kentucky Bluegrass
and perennial ryegrass. So by adhering to the 1/3 rule, using a mulching blade
like this, we can easily return a significant amount of organic fertilizer with the grass clippings to the soil.
This area here illustrates the importance of the 1/3 rule, increasing your mowing height and increasing your mowing
frequency, in relation to mulching your clippings back into the turfgrass stand.
Here, while the mowing height may be adequate, right around three inches, the frequency is not.
Therefore, we see these large wind rows accumulating on the surface here.
These wind rows of grass clippings can smother the turf if they accumulate too much
and are very unsightly for high performance turf grass situations, like athletic fields or golf courses.
And as you look across the surface here, you see a large number of broadleaf weeds encroaching
into the site. And this is probably associated with the frequent scalping. The grass is not being mowed frequently enough.
So when it is mowed, it's scalping the turf, opening the canopy, and allowing sunlight to penetrate down
to the weed seed bank.
So the second of the three primary cultural practices is fertilization. And the three tips we'll discuss today in reference
to fertilization is, first, select a fertilizer designed for turf.
Secondly, use a rotary spreader and not a drop spreader. And finally, the holiday fertilization plan.
So tip one, selecting a fertilizer for turfgrass. If we come down here and take a look at this bag of fertilizer
here, we see it's clearly named or labeled Turf Fertilizer.
We have three primary nutrients being nitrogen, phosphorus,
and potassium. So these are the essential turf grass nutrients
with the highest concentration, the most important nutrient being nitrogen, followed by potassium.
And then, finally, phosphorous. And if we move from this bag over to the second bag,
we now see a product labeled 23-0-10.
And this would be an appropriate product for homeowners in the state of Washington. There is a ban on fertilizer containing phosphorus
in the state of Washington. And the reason for this is because products that contain phosphorus can result
in accelerated eutrophication. So as these fertilizers with phosphorus
enter into waterways, ponds, and lakes, they generate algae blooms.
The algae then die, and microorganisms in the water decompose the algae using up the oxygen in the water.
This, ultimately, results in the death of the pond system. Animals and other things requiring oxygen in the water
will then die.
So the second tip to successful fertilization is using a rotary spreader rather than a drop spreader
to apply your product. So the problem with a drop spreader is once we load this fertilizer spreader with our product,
we open the stem here, we make our application, we close it,
and we turn around for our second pass. We now have to apply our second pass
right over top of the wheel past we made for the first application to get even coverage, which
is very hard across a large surface area like this field.
The rotary spreader, on the other hand, when we open this fertilizer spreader,
the product comes out and hits this propeller here, which throws the product into a large arc.
The majority of the product lands here in front of the fertilizer spreader. And as you get further and further away from the center,
the product gets to lower and lower amounts.
Then, we generally use a 10 to 8 foot turnaround period
for our second pass as we come over the surface area to provide a very uniform coverage over a large surface
area. It's not as important to be accurate on our overlap.
So the third tip to successful fertilization is the holiday fertility plan.
So with this plan, the goal is to apply three to five pounds of nitrogen per 1,000 feet annually broken up
into four applications. So the first application, which can be made at a rate of a pound to a pound and a half
should be made on Memorial Day. The second application, which should be applied at a reduced rate, a half
to a pound of nitrogen per 1,000 feet, should be made on July 4th. The third application then made again
at a reduced rate of a half to a pound of nitrogen per 1,000 feet on Labor Day.
And then, the final application now at an increased rate at a pound to a pound and a half on Thanksgiving.
The reason we do this is because cool season grass, such as perennial ryegrass and Kentucky
bluegrass-- the dominant grasses in our part of the world-- have a diurnal growth pattern with heavy growth
in the spring and the fall, very little growth in the summer as heat drought sets in, and then, again,
little growth in the winter when temperatures are relatively cool. Three weeds that we're gonna wrap up
with related to low fertility include white clover,
false dandelion, and plantain.
So just remember these four dates. Memorial Day, 4th of July, Labor Day, and Thanksgiving.
[MUSIC PLAYING]
The third primary cultural practice that we're going to discuss is irrigation. And the three tips we'll be covering
are, first, know your precipitation rates, secondly, adjust your irrigation rates with the season
and, finally, twice as much is not twice as good. So the first tip is know your precipitation rates.
And more specifically, what is the depth of water you're applying in an irrigation event rather than the time.
This can vary substantially from irrigation head to irrigation head.
For instance, a pop up sprayer can apply a tenth of an inch of irrigation in as little as 5 minutes while a rotary sprayer
may apply the same amount of water in as much as 20 minutes.
So in this point, we're gonna demonstrate an irrigation audit. And you're gonna see three steps.
The first is placing the catch cans across the irrigation area that you're going to audit.
Second, run the irrigation system for a half an hour, 30 minutes.
Third, look at the irrigation depth in the various catch cans, and use that to develop an average irrigation
depth per the 30 minutes. We're gonna then use that to develop an irrigation
rate targeting 2/10 of an inch of irrigation. So the reason we're using 2/10 of an inch of irrigation
per event as our general guide is because a loamy soil, which is very
typical of this part of the United States, can only hold about .06 inches of water per inch of soil.
Therefore, if we irrigate 2/10 of an inch, it's gonna wet the soil to a 3 inch depth.
And if we take a look back to our turf sample here, remember, this is a very shallow rooted plant.
The maximum rooting depth is only going to reach a few inches.
And the vast majority of the roots are gonna be in the top three and four inches of the soil.
So other problems associated with irrigation events greater than 2/10 of an inch is precipitation rates
will often exceed infiltration rates. Therefore, if you put down more than 2/10 of an inch of water,
the water has a tendency to run off the surface. And if we exceed 2/10 of an inch and it
does happen to drain into the soil, often, the water will drain past the root depth,
which we previously discussed. Tip two to proper irrigation is adjusting your irrigation rates
with the seasons. In our part of the world, we have a temperate climate,
which has a vast majority of its rainfall through the fall, winter, and spring months with a very
droughty summer period. Therefore, we need to adjust our rates
to compensate for this summer heat stress, which is exactly the time when cool season turf, which is the dominant grass
species in our part of the world, as well, also needs the vast majority of water.
So in the spring and the fall, we're gonna target our rates from 0 to 0.75 inches per week,
depending on your specific environment and location. And then, as we move into the summer months,
we're gonna increase our rates from an inch to inch and a half. Again, depending on your particular situation.
So if we then reference back are 2/10 of an inch of irrigation per event,
if we irrigate five times a week at 2/10 of an itch, that'll put us at an inch of water per week, which will get us
at the beginning of our inch to inch and a half rate for the summer. And then, we can adjust the rates accordingly,
if we need to. So the third tip to successful irrigation is twice as much is not twice as good.
Over irrigation is gonna result in runoff of nutrients and pesticides that you've applied.
Runoff of fertilizers containing phosphorus are gonna accelerate processes like eutrophication, which
we've previously discussed. And over irrigation is also gonna result in leeching of nutrients and pesticides
through the soil. You're also wasting water when you're creating surface runoff
and leeching. So some things associated with over-irrigation include annual blue grass, rough blue grass, moss,
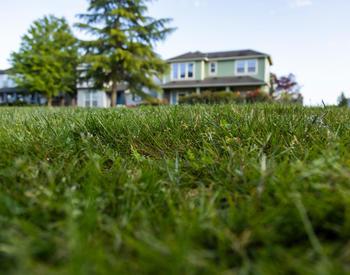
and crane fly. Here we are at Lauren's Field at Oregon State University.
And the point of this visit is to illustrate the importance of frequent mowing, proper fertilizer,
and proper irrigation. So this soccer field, which is host to the men's and women's soccer team at Oregon State,
receives mowing three to four times a week, fertilization five to six times a year,
heavy applications in the spring and the fall totaling around 6 pounds of nitrogen for 1,000 feet per year,
and daily irrigation through the summer heat stress period between a tenth and 2/10 of an inch of irrigation,
again, targeting right around an inch of water a week. And if we just take a look at this field,
we can see the benefits of proper implementation of these three primary cultural practices.
[MUSIC PLAYING]
So now that we have completed our primary cultural practices-- mowing, fertilization, and irrigation--
we're gonna move into our secondary cultural practices, which include cultivation and pest management.
So starting with cultivation, when picking a cultivation method, time, or reason, there are three objectives
that we want to complete. Those objectives are, first, relieving soil compaction.
Secondly, improving drainage and air movement. And third, reducing organic matter.
So if these three things are not a problem on your turf area, there's no reason for you to core, cultivate, or airify.
In reference to that, grasses that grow stoloniferously, like creeping bank grass on a putting green,
or risominously like Kentucky bluegrass in the eastern half of Washington and Oregon
are going to require regular cultivation. Grasses like perennial ryegrass, however,
which are bunch type grasses, will not need regular core cultivation or aerification.
So again, I'm reminding you, do you have soil compaction, organic matter accumulation,
or is drainage a factor? Those are the three things that we should assess before choosing a cultivation method.
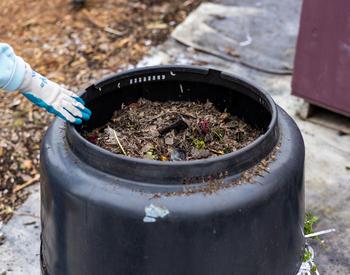
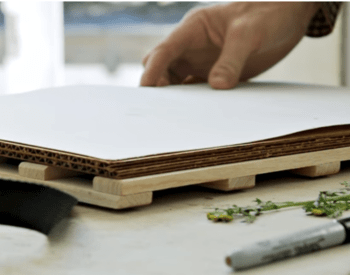
So there are all types of different core cultivation or aerification units that you can use.
In my opinion, Hollow Tine core cultivation is the most advantageous.
So if we look down at this bottom of this unit here, this is a Hollow Tine core harvester.
So it punches hollow holes into the soil and removes cores.
And the reason I think this is such a good unit is because it satisfies all three of those objectives
in choosing cultivation. It's gonna release soil compaction. It's gonna improve gas exchange and drainage.
And it's gonna remove organic matter that's accumulated over time.
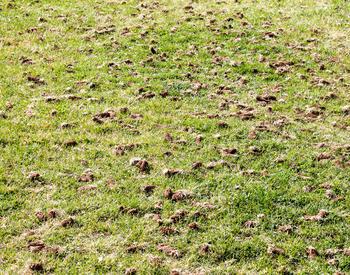
So once we've gone through and run our core cultivator on this area, we need to either remove these cores
from the surface of the grass or incorporate them back into the soil.
We are gonna incorporate the cores back into the soil using a steel drag mat or a hand rake.
And then, we can remove cores using a flat end shovel. So once you've taken your drag mat over the surface,
if there's any remaining material, some choose to run a rotary mower over top of this.
You can either rotary mulch that back into the ground, or pull it off with a bagger.
So once you've completed your core cultivation, harvested your cores, or dragged them back into the surface
or raked them into the ground, it's a great time to intercede your existing turfgrass stand to try
and build the turf back up. This is an important practice, particularly when managing perennial ryegrass.
Remember, this is a bunch type grass, so it does not spread laterally. So it cannot repair from traffic.
Can't fill in after areas become bare. So we're gonna intercede perennial ryegrass
into areas like this. If you're managing Kentucky bluegrass I would also suggest interceding perennial ryegrass
into those areas, as well. The reason being perennial ryegrass will germinate in seven to 10 days,
while the bluegrass takes 21 to 28 days to germinate. When selecting the seed, you're gonna
apply it with a drop spreader, and apply it at 8 to 10 pounds per 1,000 feet using the drop spreader.
Here we are at the Trysting Tree Golf Course. And we're illustrating the importance
of core cultivation or thatch management using a golf course putting green.
The creeping bank grass on this putting green has a very aggressive, stoloniferous growth,
which will accumulate thatch in this layer here. This thatch is very closely related to the disease
problems you have on most golf courses. So the better you can do at managing this thatch,
the less disease you'll have on your golf course. This golf course receives cultivation twice annually,
as well as verticutting and top dressing all summer long, which provides very good organic matter accumulation
control, which relates to less pesticides when managing the diseases on the golf course.
As we relate cultivation back to integrated pest management, a weed that is a particular indicator of a compacted soil
is not weed. And finally, let's review the cultural practices
that we've covered so far. We should be mowing at a relatively high height
around 3 inches once a week at a minimum. We should be fertilizing four times a year.
Twice in the spring. Twice in the fall. We should be irrigating, particularly during the summer
months, around a inch per week broken up into 2/10 of an inch applications.
And we should be cultivating, as well, particularly in situations when we have grasses that have rhizomatous
or stoloniferous growth habits, like Kentucky bluegrass or creeping bank grass.
So as we finalize this part of the project,
you should remember we should not revert to pesticides until we have exhausted
proper mowing, proper fertilization, proper irrigation, and proper cultivation.
It's only after we've successfully implemented these cultural practices that we should consider pesticide applications.
[MUSIC PLAYING]
For the final part of this training, we'll be covering pest management. The three things we'll be highlighting here
are, first, the pest triangle. Secondly, pesticide mixing, loading, and application.
And finally, the control of three different pests. Weeds, diseases, and insects.
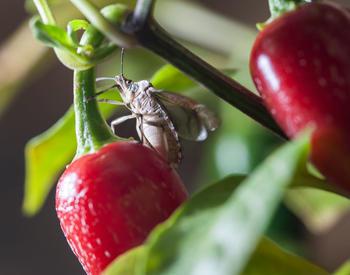
So first let's talk about the pest triangle. The pest triangle, regardless of the pest you're managing,
a weed, a disease, an insect has three parts to it. The host, the pest, and the environment,
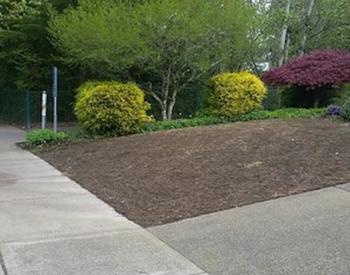
which is a very important or critical part to integrated pest management. Here, we see a perfect example of this.
The host is perennial ryegrass. It was seeded as a pure stand of grass.
Then, over time, the fertility became deficient. So the host is perennial ryegrass.
The environment is a nutrient deficient soil. And the pest now is white clover,
the weed that does very well in low fertility situations.
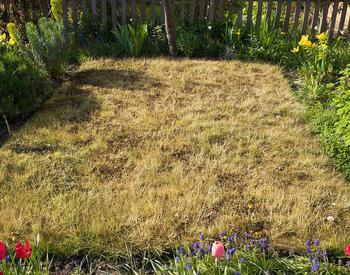
Then, if I take a few steps forward, we see another perfect example of this pest
triangle here, again, in an area that was seeded as perennial ryegrass.
It was nutrient deficient. And now rather than a weed, we see a disease here.
Red thread, an indication of poor fertility. So here we have two different pests.
A weed, which was white clover. And a disease, red thread, which are both indicators
or pests that do very well in low fertility environments. So probably the first solution to the problem
here is increasing the fertility. Regarding pesticide mixing, loading,
and personal protective equipment, remember to always consult the pesticide label.
The pesticide label is your reference for all these different things.
Mixing, loading, pests that are properly controlled by the pesticide, the proper host
that the pesticide can be applied to, and the proper personal protective equipment for the various products that you're applying.
So remember, always consult the label. It'll make sure that you're in compliance with Department of Agriculture regulations.
In reference to personal protective equipment,
always consult the label. Some minimal PPE include things like boots, socks, shoes,
long pants, long sleeve shirt, and gloves.
To summarize mixing, loading, and application of pesticides, in turfgrass management, products
are typically applied at one to two gallons of water per 1,000 feet.
This is very important because adequate uniform surface coverage will successfully ensure
proper use of your products. To conclude our pest management section,
we're now gonna focus on the control of broadleaf weeds. More specifically, white clover and false dandelion, pathogens
being read thread and necrotic ringspot, and finally, the control of an insect, European crane fly.
So at this point, we're going to discuss control of two broad leaf weeds, the first being false
dandelion. False dandelion is a perennial broadleaf weed
with a deep rooted tap root system. This tap root system allows the weed
to persist well in dry, droughty, summer stress conditions.
This weed is typically an indication that you have not been watering your lawn. It's often one of the only weeds or plants
that stays green in the unirrigated lawn through the summer. In areas where this weed is not mowed regularly
it produces a large seed stock, and then a bright yellow flower at the end.
So broadleaf herbicides that we can use for post emergent control of weeds like false dandelion, common dandelion,
and the thistles are three and four way mixtures containing 2,4-D. 2,4-D is the most important active ingredient
for this group of weeds. This product here, Trimec Classic, is the first example.
So active ingredients in here are 2,4-D, MCPP, and dicamba.
The next product we're going to cover
is speed zone, which has these same three active ingredients,
as well as carfentrazone, which is a fourth broadleaf weed herbicide.
And the final product we'll look at its Q4. So this four way herbicide mixture includes 2,4-D,
dicamba, as well as quinclorac and carfentrazone. This is a nice product to include in our list
as well because quinclorac will provide very effective control of crab grass and lawns
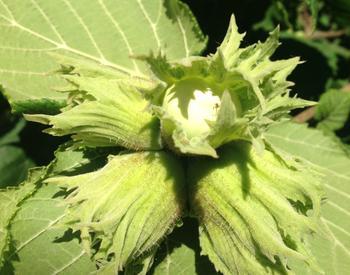
that have this weed, as well. So the next broadleaf weed that we'll cover is white clover.
So here I have an example of white clover that's growing in combination with perennial ryegrass.
So this broad leaf weed is a good indicator that you're not putting down enough nitrogen on your turf.
It is a lagoom. And like other lagooms-- soybean, for example-- it fixes nitrogen from the atmosphere.
So it is very often an indicator that you're not putting down adequate amounts of nitrogen. If I set this sample down
and then pick up another sample of white clover here, we can see the stoloniferous growth
habit of this weed, which allows it to creep over the surface as it grows perennially.
Again, the weed growing with its stolons across the surface. And then, if we take a very close look here,
we can see some nodules forming on the roots of the white clover where the fixed nitrogen
from the atmosphere goes. White clover, however, is often tolerant to 2,4-D,
the major active ingredient in products like Trimac Classic, which we discussed earlier.
Other weeds that are tolerant to 2,4-D include English daisy,
black medic, as well as wild violet.
So for control of this group of weeds, we're gonna look for products with triclopyr.
An example of such a product, here is T Zone.
T Zone has triangle triclopyr as the first active ingredient, as well as carfentrazone, and the ingredients 2,4-D,
and dicamba. To summarize our weed control section,
if you apply a herbicide to take white clover out of your existing stand of grass and you
don't change your fertility mowing or irrigation practices, you can expect the white clover to return to those areas.
Remember, after herbicide applications are made, you need to get the proper primary cultural practices
mowing fertilization into effect, or weeds will only return to the areas
where they previously existed. At this point in pest management,
we're going to cover the control of two different pathogens. Red thread and necrotic ring spot.
First is red thread. So red thread is a disease that's
very damaging to perennial ryegrass in low fertility situations.
Typically, when we find this disease, it's an indicator that we're not achieving our recommended
rate of nitrogen per year, which was three to five pounds annually. And it gets the name red thread because of the mycelium, which
gives it this red appearance. The pathogen spreads across the surface of the leaves.
And when it dries out in the sun, it provides this pinkish, reddish, hard mycelium
on the surface of the leaves. So typically, a control of this pathogen
can be easily provided by adequate fertilization. And remember, that's three to five pounds
of nitrogen applied four times. Twice in the spring and twice in the fall. And this disease also can be controlled in high priority
situations, high value situations, when the fertilizer has not been affective
with a broad number of contact or systemic fungicides.
The second pathogen that we'll cover today is necrotic ring spot.
Necrotic ring spot is very specific to Kentucky bluegrass.
The reason being, Kentucky bluegrass is a rhizomonas grass spreading laterally underground.
These rhizomes develop organic matter over time. As organic matter increases, the root
borne pathogen necrotic ring spot will become worse and worse because the pathogen not only
feeds on the turf but also on the organic matter that accumulates in the soil profile.
This pathogen has a very interesting lifecycle. Initial affections typically begin
in the fall months and the spring months when the environmental conditions are wet and cool.
However, symptoms are not visible this time of year. It is very good growing conditions for grass
like Kentucky Bluegrass, the cool, wet weather. So as the pathogen infects the turf,
we often do not see the symptoms until we enter into the summer period when heat and drought affect decrease
the health of the turf. The pathogen is not very active this time of year.
However, the grass-- because the root system has been compromised by the pathogen-- succumbs to the summer heat and drought stress.
This is very important because when we consider fungicide applications, a fungicide application, when the symptoms are
present during the summer, will not control the pathogen because the pathogen infected the turf back
in the previous fall and spring months. We need to make preventative applications
in the spring and the fall before the symptoms are present. Symptoms of this pathogen initiate as small,
necrotic, brown, or yellow patches that grow larger and larger.
As these patches get larger to about an 8 inch in diameter, grass will often recover in the center of these patches.
You then have a necrotic circle or ring with grass outside the ring and grass inside the ring.
We often commonly refer to this symptom as the frog eye, which is very typical of necrotic ring spot.
In terms of control of necrotic ring spot, we're gonna use cultivation and fungicides.
Remember, this disease is specific to Kentucky bluegrass, which has the aggressive rise ominous underground growth,
which accumulates organic matter. The pathogen feeds on the organic matter, as well as
the grass. So reducing organic matter through frequent core cultivation is very important.
Cultivating twice a year can substantially reduce your necrotic ring spot, infection, and activity.
In terms of fungicides, the two major active ingredients that are going to be effective on this pathogen
include DMI fungicides, such as propiconazole,
which has the common name Banner Maxx, as well as azoxystrobin,
known as Heritage. Another product that is very effective on this pathogen
is headway, which is a mixture of the active ingredients propicanazole and azoxystrobin.
And again, remember these applications need to be made preventitively in the spring or fall months,
rather than in the summer months when the symptoms are present.
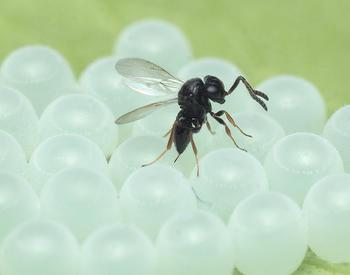
Management of European crane fly will be the last pest that we discuss.
This insect is a diptera or member
of the fly family, which also includes common crane fly. It is easily identified by the long, thin legs
and the large, membranous net vein wings that are held out against the body when
the insect is at rest. Turfgrass areas adjacent to wetlands
are very particular to crane fly habitat. These insects prefer very moist, wet soils when finding areas
to lay their eggs. So typically, grass that is adjacent or next to ponds,
lakes, various wetlands, low lying areas that drain water,
or areas that are over-irrigated or shady are very typical of crane fly habitat.
So things that we can do to dry out the soil surface will reduce crane fly infestations.
A general recommendation is if you have a history of crane fly infestations,
turn your irrigation system off on Labor Day. This will decrease the crane fly populations.
And it will not be very detrimental to the turf because during this time of year, heat is reducing.
And the seasonal rains, typically, are coming into the fall season. So environmental stresses are not as a concern for turfgrass.
So adult European crane fly emerge from the soil in mid August to October.
They quickly find a mate, reproduce, and then lay eggs. The eggs take about a two week period to hatch.
The larvae then go through several instar, beginning in the fall, through the winter,
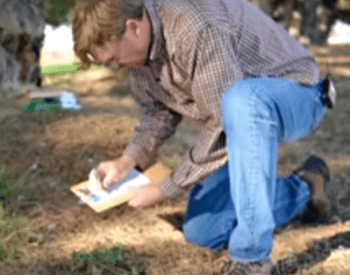
into the summer months. During these instars, we should be doing our scouting
in December and January about the third instar stage. This is when the larvae are the most active
and will often find the highest concentration of larva. For scouting, we can use a square end shovel like this.
We're gonna make a square hole down to about a three inch depth in the soil.
And then, flip over that piece of soil. We're looking for concentrations of 20 to 50 larvae
per square feet. The number of larvae that determine our action threshold
is gonna be dependent on the successful mowing, fertilization, and irrigation.
If we're not doing these cultural practices successfully, we'll have a lower action threshold.
Closer to 20 larvae per square foot where we start to see thinning turf.
If the cultural practices are maintained at adequate levels-- regular mowing,
regular fertilization in the spring and the fall, and adequate fertilization in the summer--
we'll have higher action thresholds of 50 larvae per square feet, or even greater before we
start to see thinning turf. The larvae will complete their life cycles
in the late spring, early summer months, go into pupation in July, and then emerge again
as adults in mid August. For control of these insects when
we have reached an action threshold of 20 to 50 or even more larvae, depending on our cultural practices,
we have a number of different active ingredients that are effective on early, and then late instar stages.
Products effective on early instar periods of this insect, which, again, would be the early winter months, include
a [? metoclopramide, ?] which is also known as a product merit. There is some danger associated with this product in relation
to bees. It has been known to kill bees and does kill bees. However, when we apply it to a turfgrass situation,
the risk is very low because turf is not a flowering plant.
[MUSIC PLAYING]
To summarize this training, let's review the primary and secondary cultural practices.
The primary cultural practices were mowing, fertilization, and irrigation.
In reference to mowing, remember a high mowing height around three inches for perennial,
ryegrass, and Kentucky bluegrass is best. And frequent mowing. At least once a week.
In reference to fertilization, remember, three to five pounds of nitrogen per 1,000 feet.
Two applications made in the spring months, and two applications made in the fall months,
avoiding applications in the winter months. In terms of irrigation, remember,
2/10 of an inch of irrigation per application is best. It prevents runoff and leeching.
During the peak summer months when it's very droughty and you have a lot of heat stress,
remember, one to 1 and 1/2 inches of irrigation. If you put down 2/10 of an inch of irrigation five times
a week, that's one inch per week. Now the secondary cultural practices
were cultivation and pest management. Remember, you need cultivation in situations
where you have laterally spreading grasses, like Kentucky bluegrass or creeping bank grass.
These grasses produce a lot of thatch, which encourages disease development.
Use core cultivation in the spring and the fall to reduce thatch and organic matter, as well as compaction, poor drainage, and air movement
into the soil. And the second of the two secondary cultural practice
is pest management. Remember, we're only relying on pesticides-- whether they're
herbicides, fungicides, or insecticides-- after proper mowing, fertilization, irrigation,
and cultivation have failed to provide adequate turfgrass
stands. When we consider the various pesticides, remember to get proper pest identification
before selecting a product and a time to put down that product.
[MUSIC PLAYING]
This video highlights the five cultural practices needed for proper integrated pest management in turfgrass:
- mowing
- fertilization
- irrigation
- cultivation
- pesticide selection and use
Catalog - EM 9123
¡Use los pesticidas con seguridad!
- Póngase ropa de protección y equipo de seguridad según las recomendaciones de la etiqueta. Báñese después de cada uso.
- Lea la etiqueta del pesticida—aunque lo haya usado antes. Siga al pie de la letra las indicaciones de la etiqueta (y cualquiera otra indicación que Ud. tenga).
- Tenga precaución al aplicar los pesticidas. Conozca su responsabilidad legal como aplicador de pesticidas. Usted puede ser responsable de heridas o daños resultantes del uso de un pesticida.