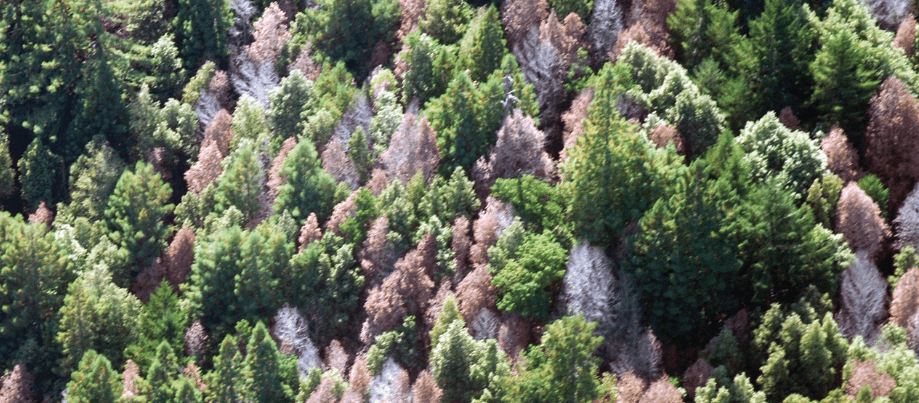
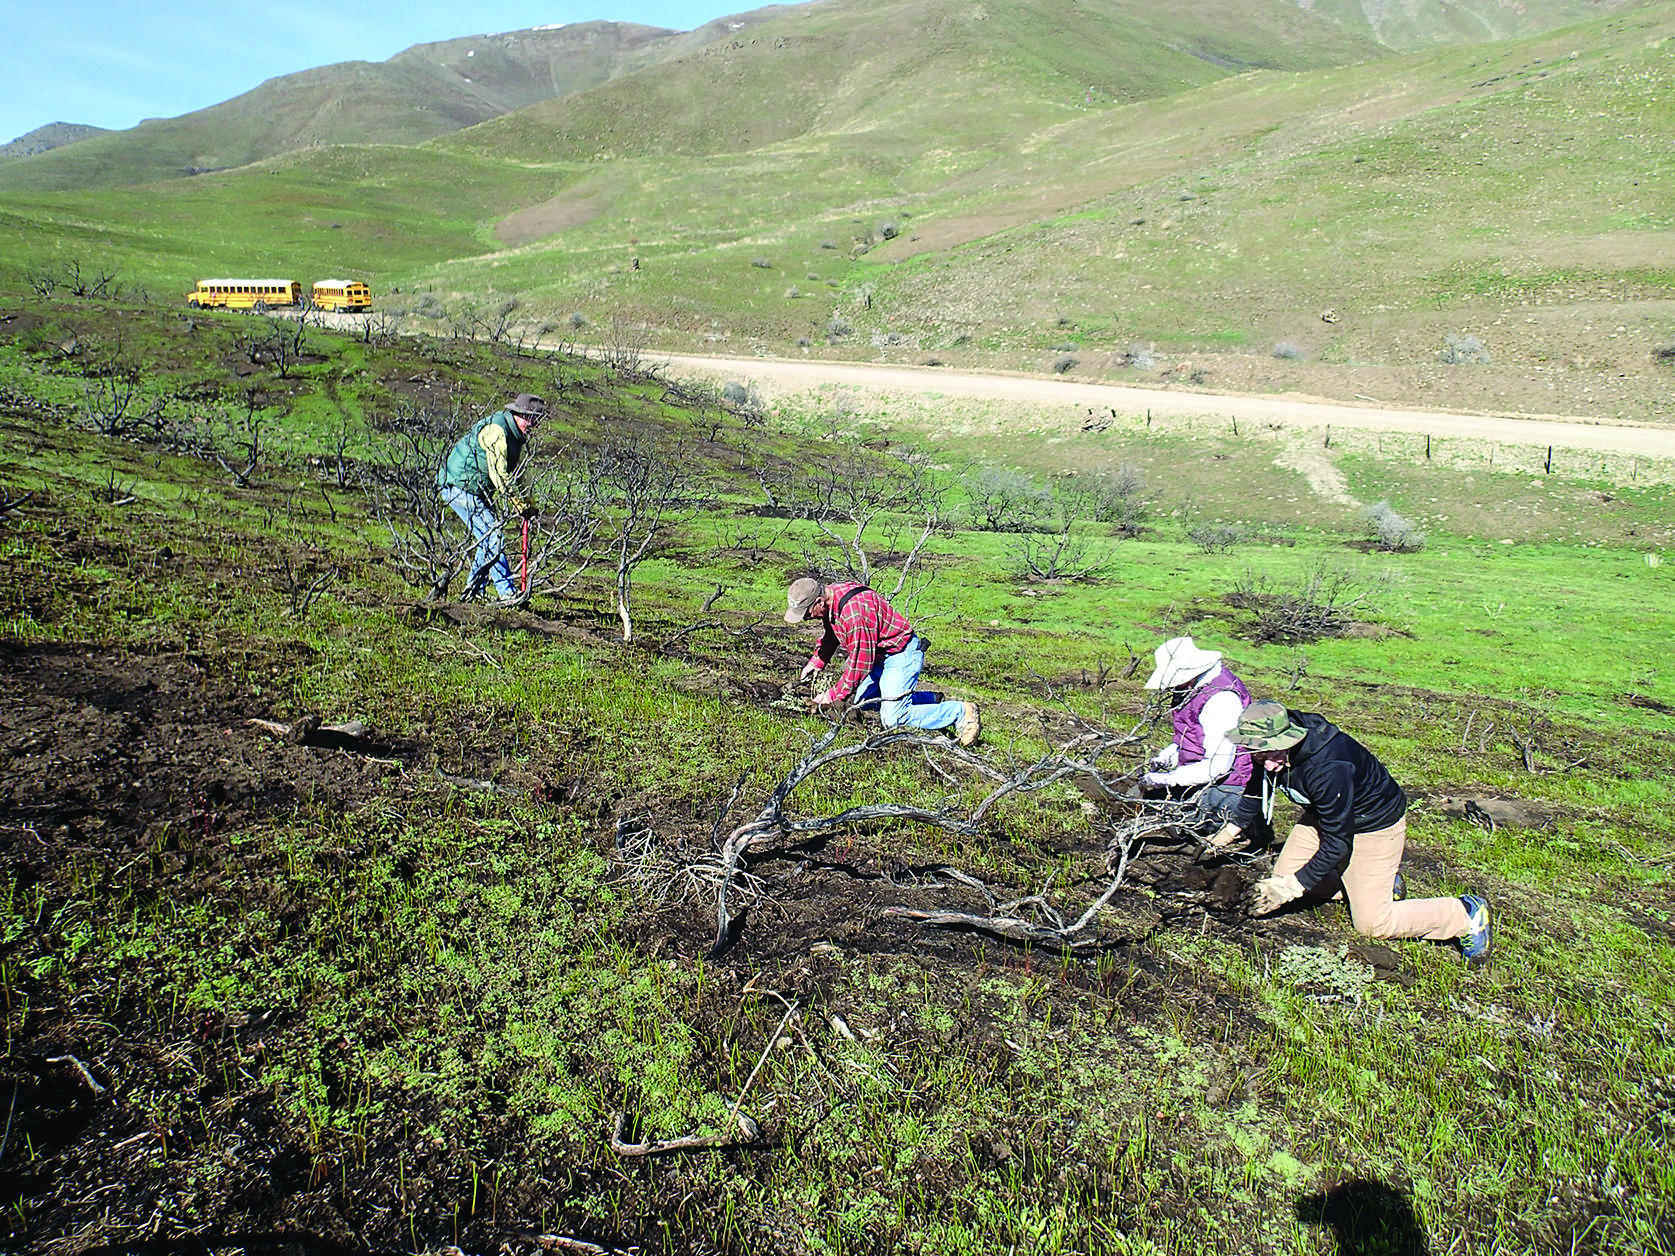
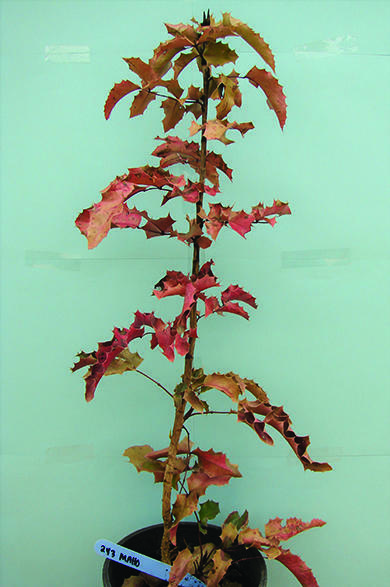
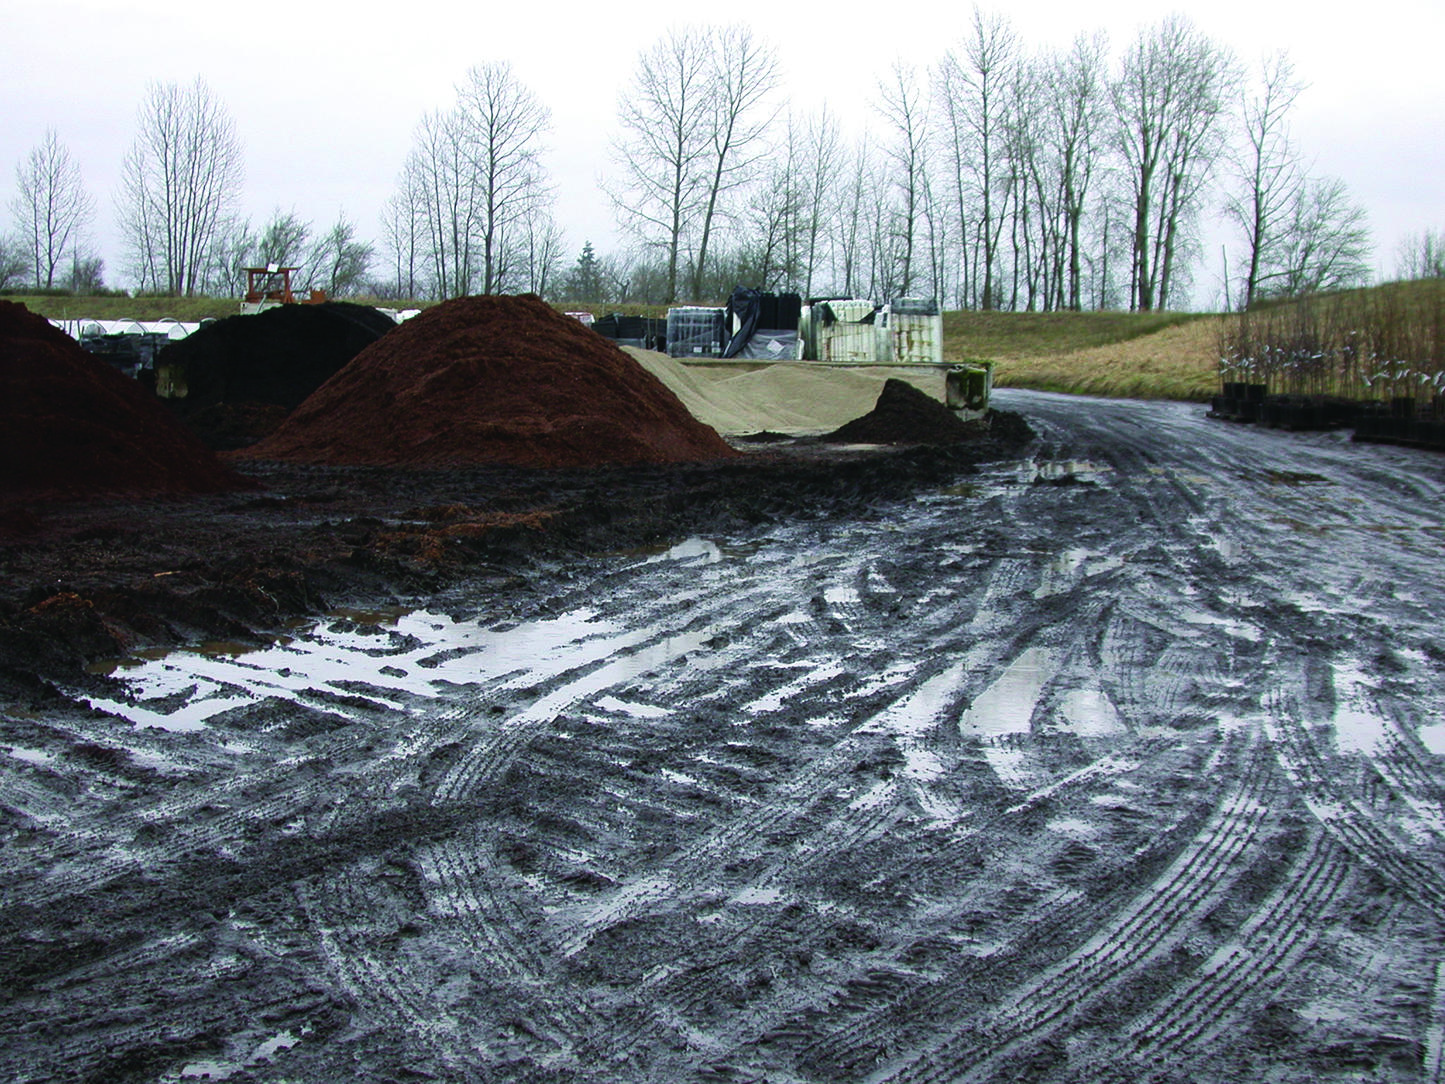
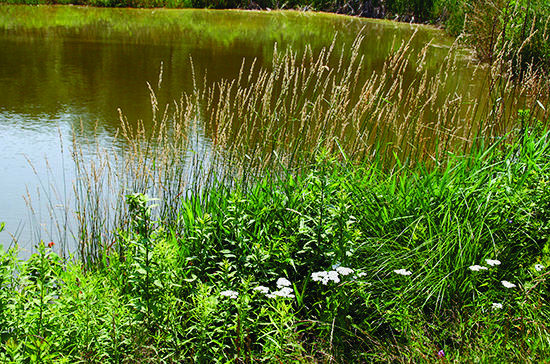
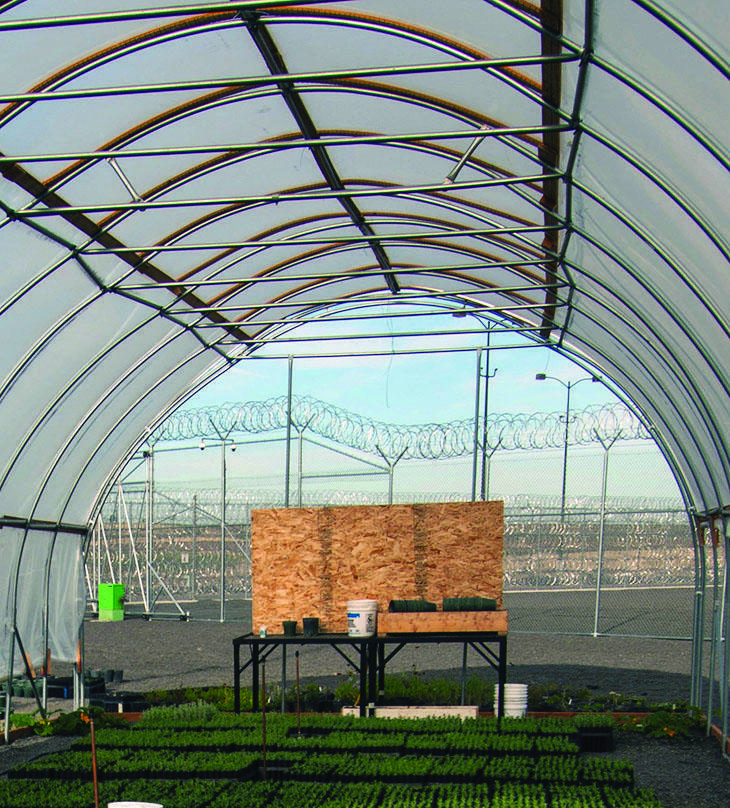
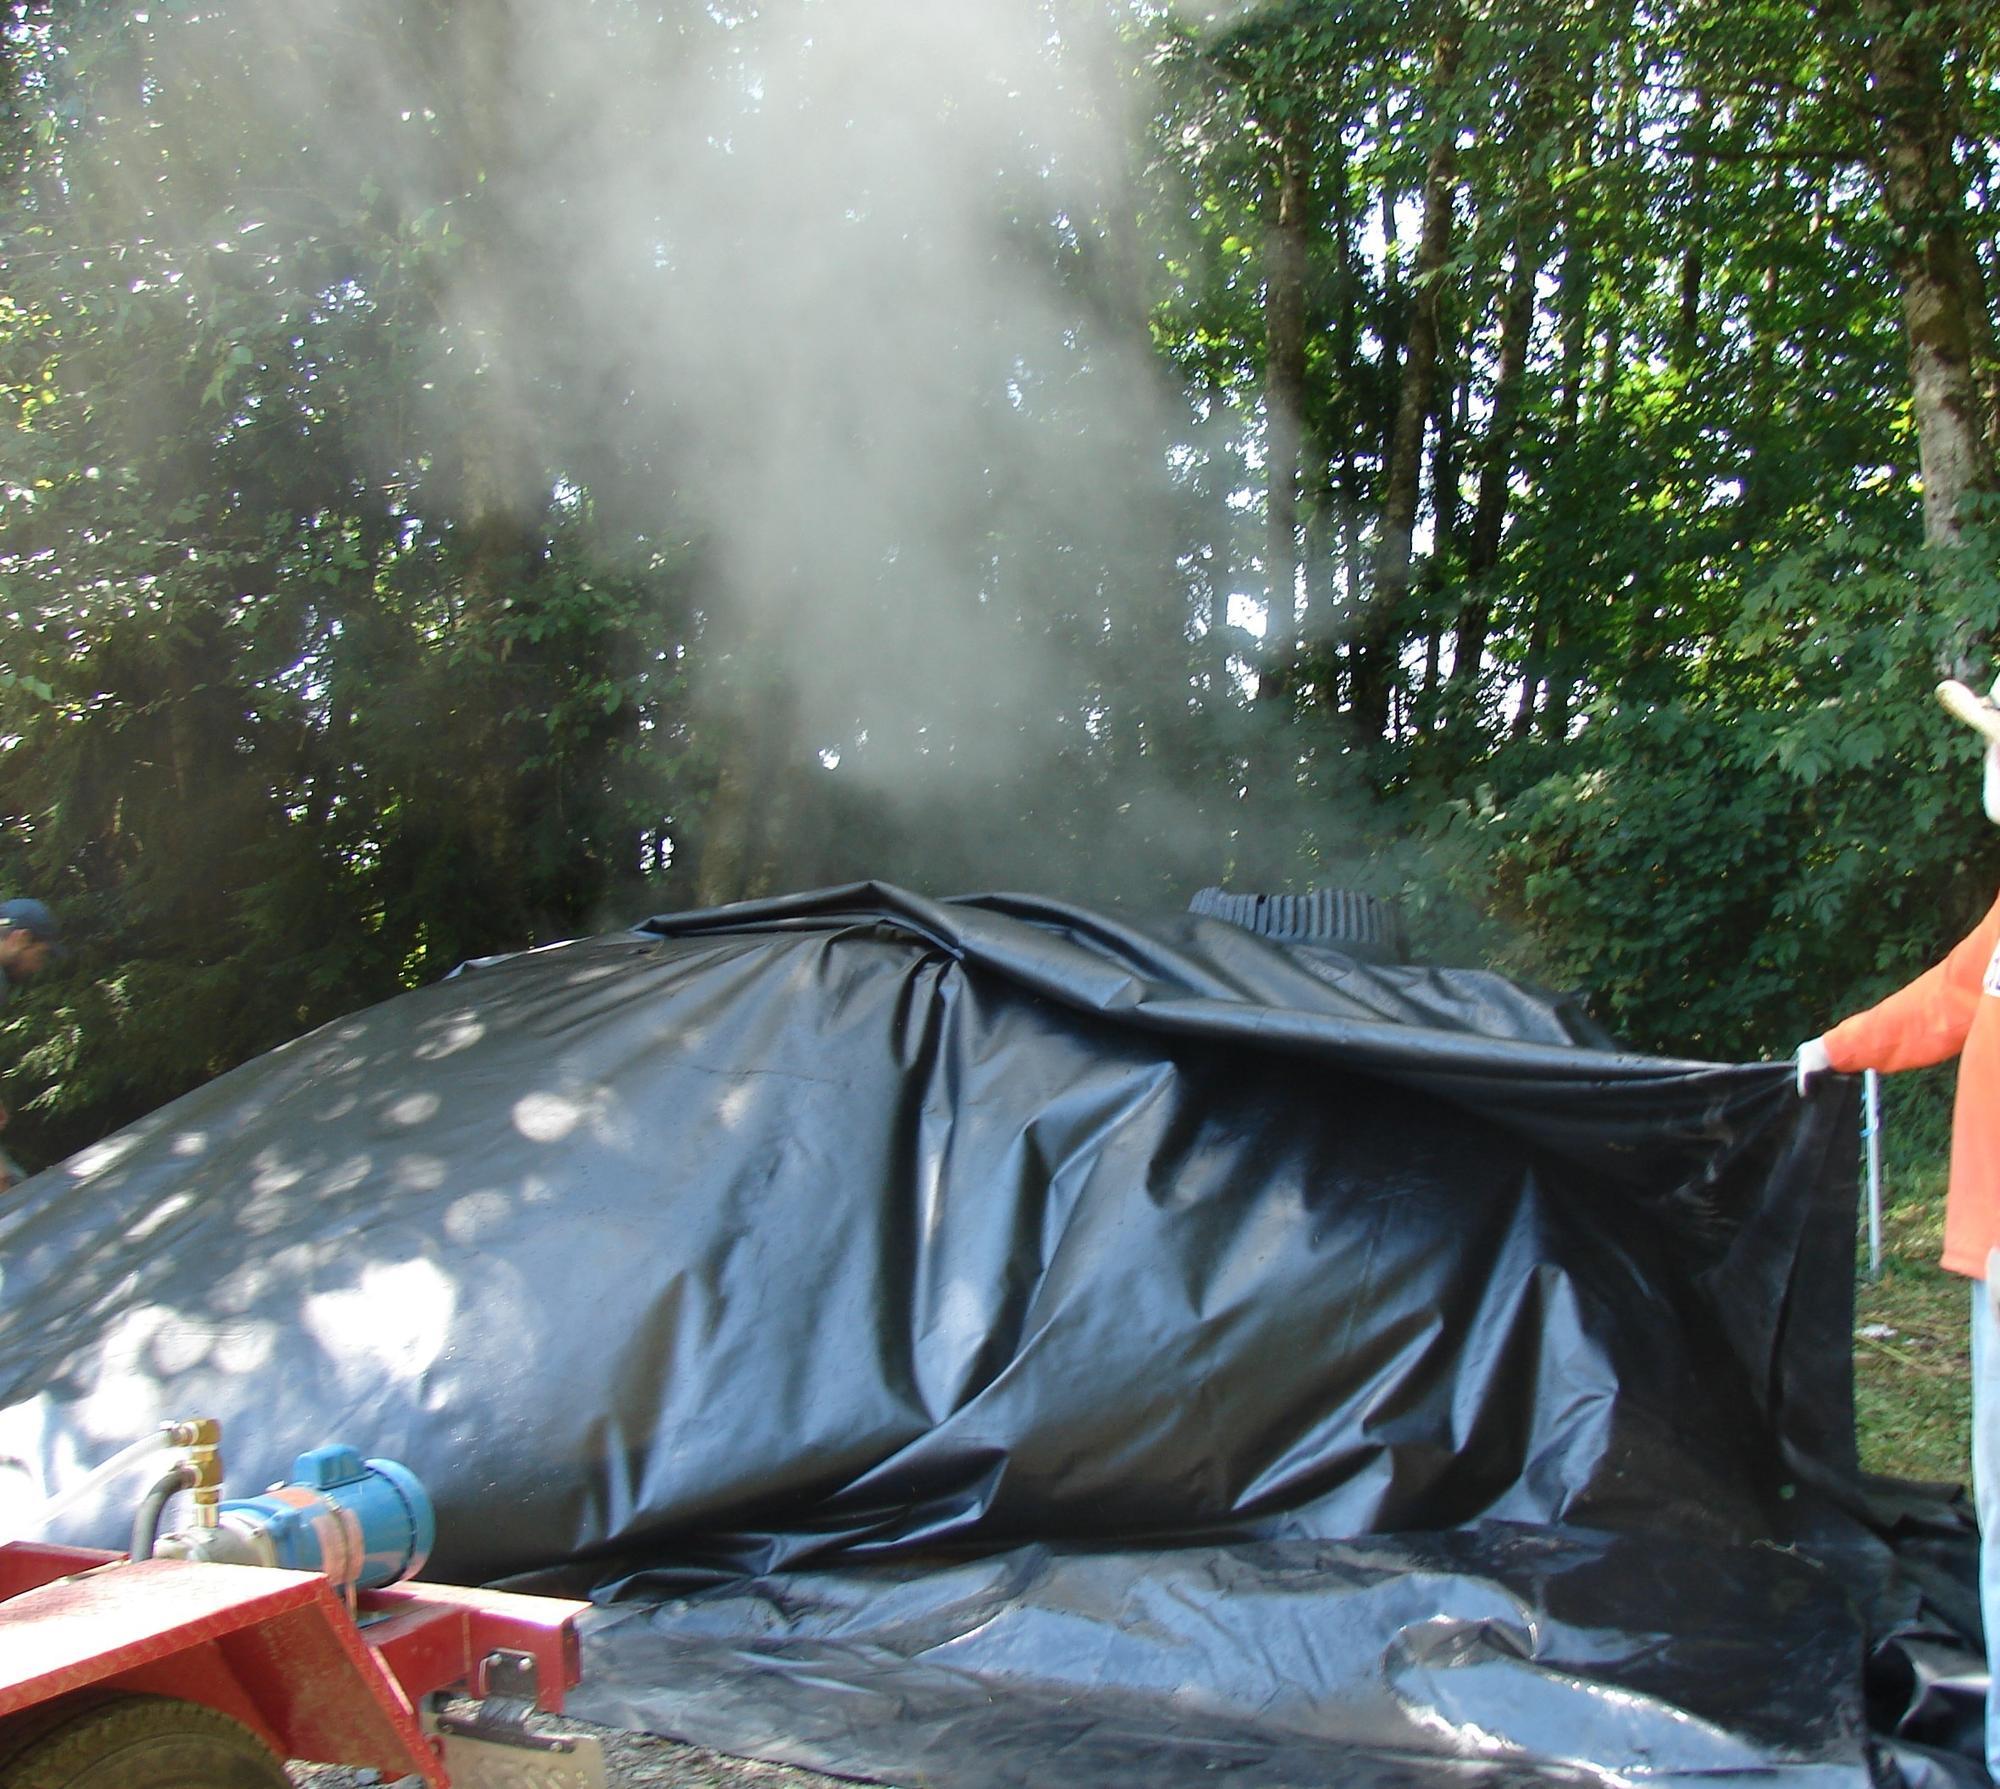
Phytophthora species are an invisible threat to ecosystems in the Pacific Northwest. These plant pathogens can remain undetected in container plants, on field equipment and even footwear. They have been inadvertently introduced to wildland plant communities in the western United States and around the world (Figures 2 and 3). Once these invasive pathogens are introduced to new ecosystems, they can spread widely under the right environmental conditions, damaging and killing plants (Figure 4). Eradication is difficult or impossible. This outcome is of particular concern to restoration practitioners replanting sensitive habitats altered by past management practices and invasive species (Figures 5 and 6). Preventing Phytophthora infestations in nurseries and restoration sites is a critical step in the long-term success of restoration projects. This publication is designed to help nursery growers and their clients recognize and prevent Phytophthora infestations in nurseries and restoration sites.
Phytophthoras are water molds, which are microscopic organisms (Figure 1) that thrive and spread in moist conditions. They cause plant diseases worldwide.


Similar to fungi, they grow root-like structures called hyphae and produce spores. A unique feature of Phytophthoras are mobile spores with specialized structures that enable them to swim. There are more than 150 described species of Phytophthora worldwide. They are among the most destructive pathogens of agricultural and horticultural crops as well as wildland plant communities. One notable agricultural example is P. infestans, which caused the Irish potato famine of the 1840s. Wildland introductions include:
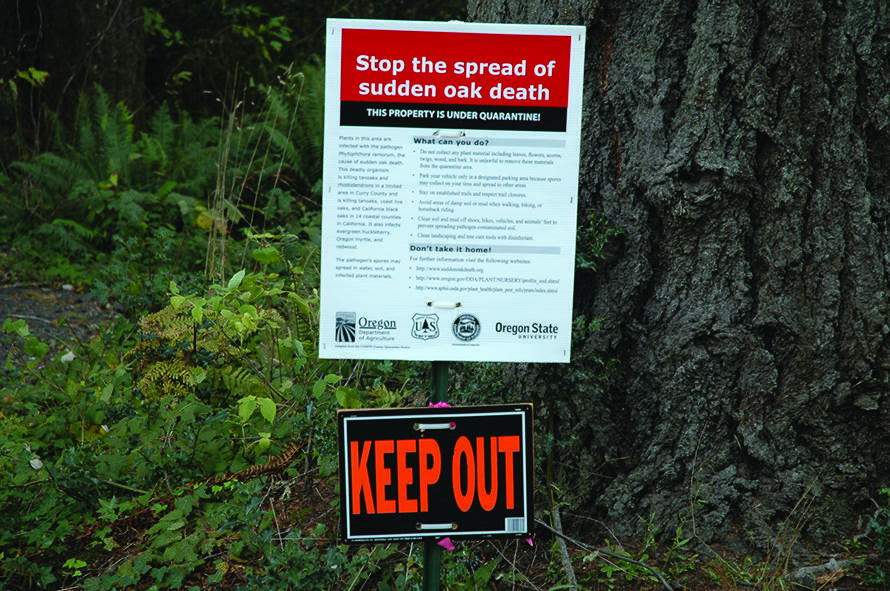
- P. ramorum, the pathogen responsible for the extensive mortality of tanoak in Curry County, Oregon, and central and north coastal California.
- P. lateralis, which was inadvertently introduced on infested ornamental nursery stock and spread to wildlands in southern Oregon in the 1950s and has infected and killed Port-Orford-cedar throughout its natural range.
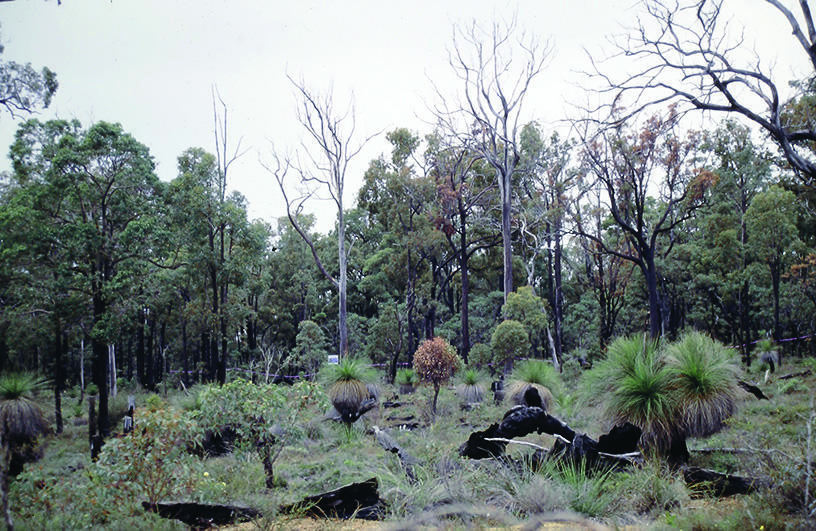
- P. cinnamomi, which causes severe root rot problems on eucalypt forests in Western Australia, and chestnut and short-leaf pine in the eastern U.S. It is considered an increasing threat to forests of western North America as temperatures rise.

Contents
- How are non-native Phytophthora species introduced to natural ecosystems?
- Why are nurseries susceptible?
- What can be done?
- Prevention guidelines
- Disposing of unhealthy plants
- Create a gravel sandwich
- Risk of moving plants into the nursery from off-site
- Sanitation approaches for containers, tools, potting media and soil
- Chemical disinfectants
- Heat treatment
- Recognizing Phytophthora symptoms
- What about bare-root plants?
- What happens when you find plants with potential disease symptoms?
- Implementing a bench testing monitoring strategy in addition to physical inspection
- Recommendations
- Use of chemicals and biocontrols
- Solutions for nurseries
- Nursery organization and recordkeeping
- Nursery licensing and inspection programs
- Purchasing native plants
- Phytophthora prevention at restoration sites
- What does the future hold?
- Resources
How are non-native Phytophthora species introduced to natural ecosystems?
Shipment and planting of infected nursery stock (Figure 7) is considered the most common means for the introduction of new Phytophthora species into landscapes and habitats worldwide. Once infected nursery stock are planted, the pathogen has a number of mechanisms for spreading, including soilborne (P. lateralis) or wind- or rain-borne spores (P. ramorum). A distressing new introduction was discovered in 2012, when P. tentaculata was detected in several California native plant nurseries and restoration sites. This inadvertent planting of infected sticky monkey flower, Diplacus aurantiacus, into wild populations elevated the need to prevent further introductions through increased recognition and awareness. Since then, many native plant nurseries surveyed in California, Oregon and Washington have been found to harbor Phytophthora species.
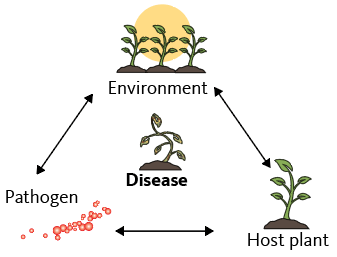
Why are nurseries susceptible?
The disease triangle in Figure 8 illustrates the three factors that are necessary for a plant disease to develop. There must be a susceptible host plant, a virulent pathogen and conducive environmental conditions. Many Phytophthora species have a wide range of host species commonly grown by nurseries. Phytophthora can be inadvertently introduced into a nursery by sharing contaminated stock; using contaminated pots, soil or equipment; irrigating with contaminated water; or even carried in on employees’ or visitors’ footwear and vehicles. Nurseries with poor drainage or the tendency to overwater create ideal environmental conditions for these water molds. Plants grown in tightly packed arrangements and propagation from cuttings can facilitate rapid pathogen spread via soil splash or transfer on infested tools.
What can be done?
Nursery and restoration practitioners involved in planting projects play a key role in recognizing and preventing invasive pathogen introductions. Take these steps to prevent infestations in the nursery and native ecosystems:
- Follow best management practices (Table 1) to prevent pathogen introductions and conditions favorable to disease spread at every phase from the nursery to the restoration site.
- Implement a systematic monitoring plan to assess nursery plant health.
- Know what a healthy plant looks like.
- Recognize and correct problems at early stages of disease before they become widespread.
- Know when to use diagnostic tests.
- Destroy diseased plants.
- Buy plants only from nurseries that follow best management practices for disease prevention. See Table 1 and “Purchasing native plants.” Use best management practices to avoid introductions when planting in restoration sites. See “Phytophthora prevention at restoration sites.”
The best management practices recommended throughout this publication are intended to reduce the introduction of pathogens to nurseries and restoration sites. Adhere to monitoring, testing and sanitization to help restrict pathogen infestations. Create nursery conditions that interrupt potential paths of contamination. Take utmost care in restoring plants in sensitive habitats to prevent pathogen introductions. Ensure that each step at the nursery and during a restoration project is designed to prevent contamination. Check your state’s licensing and shipping requirements and consult with your department of agriculture to ensure compliance with state programs. (See “Nursery licensing and inspection programs.”) Additionally, a new voluntary nursery certification program, Systems Approach to Nursery Certification, or SANC, is in development; see “Resources.”
Prevention guidelines
Preventing Phytophthora infestations in the nursery setting is the first step in the chain of actions that will help protect against wildland infestations and damage on a larger scale. Table 1 describes best management practices that will help reduce the conditions that foster disease and prevent pathogens from being introduced, as well as nursery practices to avoid spreading the disease. The key to disease prevention is to identify and interrupt all potential paths of contamination from potentially infested soils, plants and water, at every phase of the nursery process. These practices also aid in the production of healthy plant stock. While the focus in Table 1 is on best management practices that will help produce clean container nursery stock, many of these practices will help nurseries growing bare-root stock as well.
Table 1. Best management practices for nurseries
Table adapted from:
-
Buying healthy plants: What to look for at a nursery. 2017. California Native Plant Society Ad Hoc Committee on Phytophthoras and the Phytophthoras in Native Habitats Work Group.
-
Guidelines to Minimize Phytophthora Pathogens in Restoration Nurseries. 2020. Phytophthoras in Native Habitats Work Group.
Plant health
Recommended practices
- Plants should appear healthy.
- Closely monitor plants for disease symptoms.
- Be careful of plants brought in from off-site. See “Risks of moving plants into the nursery from off-site.”
Containers and potting material
Recommended practices
- Use all new containers, if possible.
- Any containers that are reused need to be properly sanitized. See “Sanitation approaches for containers, tools, potting media and soil.” Be especially careful to sanitize used containers that are donated.
- Store clean containers off the ground in clean racks or covered bins (Figure 10).
- Use potting materials that have been heat-treated.
- Potting media, soil and compost can be baited to test for contamination. See video tutorial, Baiting — a method for early detection of Phytophthora.
- Store potting materials in sealed bins or bags with no direct ground contact (Figure 11).
- Ensure that tools and equipment for mixing and loading potting materials are clean.


Water and irrigation
Recommended practices
- Ensure good drainage in the nursery site.
- Confirm that all irrigation water comes from a pathogen-free water source, such as municipal water or a well. Assume that water from surface sources (rivers, ponds) is contaminated and needs treatment. If in doubt, see Testing the waters — how to test your irrigation system for the presence of Phytophthora.
- Employ irrigation systems that minimize splash between containers, such as drip irrigation.
- Verify that irrigation systems deliver the right amount of water. There should be no pooling of water or drought-stressed plants.
- Keep hoses and wands off the ground.


Workflow and layout
Recommended practices
- Maintain maximum separation between clean growing areas and potentially contaminated areas (holding areas for new plants, cull piles) of the nursery.
- To prevent contamination in the clean production zones, install barriers and control access by restricting movement from contaminated areas into clean production zone.
- Design workflow to move from clean areas in the nursery, such as plant propagation areas, to dirty areas, such as cull piles.
- Clearly separate the plant cull pile from clean production area to avoid cross-contamination.

Propagation and growing area
Recommended practices
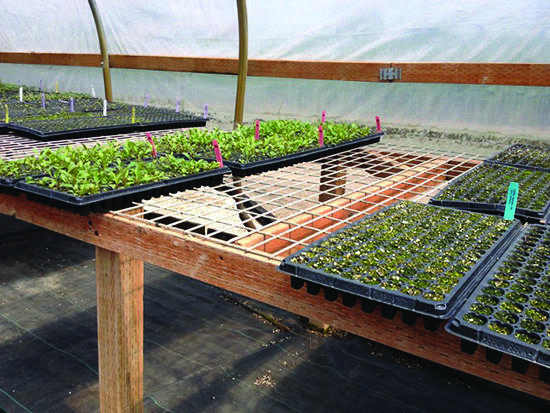
- Propagation area (where trays are filled and seeded, cuttings made) is kept scrupulously clean (Figure 18).
- Growing area kept separate from propagation area.
- Never place pots on bare soil.
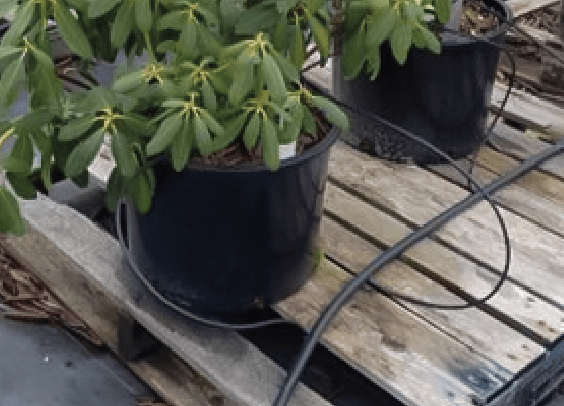
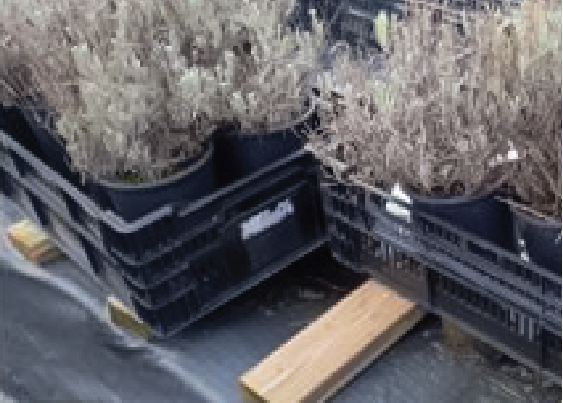
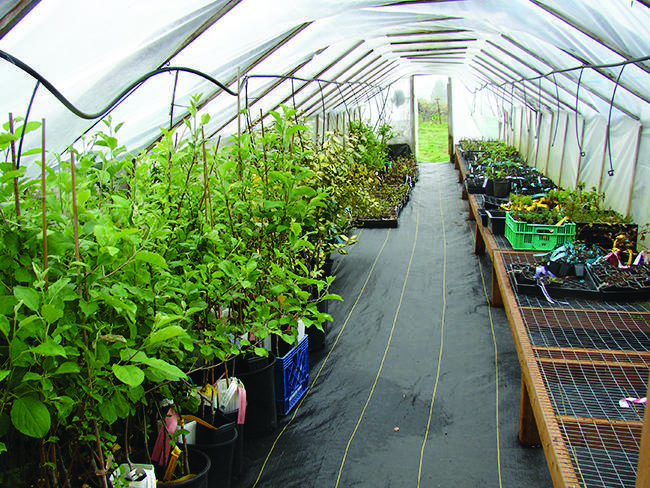
- Plants are kept off the ground on benches at least 2–3 feet high (Figure 19). Pallets and overturned crates can also keep plants off the ground (Figure 20A, 20B).
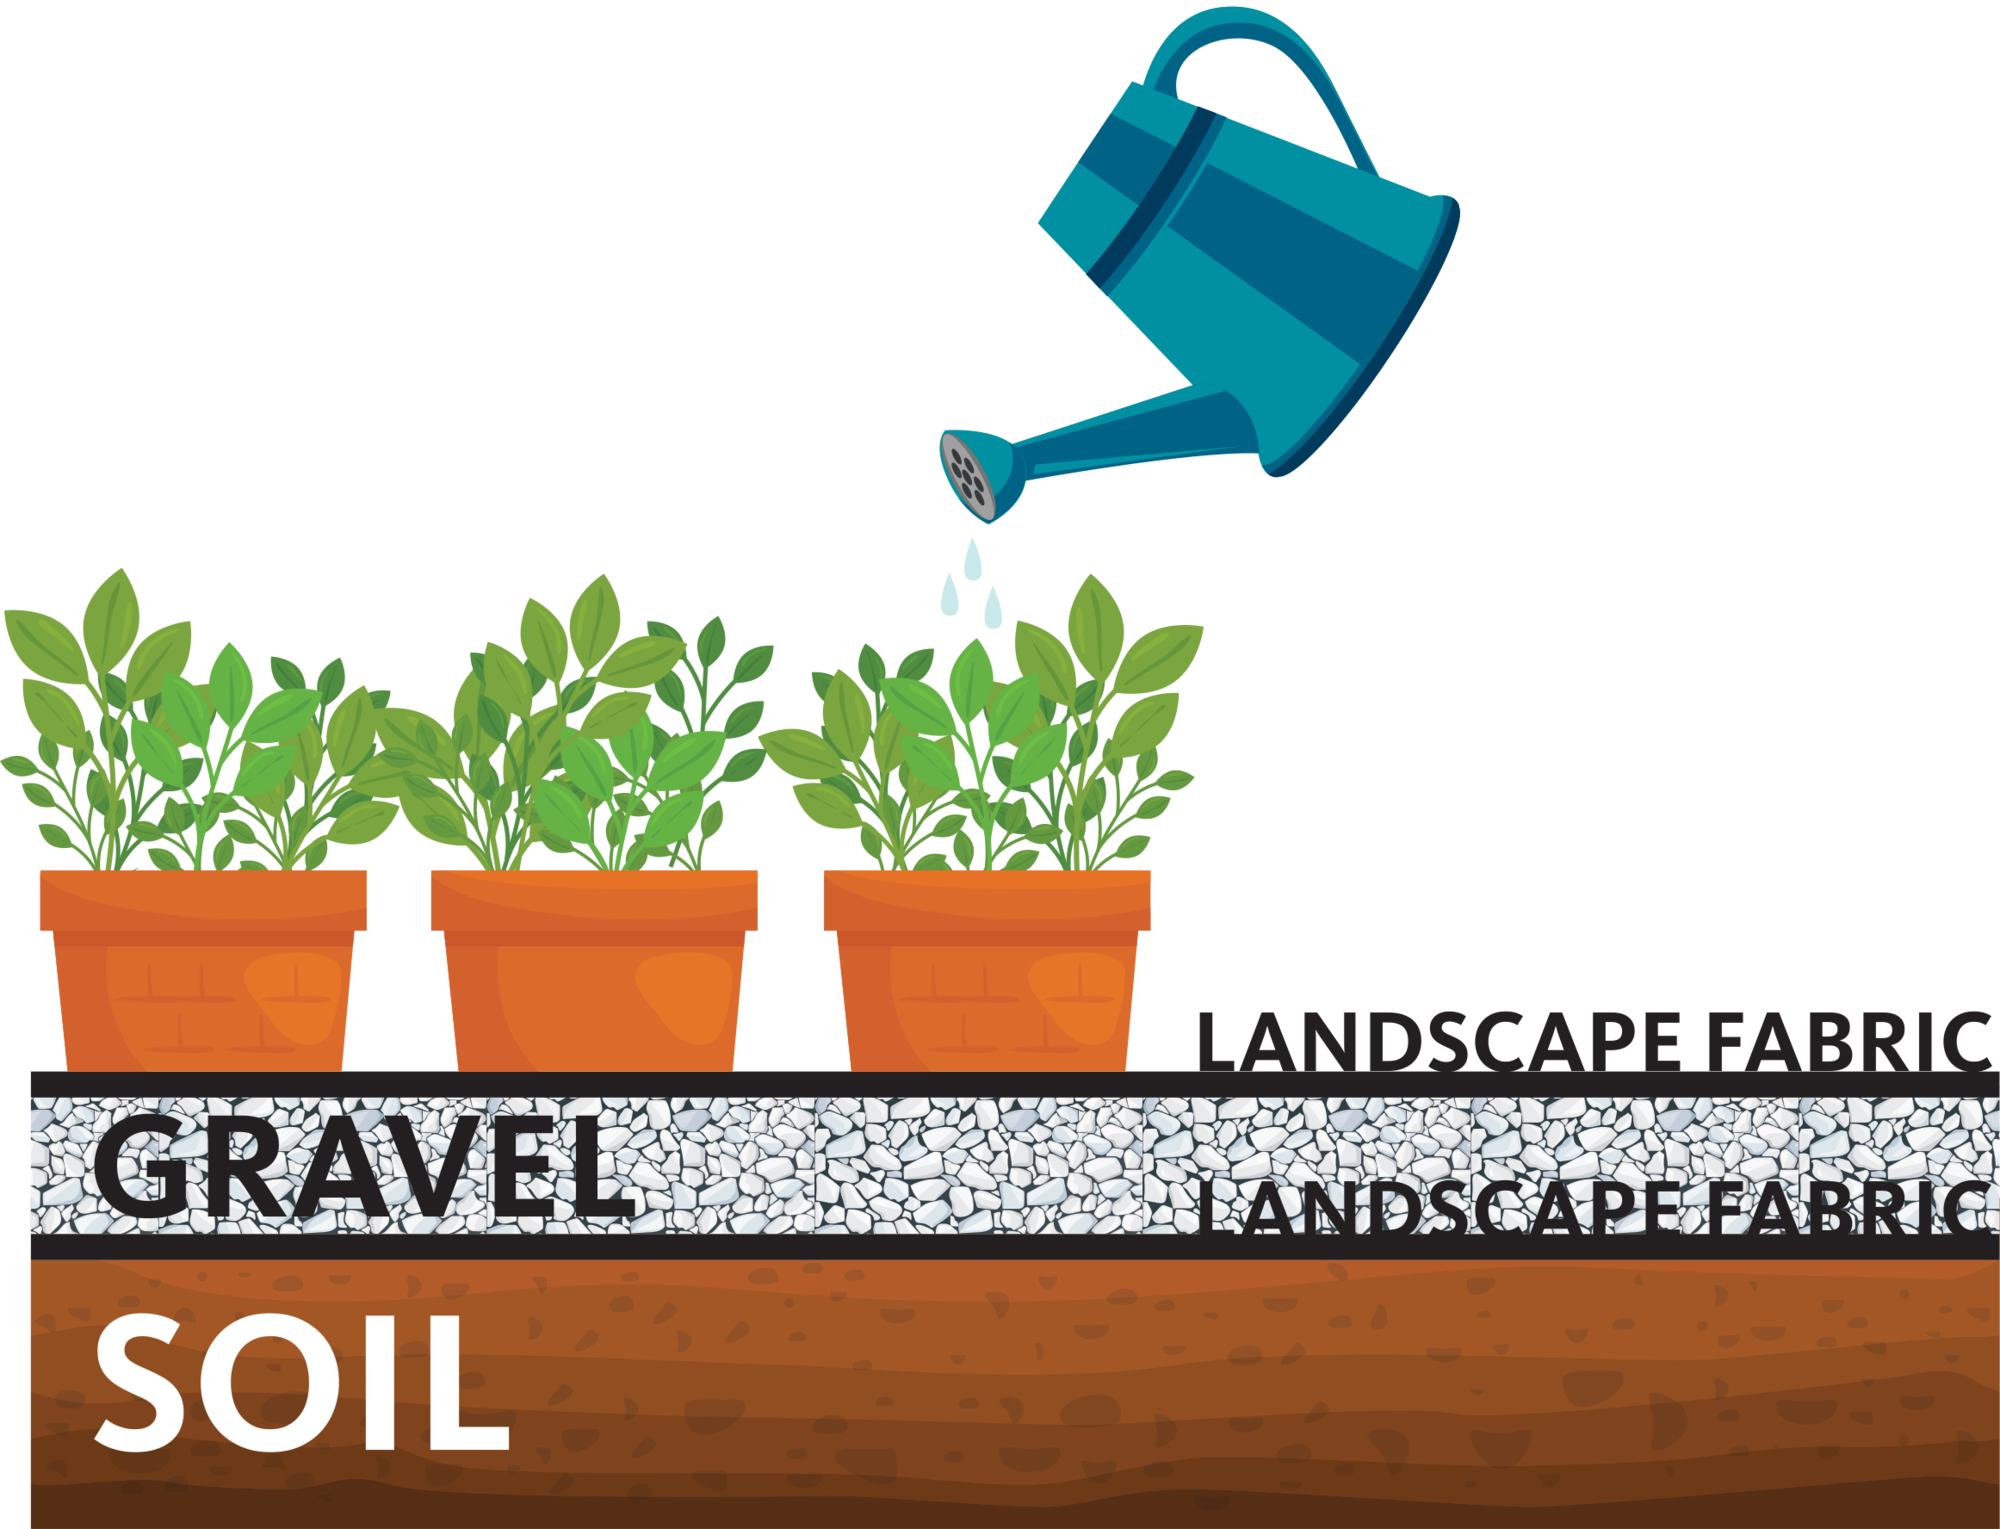
- Surface covered by gravel, landscape fabric or “gravel sandwich” to prevent splashing from underlying soil (Figure 21). See “Create a ‘gravel sandwich.” Landscape fabric used alone (between bare earth and pots) can become easily clogged.
- Ensure site has adequate drainage.
- Clean up leafy debris (Figure 22).
- Disinfect bench surfaces between crops.
- Prevent containers from tipping over.
- Dispose of sickly plants by heat treatment or in a properly located separate cull pile (Figure 23). Do not recycle diseased plants and potting media. See “Disposing of unhealthy plants,” page 14.
- Organize nursery with space between blocks on benches and between benches (Figure 24).
- In greenhouses, manage populations of fungus gnats and shore flies, which can spread Phytophthora.


Phytosanitary practices
Recommended phytosanitary practices
- Provide mandatory sanitizing foot baths (Figure 26) and instructional signage at the entrance to the growing area. See “Sanitation approaches for containers, tools, potting media and soil.”
- Have staff wear clean waterproof gloves.
- Implement a sanitizing system with clearly noted tool cleaning procedures.
- Dedicate tools, hoses, equipment for different growing areas in the nursery.


Disposing of unhealthy plants
Proper disposal of unhealthy and diseased plants is a critical step to prevent contamination in a nursery setting. Place diseased and unhealthy plants in a cull pile following these recommended practices:
- Locate the cull pile in an area separated from the growing area.
- Ensure that all water from cull pile drains away from nursery and does not drain into water used for irrigation.
- Ensure that material from cull pile is never used for compost.
- For nurseries that have received a positive result for a Phytophthora species with a regulated status, see “A diagnostic test reveals that a plant is positive for Phytophthora; what’s next?”
Create a ‘gravel sandwich’
Place plants on a gravel sandwich when it is not possible to elevate plants on benches, pallets or overturned bulb crates. Here’s how:
- Lay landscape fabric (weed cloth) over the soil to create a barrier and prevent the gravel from compacting into the soil (Figure 27).
- Next, install a layer of gravel 3 to 6 inches deep to promote drainage and prevent puddling.
- Lay landscape fabric over the gravel.
- Pin down the top and bottom edges of the landscape fabric to keep gravel in place (Figure 28).


Risks of moving plants into the nursery from off-site
Plants brought into the nursery from off-site locations pose a special risk of pathogen introduction. Off-site plants can include plants propagated at another nursery site owned or managed by the same nursery; plants shared or purchased from another nursery; or plants collected from the wild. Some restoration nurseries will not accept off-site plants due to this risk, preferring to propagate all their own plants. Plant returns are treated with the same risk as off-site plants since they were outside of the nursery’s control. If you must procure plants from off-site or accept returns, follow these practices:
Keep off-site and returned plants away from your clean areas in a segregated holding area for at least eight weeks.
Inspect off-site or returned plants regularly. If practical, test for pathogens at the end of the holding period.
Inform potential purchasers of plant origins. Purchasers may trust and know your nursery practices but will want to know of any plants that did not originate from your nursery or remain in your care.
Never accept other nurseries’ plants or empty containers left over from multinursery restoration projects. This transmits disease among restoration nurseries.
Special considerations for bare-root plants from off-site locations
Before you integrate bare-root plants obtained from off-site locations into nursery operations, segregate them as described above.
Bare-root or plug plants obtained from off-site locations intended for transplanting in bare root beds should be purchased from nurseries with excellent practices, inspected prior to planting (Table 1) and monitored for plant health. For more information, see “Recognizing Phytophthora symptoms.”
Sanitation approaches for containers, tools, potting media and soil
There are several sanitation approaches available to restoration nurseries. The best methods for your nursery or restoration site depend on the scale of your operation. Materials to be sanitized, expense, labor and potential for environmental contamination are also factors.
When choosing a sanitation method, examine the tradeoff between labor costs and the cost of new materials. Packaged potting media may be the most cost-effective option for some operations. For pot sanitation, chemical disinfectants are cost-effective in terms of materials but require a number of careful steps to ensure reliable results. While sanitizing with heat treatment may be fast, it requires specialized equipment. Buying new pots can be the most expensive option for any size nursery.
Another consideration is the cost of disposing of used pots and its environmental impact. The least expensive option for a small nursery is to solarize used pots if conditions are suitable. Otherwise, consider washing and disinfecting pots, which requires more worker time but costs less in materials. Steaming is the most cost-effective choice for a larger nursery, even with higher initial costs for equipment. Labor costs for treating pots with steam are far less than for washing and disinfecting. See Table 2 for a summary of sanitation methods and their suggested uses. Refer to Tables 3 and 4 for safety, cost and environmental considerations of each sanitation method.
Chemical disinfectants
Container sterilization (Table 3) can be accomplished using chemical sanitizers such as bleach or quaternary ammonium compounds, or QACs. If you are using chemical sanitizers, clean the containers of any organic material first. The organic material will use up the oxidizing potential of the disinfectant. Soak the containers in water to loosen soil and media, then scrub, rinse and soak in disinfectant. Follow up by rinsing in clean water (Figures 30, 31). Chemical sanitation is not appropriate for soil, potting media or compost. Bleach and QAC solutions can be used in sanitizing footbaths.
Chlorine bleach is a strong oxidizing agent commonly used as a disinfectant in many situations. Its efficacy is affected by changes in pH, the amount of organic matter present and nitrogen contaminants such as fertilizer. Chlorine bleach is inexpensive and readily available. Test strips are available for measuring the concentration of free chlorine in water. Make a bleach bath to sanitize pots and flats by diluting bleach by a ratio of 1:10 with cold water, producing a final concentration between 525 and 800 ppm.
Quaternary ammonium compounds are ingredients in a number of common household products such as Lysol and Formula 409. They are composed of a mixture of chemicals with the active ingredient benzalkonium chloride or a similar chemical. Commercial products such as Physan or Greenshield are available for use in nurseries. As with chlorine bleach, you can test the disinfectant bath with test strips to monitor activity. The effective range for QACs is between 781 and 1040 ppm.


Chlorine bleach, toxic on its own, is also extremely reactive and should never be mixed with ammonia, acids or other cleaning products; this can produce deadly gases. Mixing bleach with ammonia will also produce nitrogen trichloride and hydrazine, which are explosive. Do not use the same containers for mixing solutions of bleach and solutions containing ammonium compounds such as Green Shield, Physan and others. (Check the label.)
You can sanitize metal tools and surfaces with alcohol or QACs. Use ethanol or isopropyl alcohols in the 70%–90% concentration range. Concentrations above 90% are not effective because some water is needed for disinfectant activity. Alcohols need a longer contact time than other disinfectants such as bleach, and they are inactivated in the presence of organic matter. Spray a 70%–90% solution onto the surface and allow it to dry. This shouldn’t take long, as the alcohol evaporates rapidly. Don’t use bleach on metal tools because it is corrosive.
| Chemical disinfectant | Suggested use | Stability | Cost | Safety and environmental impact |
|---|---|---|---|---|
| Chlorine bleach | Used containers, concrete floors if soil/organic material is removed first. | Chlorine bleach is unstable; mix diluted bleach solutions daily or more often. Chlorine is inactivated by the presence of organic matter, so items should be washed before disinfecting. Chlorine gas evaporates at a high rate after mixing when exposed to air. When you can no longer smell chlorine, the solution is used up and should be changed. You can use test strips. | Since bleach solution has to be mixed up more often, it does not save money when compared to other options, such as QACs. | Chlorine is toxic to microbes and all living things. Corrosive; do not use on metal tools. Because it is so reactive, observe safety precautions when working with chlorine. Workers should wear appropriate protective equipment when handling concentrated chemicals, and rubber gloves when working with diluted solutions. Do not mix with QACs; toxic chemicals will form. |
| Quaternary ammonium compounds, or QACs | Footwear, used containers, hand tools, metal benches if you remove soil or organic material first. | QACs are relatively stable. Solutions can be used for up to a week if not heavily contaminated with soil or organic material. Stock solutions can be stored up to two years in a cool, dark place if unopened. | Relatively low and easily obtained. | Do not mix with bleach; toxic chemicals will form. QACs are toxic to microbes and larger marine life. These chemicals should be disposed of as chemical waste and not allowed to enter wastewater treatment systems or surface water bodies. While wastewater systems can process small amounts of these chemicals, large volumes (hundreds of gallons) will overwhelm the system. |
| Alcohols (70-90% range, volume basis) | Hand tools and metal benches if soil or organic material is removed first. | Solutions are unstable as the alcohol evaporates, but they can be stored in a closed container for one week. | Most alcohols considered to be too expensive to use for disinfection on a large scale, but are more suitable for uses such as disinfecting cutting tools in a propagation house. | Flammable, so should not be used around open flames. Alcohol in high concentrations irritates tissues and can damage rubber and plastic with extended use. |
| Peroxides | Used containers, concrete floors if you first remove soil or organic material. | Hydrogen peroxide is unstable, but the product ZeroTol has greater stability. Use solutions of peroxide-based disinfectants soon after mixing. | Since less ZeroTol is needed per gallon of solution, it is less expensive than food-grade hydrogen peroxide. | Hydrogen peroxide is corrosive to metals. Wear eye protection and gloves when handling. ZeroTol concentrate should be handled with the same care as peroxide, but it becomes relatively safe for use when diluted. |
Heat treatment
You can also sanitize containers, potting media, soils and substrates using heat. Temperatures of 140°F (60°C) (for specified time intervals and moisture contents) will kill Phytophthora. Temperatures of 140–178°F (60–81°C) will kill many other types of plant pathogens, while most weed species and certain plant viruses require even higher temperatures. See Figure 32 for temperatures necessary to kill various groups of soil organisms. Heat treatments include techniques using steam, aerated steam and solarization. See Table 4 to determine which techniques best fit your operation. Containers decontaminated using heat treatment do not require precleaning, unlike methods of chemical disinfection. However, some techniques such as steaming use specialized equipment and may not be feasible for small nurseries.
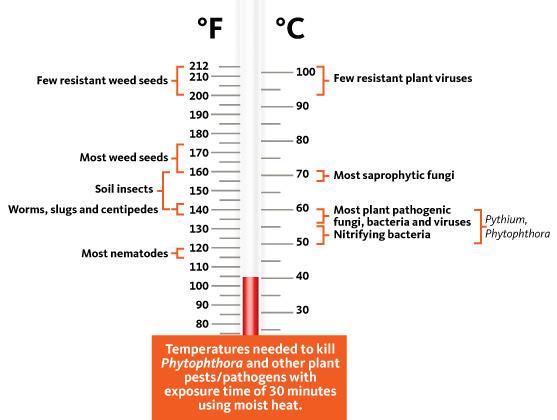
Sanitizing potting media, soil and compost with heat treatments within the range of 140–162°F (60–72°C) will avoid phytotoxicity or “chemical burn” and prevent the destruction of beneficial soil microorganisms. Excessive heat treatment between 176° and 212°F (80°–100°C) can kill beneficial soil microorganisms, resulting in a biological vacuum easily invaded by pathogens if they are reintroduced. You can use aerated steam (described below) to pasteurize potting media and soil in field plantings without eliminating most other beneficial soil microorganisms. Pasteurization heats barely moist soil to a temperature sufficient to kill Phytophthora, 140°F (60°C), for 30 minutes.
Heat treatments using steam
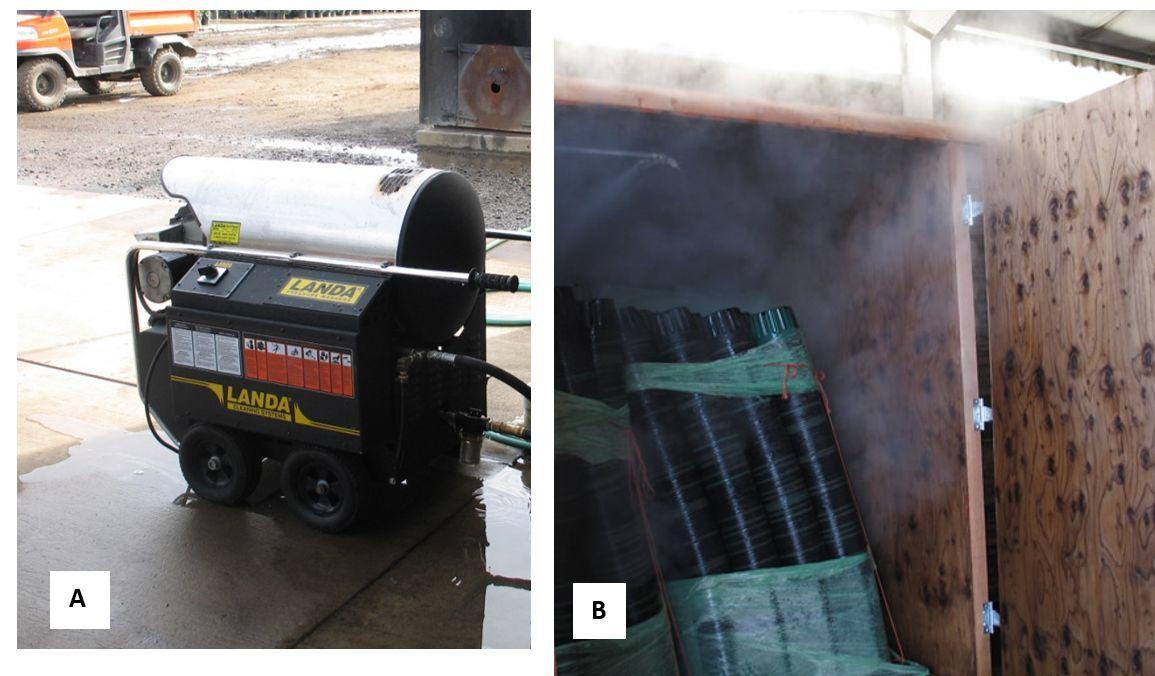
Containers can be heat-treated with steam inside a chamber (a wooden box or a shipping container) or piled under a tarp (Figures 33, 34). Steam can be applied directly from a boiler (live steam) or aerated with a fan (aerated steam). Monitor temperature with a solenoid and temperature sensor until the containers reach the target temperature. It is easier to control temperatures in a steam chamber than in a tarped pile. Live steam is very hot — 212°F (100°C) — and will melt some types of pots (thin-walled plastic containers or styroblocks). Heat one size of container at a time and test a small batch to ensure that steam will not destroy containers. Consider using containers made of heavier materials when heat treated under a tarp. You can steam treat a load of empty containers fairly quickly; filled containers take up to four hours, depending on the size. Steam treating containers of diseased or dead plants is an effective way to destroy Phytophthora before adding diseased material to a cull pile, preventing possible nursery contamination.
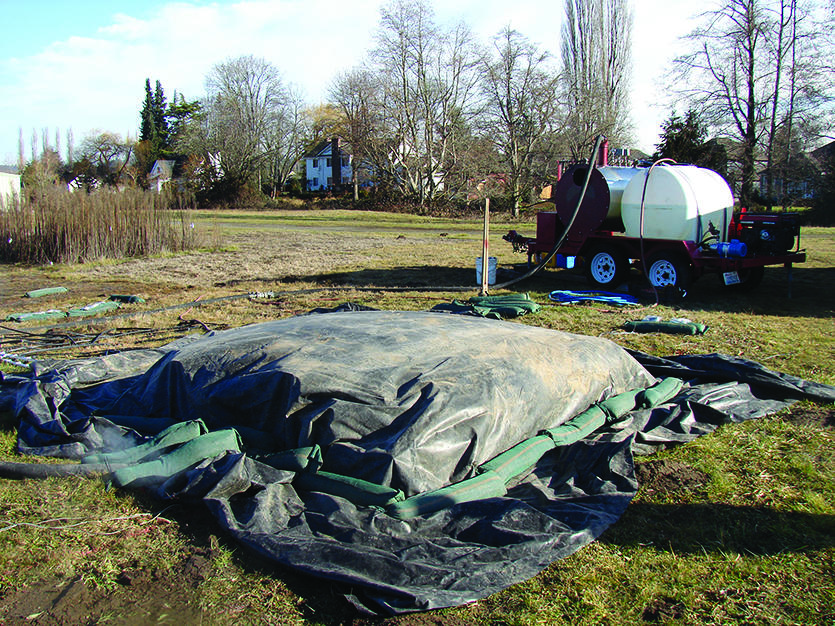
You can also treat contaminated soil or nursery substrates (such as a gravel bed) with steam to kill Phytophthora (Figure 35). This requires more steam than you need to treat used containers, so a larger boiler is usually necessary. The plot size, soil type, moisture content and compaction level will determine the amount of time required to reach the target temperatures. Heat transfer is most effective in moist soil, but steam cannot penetrate soil that is saturated with water. If you plan to steam, turn off irrigation at least 24 hours in advance. (The length of irrigation shutdown will depend on your soil type). The steaming process involves installing temperature sensors in the soil or substrate, laying out a perforated hose to deliver steam, tarping the plot, and sealing the edges of the tarp with weights to keep steam from escaping. Soil plots can take between four and 10 hours to reach the desired temperatures at 6 inches (15 cm) depth. Steam does not penetrate more than 6 inches beyond the edge of the plot due to the insulating properties of soil, so plants growing next to the area being steamed will not be damaged.
Aerated steam is used in agriculture to kill pests, pathogens and weeds in various substrates and requires an aerator fan in addition to the boiler. Using an aerator to create a mixture of steam and air lowers the temperature and is less damaging to beneficial soil microorganisms. You can use aerated steam treatment for containers and also to pasteurize potting media. Aerated steam can also be used to treat soil, gravel beds, or other substrates, but it will take longer to reach target temperatures.
Heat treatments using solarization
Solarization can be an effective way to disinfect soil, gravel beds or containers, provided the correct environmental conditions are present. Solarization uses energy from the sun to heat the soil to temperatures lethal to Phytophthora species and some other plant pathogens and weed seeds.


To solarize soil, lay down clear plastic over the soil or gravel and seal the edges to prevent heat escape. Solarization works best during the warmest and most cloud-free time of the year (late June through August in the Pacific Northwest). Other requirements include full sun exposure, applying plastic close to the soil or gravel bed surface, and treating an area that is at least 8 feet x 8 feet (Figure 36). To solarize containers (Figure 37), lay black plastic on the ground and place containers horizontally on a structure, such as a pallet, to elevate them. This allows hot air to circulate. Tightly secure clear plastic directly over containers, then cover with a second layer of clear plastic supported by hoops. Seal the edges of the plastic to prevent heat escape. Solarization is unlikely to work in coastal areas where fog limits solar radiation. To estimate the amount of time needed to solarize at your location for a specific start date, see the Soil Solarization Online Model. For more information on soil solarization, see Soil Solarization for Gardens & Landscapes in “Resources for disease prevention.”
| Heat sanitation method | Suggested use | Cost | Safety and environmental impact |
|---|---|---|---|
| Solarization | Used containers and potting media. See Soil Solarization for Gardens and Landscapes (“Resources for disease prevention.”) Can be used for in-ground planting areas and nursery substrates. The technique requires long days with no clouds and does not work in shaded areas. See Soil Solarization Online Model (“Resources for disease prevention,” page 35) to determine suitability. | Relatively low. Costs include plastic sheeting, labor. | Safe and low impact. Disposal of used plastic is the main concern; it often can be used again or recycled. |
| Hot water (82-93°C, 180-200°F) | Used containers, floors and wooden benches. | Can be high if you need a large volume of hot water. | Avoid burns from contact with boiling water and steam. |
| Live steam (80-100°C, 176-212°F) | Used containers and potting media if temperature is regulated between 60 and 70°C (140–160°F). Can be used in in-ground planting areas and nursery substrates, depending on boiler capacity. Avoid saturating soil at least 24 hours before treatment. | High initial equipment costs for steam generator and equipment. Operating costs for fuel and labor. | Steam is a relatively safe technique, as there are no toxic chemicals or noxious fumes. Hot surfaces should be avoided. Wait several hours after the steamer is shut off and take care when removing tarps after steaming. Environmental Impact: low. |
| Aerated steam (60-70°C, 140-160°F) | Used containers and potting media. In-ground planting areas and nursery substrates. May be possible for larger plots but will take longer to reach temperatures. Avoid saturating soil at least 24 hours before treatment. | See live steam. | See live steam. |
Recognizing Phytophthora symptoms
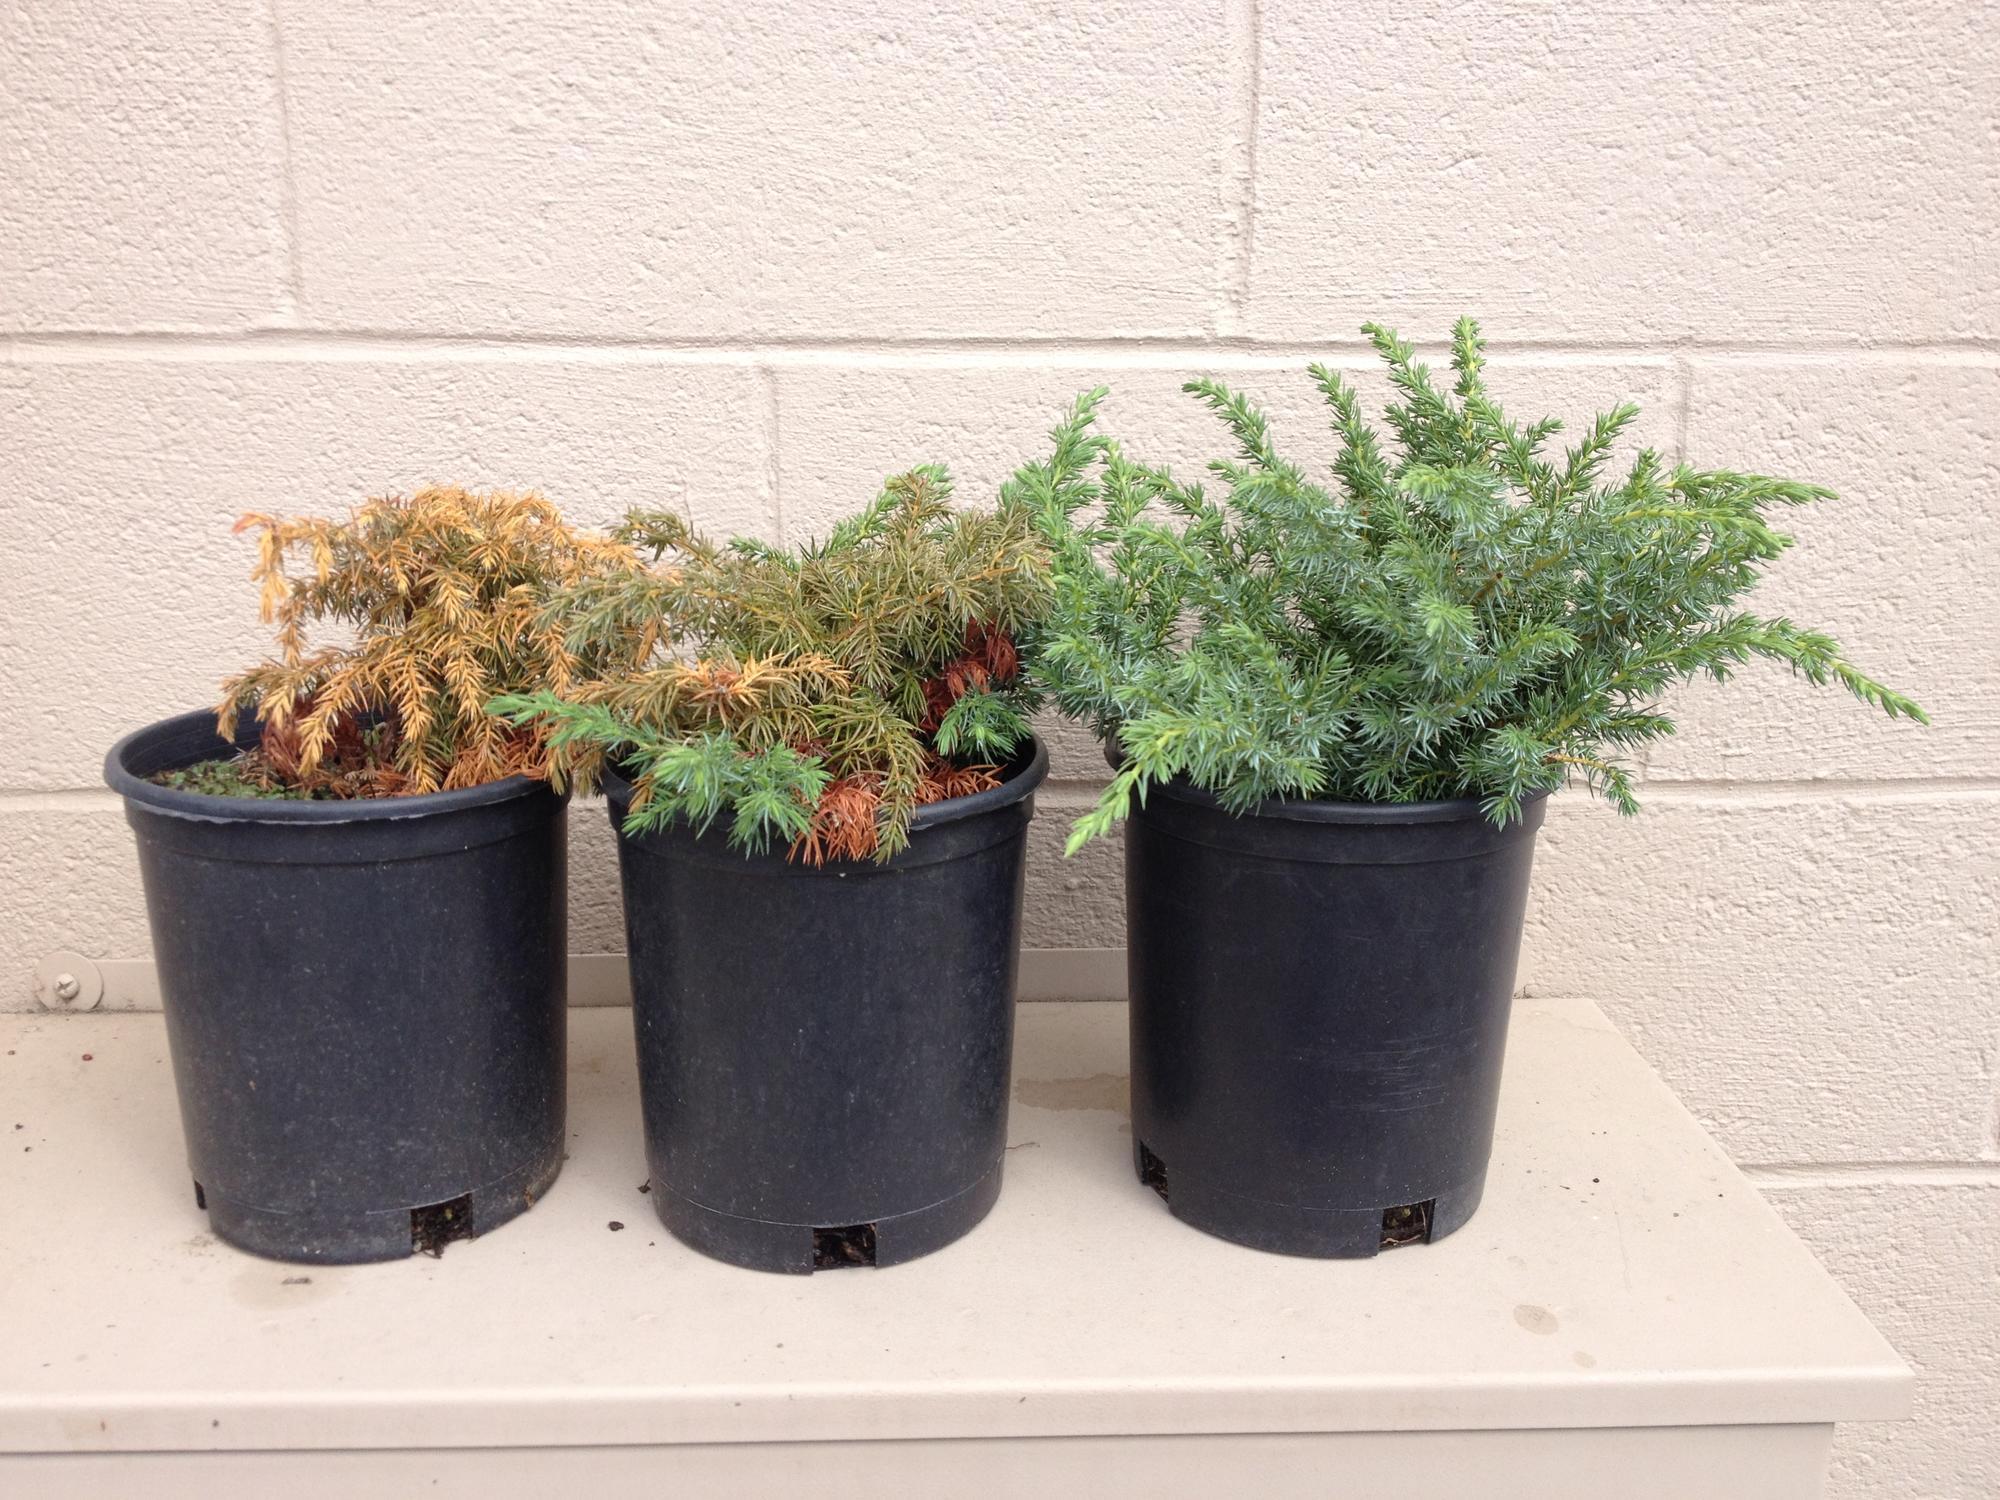
Nursery and restoration practitioners should carefully inspect nursery plants for signs of disease weekly during the growing season and conduct diagnostic testing when needed. Nurseries that have developed a systematic monitoring plan will be in good position to catch plant health issues early. Restoration practitioners need to assess each purchase for signs and symptoms of disease prior to transporting and planting. Start your visual plant assessment by understanding what a healthy plant looks like for each species that you grow or purchase. Figure 38 shows an example of a healthy red huckleberry, compared to a specimen that is in decline. What do you do when you see a plant that might be sick? Inspect the plant further by looking for both above-ground and below-ground symptoms described in Table 5; some Phytophthora species tend to infect the foliage while other species typically infect the roots. Note that unlike many fungal infections, Phytophthora structures are not visible to the naked eye (Figure 39).

Use the Table 5 checklist as part of a systematic monitoring plan or upon observation of a declining plant in the nursery or recent purchase. Note that plants may be asymptomatic and still be infected.
Table 5. Phytophthora symptom checklist for restoration plants
Distribution of plant symptoms in the nursery
Non-uniform distribution of plant damage in the nursery
Might be an indication of disease. Look for symptoms of disease.
Note: Uniform distribution of plant damage is often caused by nutritional problems affecting an entire block of plants, or environmental factors such as temperature, light or water (too much or too little).

Stem, branch and foliar symptoms
Wilting
Wilting of the above-ground parts is often the first visible above-ground symptom of root damage by pathogens. By the time a plant wilts, it is typically heavily infested. It can also indicate insufficient water. Examine the roots to determine the cause. Consider using a bench testing monitoring strategy in addition to physical inspection to help detect infestations early.
Shoot dieback
The tips of shoots and branches are killed.

Stem lesions or cankers
Sometimes the symptoms are hidden beneath the bark. Take a knife and peel back bark at the base of plant near the root crown. Look for discolored plant tissue under the bark.

Foliar blight
This might look like dark areas (lesions) on stems or on the leaf blade, leaf edge, midrib, or petiole.


Root systems
Take the plant out of the pot or bed and inspect the root system. Root inspections can damage newly established seedlings. To prevent damage, consider the bench testing approach described in “Implementing a bench testing monitoring strategy in addition to physical inspection.”
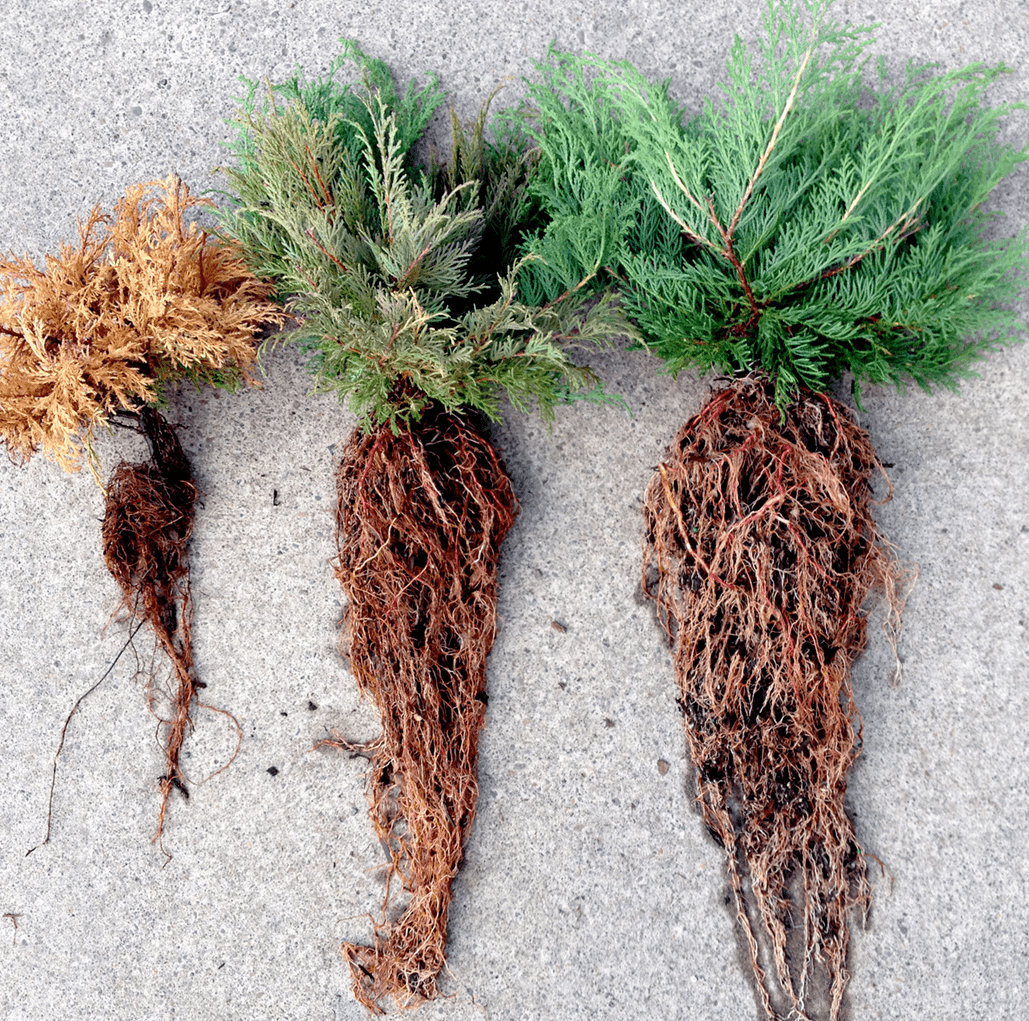
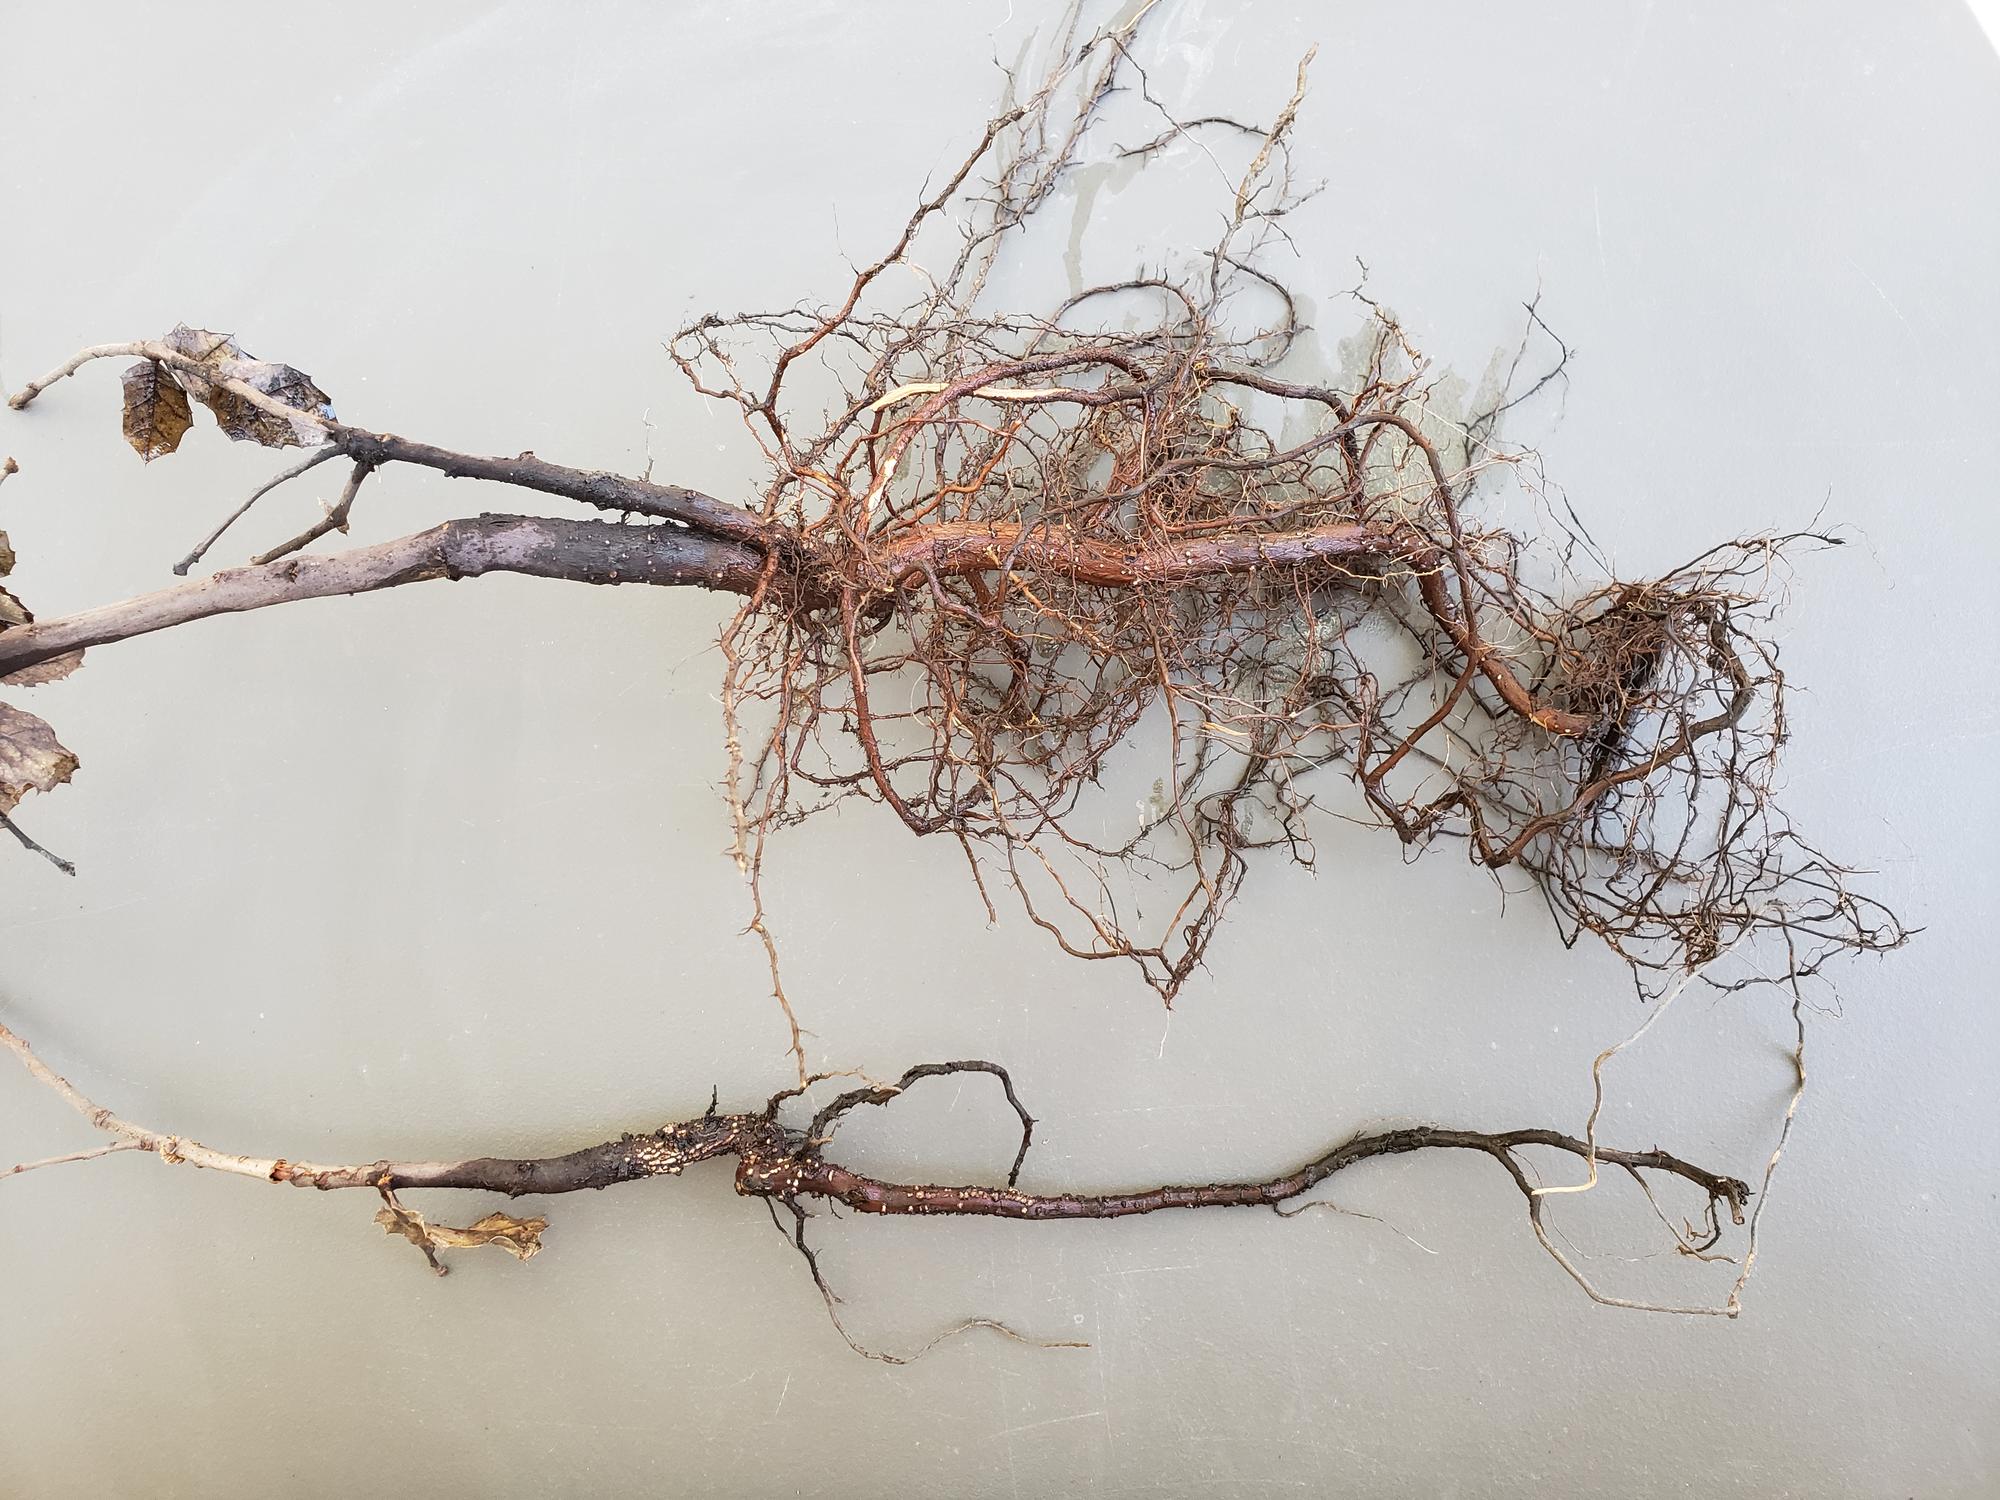
Absence of fine roots
Note the absence of fine roots on the plant on the right, compared to a healthy root system on the plant at left.

Discolored or decayed roots
Blackened root collar
What about bare-root plants?
Not all restoration plants are grown in containers. Some trees and shrubs are grown in the ground, lifted, then carefully stored and transported without soil for immediate planting at the restoration site. Nurseries and buyers should inspect bare-root plants for the same symptoms as described in the Plant Health checklist (Table 3).
What happens when you find plants with potential disease symptoms?
Because the Phytophthora organism is microscopic, symptoms always require testing to confirm infection (Figure 50). Phytophthoras do not have characteristic reproductive structures (fruiting bodies) visible to the eye, like many fungi. If you find any of the foliar, stem or root symptoms listed in Table 5, follow up with diagnostic testing. Early detection and prevention can save additional nursery plants from being infected and prevent pathogens from being inadvertently introduced into the natural ecosystem.
Do-it-yourself diagnostic kits are available to detect the presence of Phytophthora in plant tissue (Figure 51). These tests are rapid and relatively inexpensive (approximately $10 each) and are useful for confirmation of symptoms. However, a negative result does not indicate the absence of Phytophthora. See “Resources for testing and baiting techniques,” for more information on where to purchase rapid test kits and a video tutorial on how to use them.
Alternatively, you may send disease samples to a lab for diagnostic testing. Lab testing is fee-based and may include additional information such as identification of Phytophthora species present. Use Table 6 to find a diagnostic lab near you and to learn how to submit a sample.
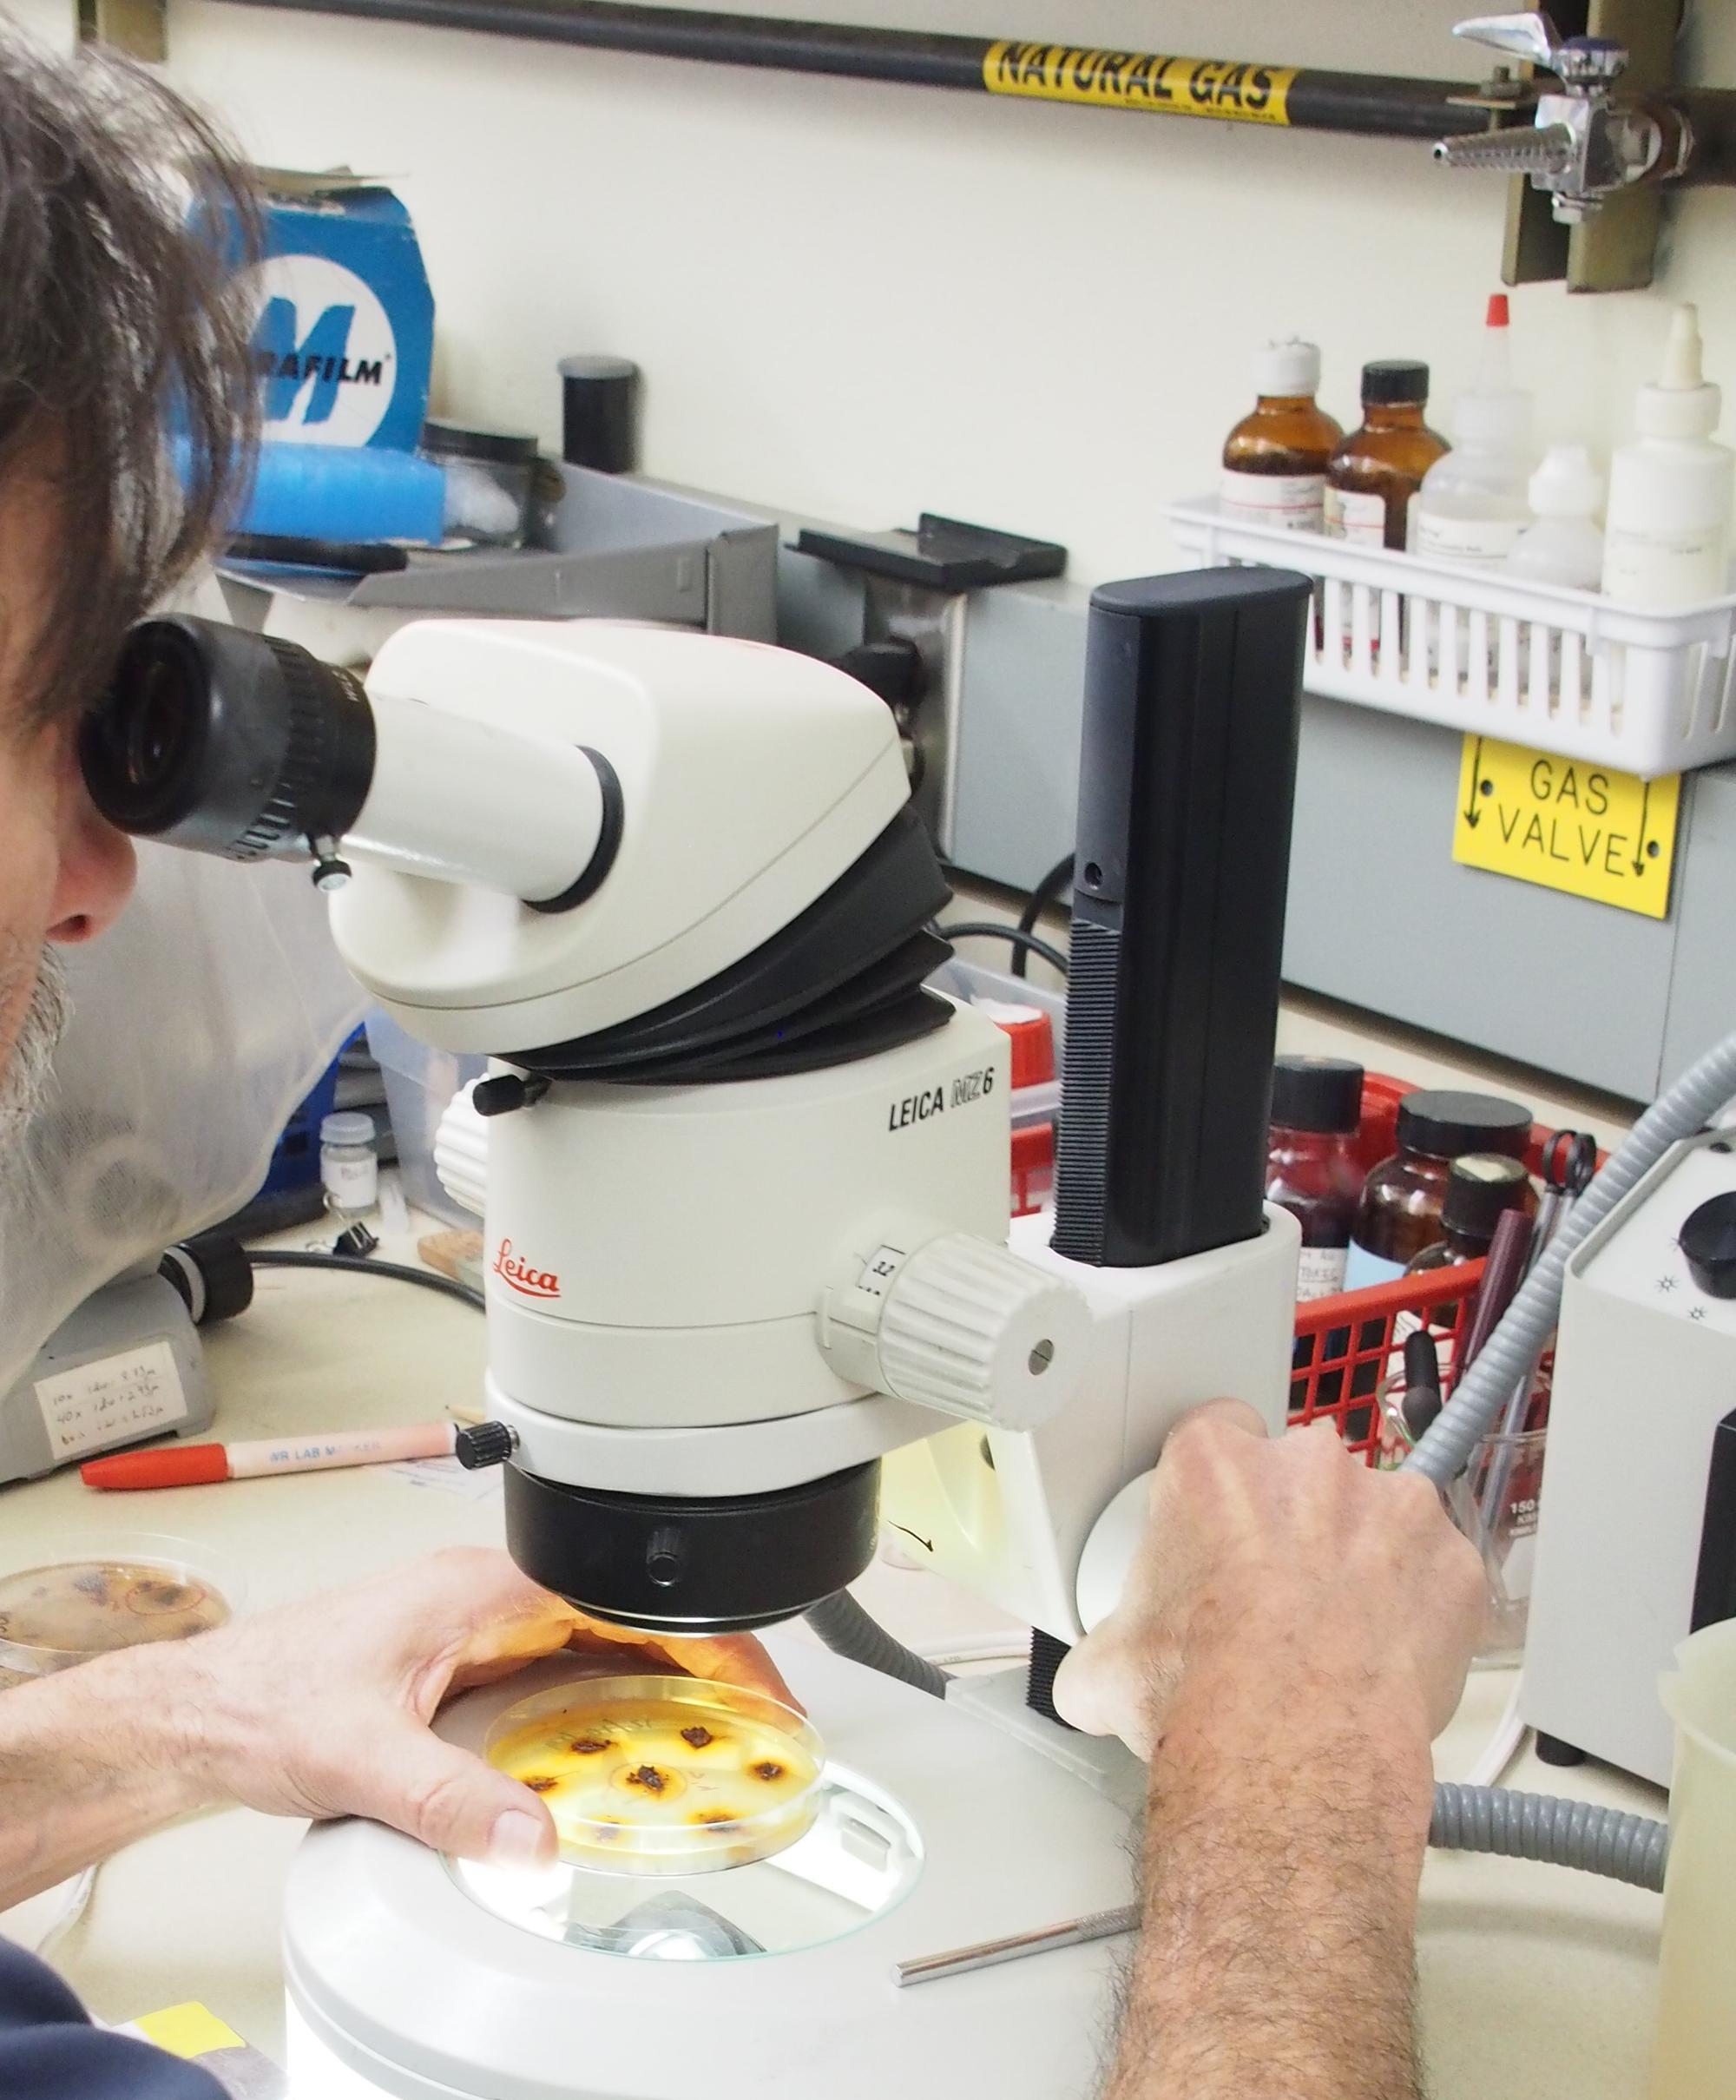
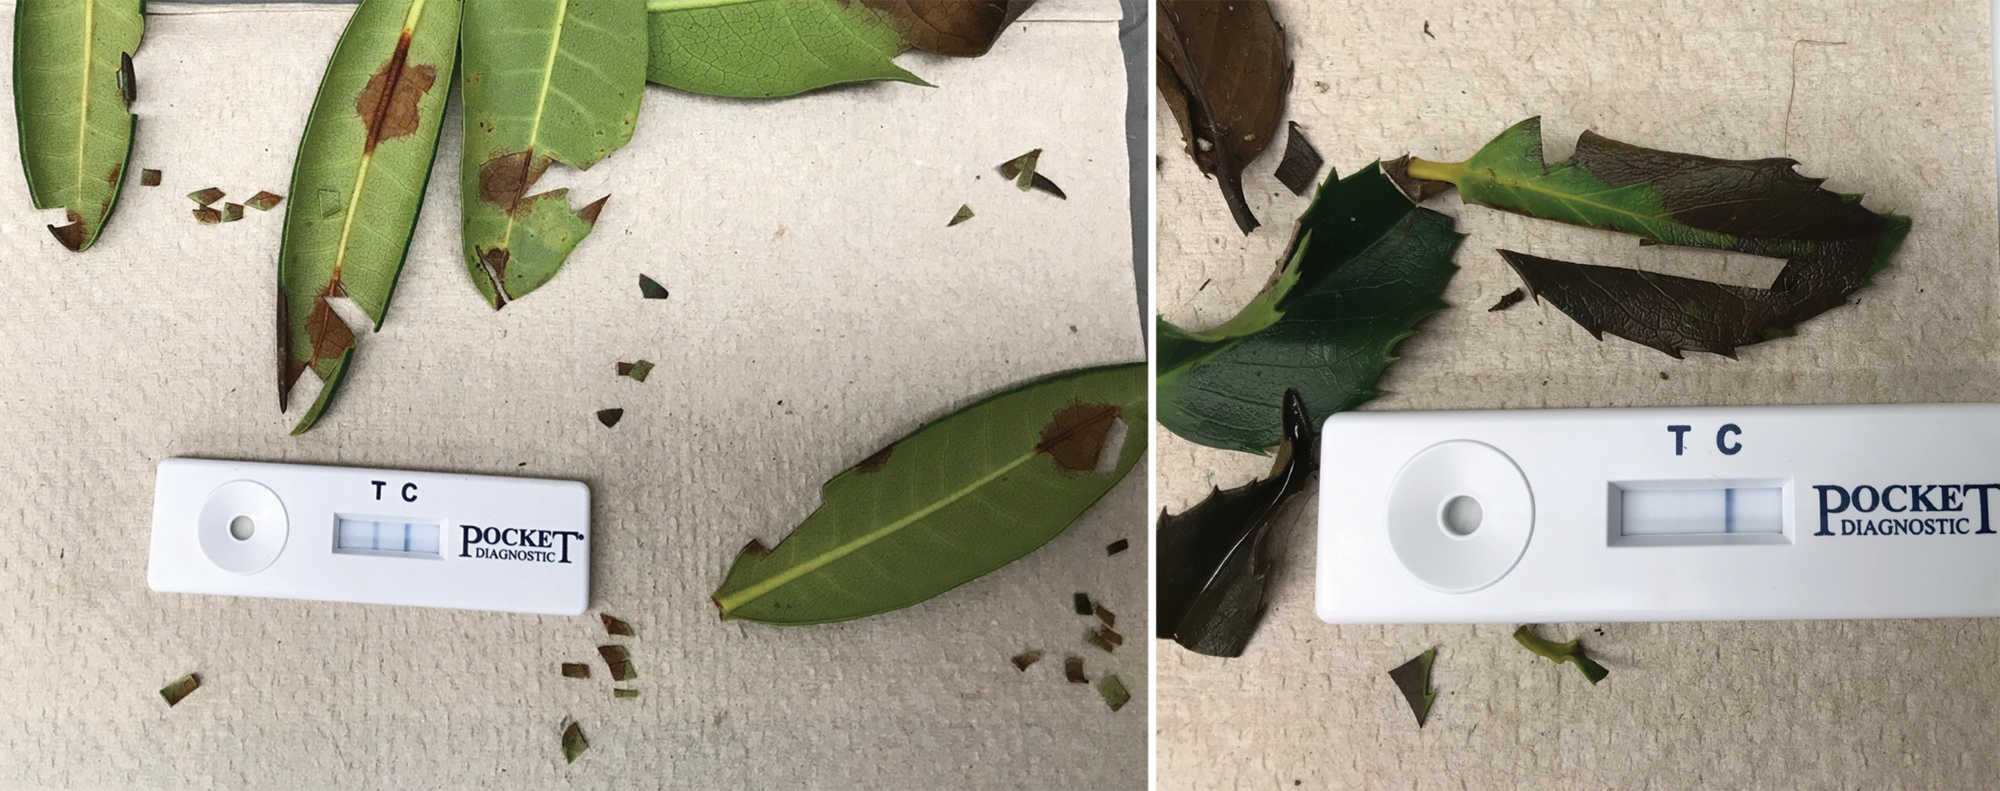
Table 6. Diagnostic testing resources
- Oregon Department of Agriculture
- Plant Health Program: Testing resources for landowners, restoration groups.
- Nursery Program (licensed nurseries)
- Oregon State University Plant Clinic
- Idaho State Department of Agriculture Plant Pathology Lab
- University of Idaho Plant Diagnostic Services
- Washington State University Plant & Insect Diagnostic Laboratory
- National Plant Diagnostic Network - Diagnostic tips and resources, including information on invasive species and a list of laboratory contacts by state.
- Western Plant Diagnostic Network
- Commercial diagnostic labs
Implementing a bench testing monitoring strategy in addition to physical inspection
Bench testing is a nondestructive approach using simple tools and techniques to test for the presence of Phytophthora by “baiting” the organism out of the soil without sacrificing plants. Bench testing, when used in addition to inspection of visible symptoms, can help increase the chance of early detection.
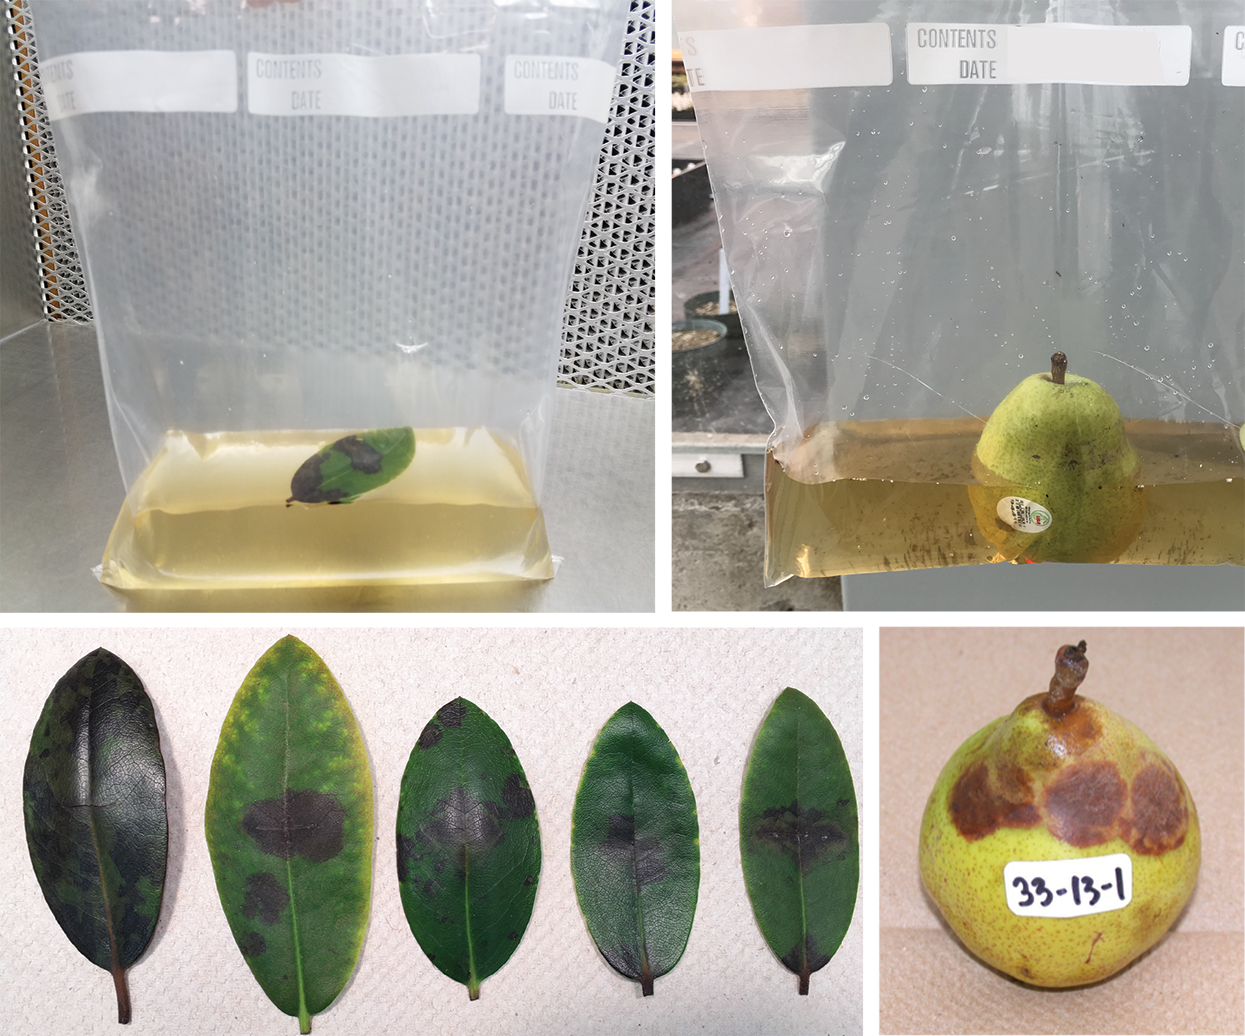
To perform a bench test, select the worst-looking plants within a growing block that show symptoms described in Table 5.
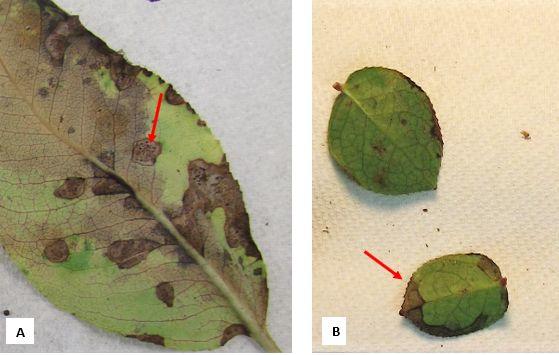
Test these as a group to determine if the pathogen is present in the block. Place the selected plants on a cart or bench and irrigate to produce leachate (water drainage) from the soil. Capture the leachate with a simple collection system beneath the bench. Add a “bait” of unripe pears or rhododendron leaves that have not been recently sprayed with fungicides; the baits should not have spots or lesions. Place the mixture in gallon-sized plastic bags for a specified incubation period. Baits infected with Phytophthora will develop lesions (Figure 52). You can send the baits to a diagnostic lab for testing, or test them with a do-it-yourself rapid diagnostic kit as described above. Diagnostic testing from baits can be more successful than diagnostic tests using symptomatic plant material. If a bait tests positive during bench testing, conduct further testing within the block to determine the source of the infection. For more detail on a bench testing approach, see “Resources for testing and baiting techniques.”
A diagnostic test reveals that a plant is positive for Phytophthora — what next?
A nursery that receives a positive result for a Phytophthora species with a regulated status should contact their state’s department of agriculture program immediately.
- Oregon Department of Agriculture Nursery & Christmas Tree Program
- Idaho State Department of Agriculture Plants & Insects Program
- Washington State Department of Agriculture Plant Services Program
- U.S. Department of Agriculture Animal and Plant Health Inspection Service
- Plant Pests and Diseases Programs
- To view species under federal quarantine for each state, select a state or region in the search function.
Recommendations
A nursery that receives a positive result for a nonregulated Phytophthora species of concern listed in “Phytophthora species of concern” should use the following recommendations to control and monitor the infestation:
- Quarantine or destroy all host plants within 3 feet of infected plants.
- Quarantine adjacent blocks in place and test those plants.
- Test other blocks that have the same plant batch.
A nursery that receives a positive result for a Phytophthora species not listed in “Phytophthora species of concern” should review nursery practices; conditions or practices that favor the establishment of one Phytophthora may be similar to other species. Consult your state’s nursery specialist or plant clinic for recommended actions for species not listed. It is important to plant clean nursery plants in restoration sites.
See “Phytophthora species of particular concern in restoration nurseries” for a list of the most harmful Phytophthora species and their regulatory status as of this publication date. For an updated regulatory status for Phytophthora species, check with your state’s department of agriculture program or the U.S. Department of Agriculture, Animal and Plant Health Inspection Service.
| Species | Plant diseases | Hosts | Notes |
|---|---|---|---|
| Phytophthora species found in U.S. nurseries or wildland communities that are considered high risk for causing disease on Pacific Northwest native plants. Species in bold are federally regulated. | |||
| P. cactorum | Damping off of seedlings, fruit rot, leaf and stem rot, collar and crown rot, stem canker, root rot | At least 154 genera of vascular plants, including trees, shrubs and herbaceous plants | Found in native plant and ornamental nurseries, landscapes, forests, agricultural crops. Cosmopolitan. |
| P. cambivora | Root and crown rot, canker, often in conjunction with other Phytophthora species | 30 genera including Abies, Acer, Alnus, Arctostaphylos, Castanea, Chrysolepis, Fagus, Juglans , Lupinus, Notholithocarpus, Platanus, Prunus and Quercus | Present in forests, Christmas tree farms. Causes disease of chinquapin in the Pacific Northwest. In Europe, causes ink disease of chestnut and mortality on European beech. Also a pathogen of fruit trees. Cosmopolitan. |
| P. cinnamomi | Root rot, wilt | 266 genera, commonly hardwood trees. Includes Abies, Arbutus, Arctostaphylos, Castanea, Pinus, Quercus. | Aggressive species favored by warm soil conditions as in greenhouses. Causes mortality of native manzanitas in California. Predicted to cause increased damage in the Pacific Northwest as a result of climate change. Responsible for jarrah dieback in Australia, ink disease in Europe. |
| P. citricola complex (P. multivora, P. pini, plurivora). Note: P. citricola is federally regulated. | Crown rot, blight, canker, root rot, wilt, shoot blight, leaf blight, decline, collar rot | 75 plant genera including many trees, shrubs and herbaceous plants | Found in ornamental nurseries, landscapes, agricultural crops. The complex is associated with declining woody hosts in Australia, North America and Europe. |
| P. cryptogea complex (P. cryptogea, P. drechsleri, P. pseudocryptogea) | Damping-off, foot rot, stem rot, leaf blight, wilt | 141 genera including many trees, shrubs and herbaceous plants | Found in ornamental nurseries, landscapes, agricultural crops. Cosmopolitan. |
| P. lateralis | Root and crown rot, girdling, death. On Chamaecyparis, foliar infections have also been reported rarely. | Limited to a few genera: Chamaecyparis, Juniperus, Microbiota, Taxus, Thuja | Causes root rot of Port-Orford cedar in its native range in northern California and southern Oregon forests. Present in ornamental nurseries and ornamental plantings. Also found in France and the United Kingdom. Widespread. |
| P. nicotianae | Damping-off, crown rot, leaf blight, fruit rot | 255 genera including many trees, shrubs and herbaceous plants | Found in ornamental nurseries in the Pacific Northwest. Aggressive in warm soil conditions such as greenhouses. Cosmopolitan. |
| P. occultans | Wilting, stem lesions, root rot | Arctostaphylos, Ceanothus, Gaultheria, Mahonia, Rhododendron | A recently described species found in Oregon native plant and ornamental nurseries. Also found in Europe. |
| P. quercina | Decline | Quercus | Implicated in oak decline in Europe, Turkey. Recently reported from soil under declining oak in Missouri. |
| P. ramorum | Sudden oak death (stem canker, crown death) and ramorum leaf blight (foliar blight, dieback, leaf necrosis) | At least 26 genera. Stem canker hosts include Fagus, some Quercus; foliar and shoot blight hosts include Rhododendron, Gaultheria, Mahonia, Umbellularia, many others. Some species show both foliar symptoms and stem cankers including Notholithocarpus and in Europe, Larix. | Regulated status. See department of agriculture websites for Oregon, Washington, Idaho for information and contacts, Table 5. The pathogen has killed over 50 million trees in 16 California coastal counties and in part of Curry County, Oregon. Nursery stock with well over 100 plant species is regulated. See www.suddenoakdeath.org for more information. |
| P. siskiyouensis | Root disease, canker | Alnus, Notholithocarpus, Umbellularia | Found on riparian alder in Oregon forests and likely on alder nursery stock. In California, found on ornamental plantings. Also found in Australia and England. |
| P. syringae | Twig blight, fruit rot, root rot, leaf blight, shoot blight and stem cankers | 29 genera including Fraxinus, Kalmia, Malus, Pyrus, Rhododendron | Cool season Phytophthora species common on woody hosts in nurseries. Widely distributed around the world. |
| P. tentaculata | Root rot, stem rot | Several herbaceous and shrub species including Diplacus. | Found in native plant nursery trade and restoration sites in California. Also found in China and Europe. |
| P. uniformis | Root and collar rot | Alnus | Riparian alders, nursery stock. Found in Europe, Alaska, and Oregon. |
| Phytophthora species not currently found in the U.S. as of 2021 (Range of hosts indicates potential risk to Pacific Northwest native species.) | |||
| P. x alni3 | Root and collar rot | Alnus | A hybrid of P. uniformis and P. multiformis. In Europe, causes extensive dieback in riparian alders and is present in forest nurseries. |
| P. austrocedri3 | Necrotic lesions on roots extending to stems; dieback, mortality | Austrocedrus, Chamaecyparis, Juniperus | Causes “mal del cipres” disease in South American Austrocedrus chilensis forests. Additional hosts confirmed in the UK in 2011. |
| P. kernoviae3 | Bark necrosis and stem canker, foliar blight, shoot dieback, foliar necrosis, wilting | Fagus, Liriodendron, Pinus, Quercus Rhododendron, Vaccinium, others | Present in UK, New Zealand and Chile. |
-
Additional Phytophthora species may be found to cause plant disease.
-
Listed on the U.S. Regulated Plant Pest Table (modified June 2, 2020), [Accessed May 14, 2021]
-
Listed as an “Additional Pest of Concern” by the National Cooperative Agricultural Pest Survey (CAPS) FY2020 Priority Pest List [Accessed May 14, 2021]
-
Disease and host information from the U.S. National Fungus Collections Nomenclature Database, and IDphy:Molecular and morphological identification of Phytophthora based on the types, [Accessed May 3, 2021]
Use of chemicals and biocontrol
We recommend that restoration nurseries use cultural controls as an effective disease management program. In certain situations, (for example, to protect rare endangered plants), fungicides might be an option of last resort. But there is the danger of developing resistance to certain fungicides.
Most chemical fungicides will not cure Phytophthora infestations and may mask symptoms. Buyers of nursery plants need to be aware of the potential suppression or masking of Phytophthora symptoms by some chemical control agents; ask the nursery for the treatment history.
Investigation into approaches using surfactants and film-forming polymers (anti-transpirants) show promise to help prevent foliar infection without masking symptom expression. Some biocontrol products containing the fungus Trichoderma can be used as a seed treatment or soil drench to protect seedlings in a nursery (Figure 53). Trichodermas are naturally found in acidic substrates like bark mulch and compost. Effective biocontrol species or strains generally proliferate in the root zone. Trials using the fungus Trichoderma indicate that it is most effective at low pathogen inoculum levels. Similar to chemical fungicides, it will not cure an advanced infection.
If chemical fungicides are being used to control Phytophthora, check for compatibility with biocontrol fungi. Broad-spectrum fungicides will kill both pathogens and beneficial fungi. For more information on biocontrol see Rhododendron-Phytophthora Root Rot, in the Pacific Northwest Pest Management Handbook, in “Resources for additional technical information.”

Solutions for nurseries
Restoration nurseries often work on a shoestring budget with a dedicated but small staff, making it difficult to adopt intensive monitoring programs. Utilizing volunteers to conduct monitoring as part of a citizen science project may be a feasible way to establish a monitoring program while providing community outreach and involvement.
Restoration nurseries could benefit from contracting for monitoring and diagnostic services either individually or as part of a group of nurseries. As restoration practitioners become more aware of the damaging consequences of Phytophthora introductions, phytosanitary nursery practices and monitoring programs will become more widely adopted and higher associated costs accepted.
Nursery organization and recordkeeping
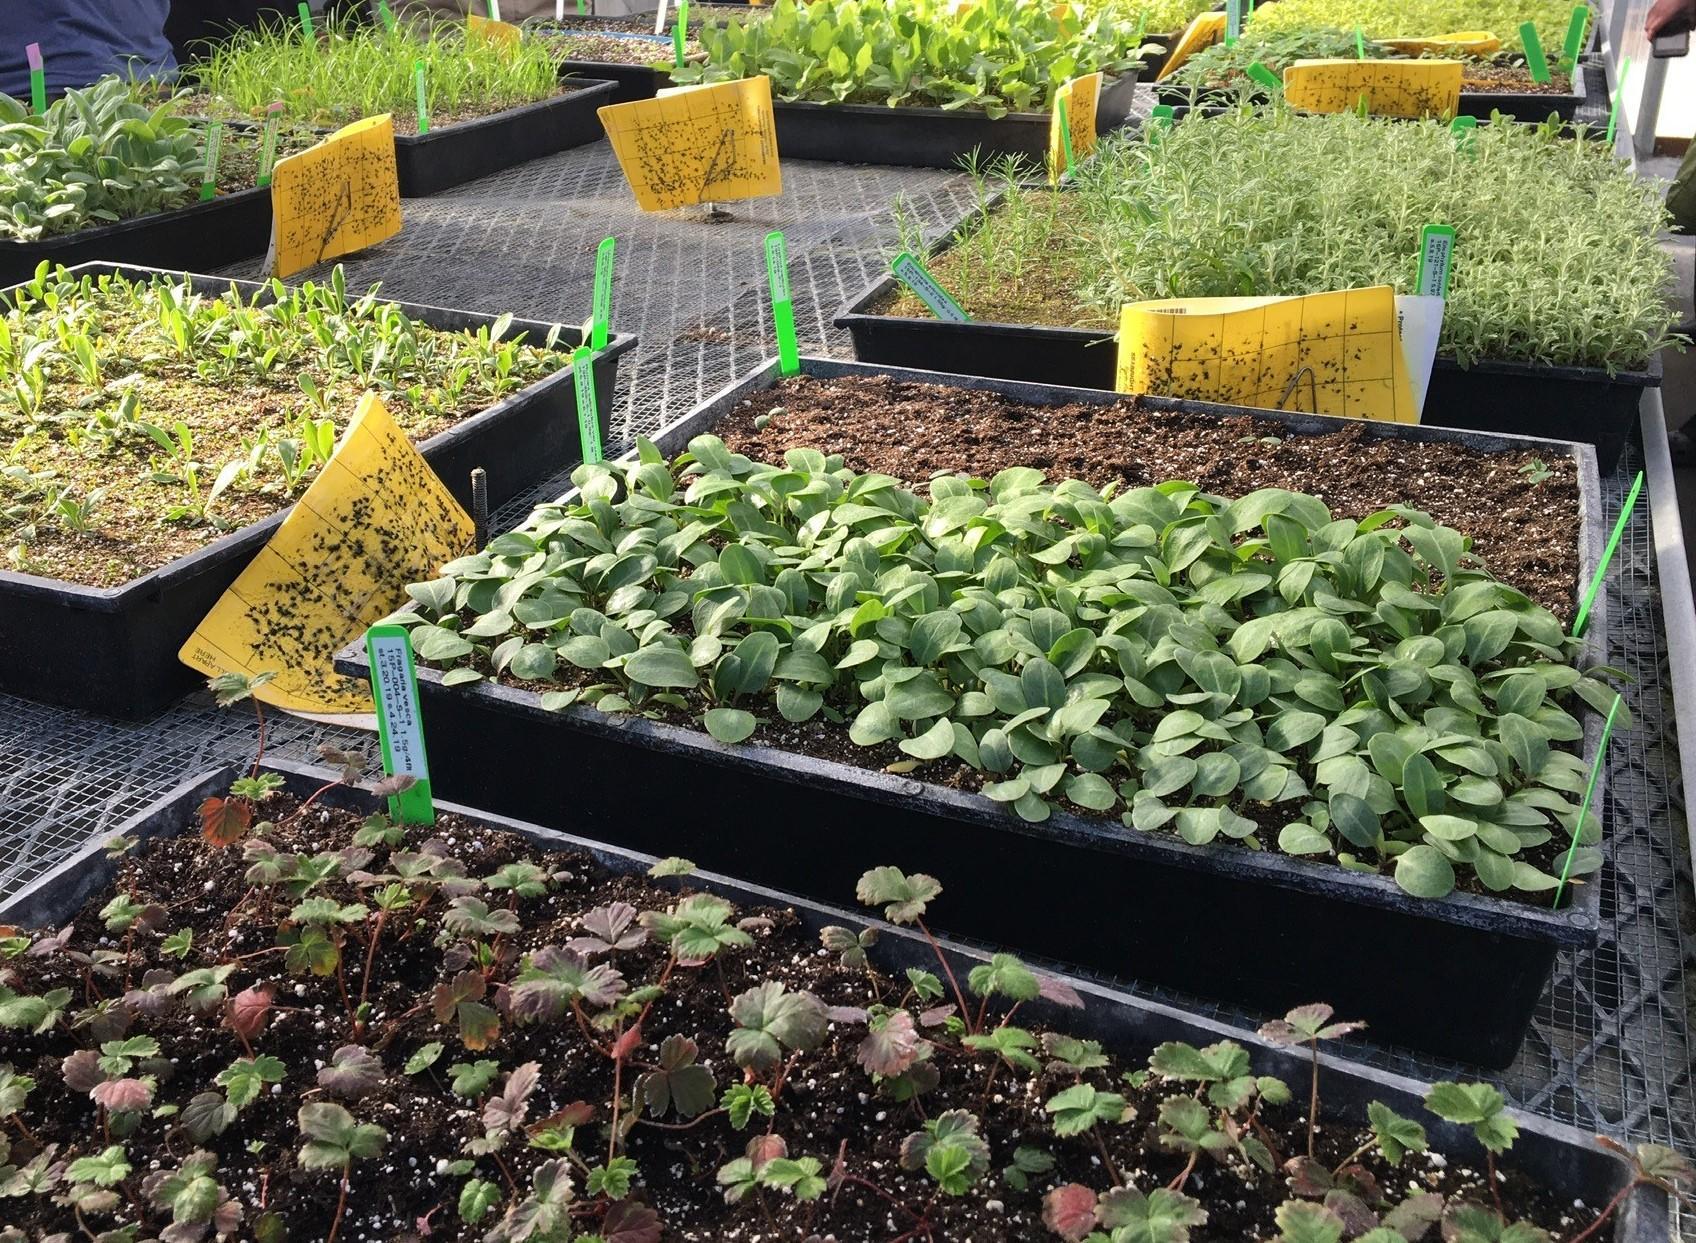
Organize nursery plants in blocks with a systematic plant labeling and recordkeeping system to improve monitoring and disease eradication efforts. Many nurseries grow individual species or cultivars in blocks as a practical way to provide appropriate growing conditions for a given species. This block organization also makes it easier to monitor, sample and focus infestation control measures to specific areas of concern and prevents unnecessary plant destruction. Use a systematic plant labeling and record keeping system to document plant origin, movement within the nursery, monitoring information and sale information (Figure 54). More information regarding recordkeeping can be found in the Safe Procurement and Production Manual: A systems approach for the production of healthy nursery stock and Nursery Industry Best Management Practices for Phytophthora ramorum — to prevent the introduction or establishment in California nursery operations. see “Resources for disease prevention.”
Nursery licensing and inspection programs
Oregon, Washington and Idaho have nursery licensing programs administered through each state’s department of agriculture. Nurseries that ship plants out of state must comply with regulatory and certification requirements of their destination state or country. Check your state’s licensing and shipping requirements and consult with your department of agriculture to ensure compliance. Nursery inspection programs are often focused on certain regulated pathogens and on shipments coming in and out of the state. State inspection programs aim to inspect all nurseries annually. Nurseries that are frequent shippers are inspected more frequently as the import of nursery stock from out of state or offshore locations is considered to be a high risk pathway for the introduction of unwanted pests.
Purchasing native plants
Restoration practitioners purchasing plants of any stock type (container or bare root) for restoration projects will want to procure plants from nurseries that follow the nursery best management practices described in Table 1. Prior to purchasing plants, ask for a nursery tour during the growing season to assess their practices and plant health. Make sure your shoes have been disinfected before visiting a nursery.
Phytophthora prevention at restoration sites
Careful sanitation measures do not stop after restoration plants have been purchased; there is still the risk that plants can be infested in intermediate holding sites or that pathogens are carried into the restoration site on dirty vehicles or equipment. Follow these guidelines during initial restoration work and conduct follow-up monitoring to help reduce those risks in restoration plantings:
- Ensure that intermediate holding areas are clean and dry, and that plants are not placed directly on the soil.
- Provide clean transport that is clear of plant debris and sanitized before loading.
- Use clean tools for restoration work. Do not lend or share tools.
- Clean tires and the underside of vehicles prior to accessing restoration sites.
- Ensure that field staff sanitize boots prior to entering restoration sites (Figure 55).
- Provide boot and tool sanitization supplies and clear procedures for using them.
Adding western redcedar chips to well-used trails may help prevent pathogen spread. Wood chips provide a barrier between soil and foot travel. Western redcedar chips have been shown to be toxic to Phytophthora ramorum in trials (Figure 56).
Do you see evidence of dying or unhealthy plants in sites planned for restoration? Some restoration sites may already be infested with Phytophthora species. Consider testing symptomatic plants for Phytophthora species; if positive, select resistant or low-risk host species to prevent new plantings from succumbing to disease already at the restoration site. High-risk host species include plants in the genera Alnus and Lupinus and plants in the families Rosaceae and Ericaceae. Low-risk species include grasses. Direct seeding in sensitive restoration sites is an option to help prevent the introduction of pathogens (Figure 57). For more information see Guidelines to Minimize Phytophthora Contamination in Restoration Projects, “Resources for Disease Prevention.”


What does the future hold?
For the Pacific Northwest, climate models indicate warmer temperatures and a variable precipitation trend. A warming trend associated with increased precipitation would create favorable conditions for Phytophthora infestation in areas currently considered to be at low risk of infestation. Land managers and restoration practitioners east of the Cascades (the “dry side”) will be well served to maintain vigilance about nursery practices along with their counterparts on the wetter “west side.” All nurseries, no matter where they are located, may harbor Phytophthora pathogens. Following the best management practices listed here and in the Resources section below will improve plant health and help prevent Phytophthora introductions into wildland plant communities.
Resources
Disease prevention
- Buying healthy plants: What to look for at a nursery. 2017. California Native Plant Society Ad Hoc Committee on Phytophthoras and the Phytophthoras in Native Habitats Work Group.
- Disease Risk Model. 2019. J. Majsztrik, J. L. Parke, C. Swett, B. Pitton, S. Kumar.
- Forest Phytophthoras of the World.
- Guidelines to Minimize Phytophthora Pathogens in Restoration Nurseries. 2020. Working Group for Phytophthoras in Native Habitats.
- Guidelines to Minimize Phytophthora Contamination in Restoration Projects, Working Group for Phytophthoras in Native Habitats.
- Nursery Industry Best Management Practices for Phytophthora ramorum — to prevent the introduction or establishment in California nursery operations, California Association of Nurseries and Garden Centers.
- Phytophthora Online Course: Training for Nursery Growers, Oregon State University.
- Plant Health and Disease Diagnosis for Nursery Crops. Oregon State University website.
- Safe Procurement and Production Manual: A systems approach for the production of healthy nursery stock. 2011. J. A. Griesbach, J. L. Parke, J. L., G. A. Chastagner, N. J. Grunwald, J. Aguirre. Oregon Association of Nurseries.
- Soil Solarization for Gardens & Landscapes. University of California Statewide Integrated Pest Management Program
- Soil Solarization Online Model. Oregon State University
Testing and baiting techniques (including video tutorials)
- Baiting: a method for early detection of Phytophthora from water or soil. Video tutorial. Oregon State University.
- Bench testing leachate from batches of container nursery plants. 2019. T. Swiecki, E. Bernhardt, Phytosphere Research.
- Do-it-yourself diagnostic kits for purchase (at the time of this publication there are limited vendors in the United States).
- How to use rapid test kits to detect Phytophthora in plant samples. Video tutorial. Oregon State University.
- Leachate Baiting Technique for Phytophthora Screening. Video tutorial. 2019. Phytosphere Research and COMTF.
- Systems Approach to Nursery Certification.
- Testing Procedures for BMPs for Producing Clean Nursery Stock. 2019. Phytosphere Research.
- Testing the Waters — how to test your irrigation system for the presence of Phytophthora. 2019. N. R. Redekar, J. L. Parke. Digger Magazine.
- Three new Phytophthora detection methods, including training dogs to sniff out the pathogen, prove reliable. 2018. T. Swiecki, M. Quinn, L. Sims, E. Bernhardt, L. Oliver, T. Popenuck, M. Garbelotto. California Agriculture 72(4):217–225.
Additional technical information
- Antimicrobial activity of extracts and select compounds in the heartwood of seven western conifers toward Phytophthora ramorum. 2008. D .K. Manter, R. G. Kelsey, J. J. Karchesy. In: S. J. Frankel, J. T. Kliejunas, K. M. Palmieri, technical coordinators, Proceedings of the sudden oak death third science symposium. General Technical Report PSW-GTR-214. Albany, CA: U.S. Department of Agriculture, Forest Service, Pacific Southwest Research Station. pp. 375–378.
- Control of Phytophthora species in plant stock for habitat restoration through best management practices. 2019. L. Sims, S. Tjosvold, D. Chambers and M. Garbelotto. 2019. Plant Pathology 68: 196–204. https://doi.org/10.1111/ppa.12933.
- Film-forming polymers and surfactants reduce infection and sporulation of Phytophthora ramorum on rhododendron. 2019. E. K. Peterson, E. R. Larson and J. L. Parke. Plant Disease 103: 1148–55.
- Phytophthora introductions in restoration areas: responding to protect California native flora from human-assisted pathogen spread. 2020. S. J. Frankel, C. Conforti, J. Hillman, M. Ingolia,, A. Shor, D. Benner, J. M. Alexander, E. Bernhardt and T. J. Swiecki. Forests 11: 1291.
- Phytophthora species repeatedly introduced in Northern California through restoration projects can spread into adjacent sites. 2021. L. L. Sims, M. Garbelotto. Biological Invasions 1–18.
- Phytophthora spp. associated with nursery-grown native plants in the Pacific Northwest. 2017. J. L. Parke, M. Elliott, J. Eberhart and G. Chastagner. Eighth meeting of the IUFRO Working Party 7.02.09, Sapa, Vietnam. March 19–25, 2017. Poster presentation. Page 78.
- Rhododendron-Phytophthora Root Rot. Pacific Northwest Pest Management Handbooks.
¡Use los pesticidas con seguridad!
- Póngase ropa de protección y equipo de seguridad según las recomendaciones de la etiqueta. Báñese después de cada uso.
- Lea la etiqueta del pesticida—aunque lo haya usado antes. Siga al pie de la letra las indicaciones de la etiqueta (y cualquiera otra indicación que Ud. tenga).
- Tenga precaución al aplicar los pesticidas. Conozca su responsabilidad legal como aplicador de pesticidas. Usted puede ser responsable de heridas o daños resultantes del uso de un pesticida.
Trade-name products and services are mentioned as illustrations only. This does not mean that the Oregon State University Extension Service either endorses these products and services or intends to discriminate against products and services not mentioned.