Recycling organic debris for composting and improving soil doesn’t have to be a chore! If hot composting is not for you, try one of these easy cold composting methods. They are considered “cold” because little or no heat reaction occurs as the material decomposes.
Each has advantages and disadvantages but the end result is the same: improved garden soil and less organic waste in landfills.
Sheet mulch composting
Sometimes called “lasagna gardening,” sheet mulch composting involves making alternate layers of green (nitrogen) material and brown (carbon) material.
You can use this method to easily create a new planting bed or to prepare an existing garden bed for planting. When established over existing lawns, dig the sod and turn it upside down before piling organic waste. Using this approach, the new planting bed receives valuable nitrogen and organic matter from the sod, which helps improve soil fertility as it decomposes.
How to prepare a sheet mulched bed
Layer 3 to 4 sheets of black-and-white newspaper over the area to be mulched.
- Be sure to overlap the edges of the paper 3–4 inches so no light reaches below the paper.
- Sheets of cardboard may be used as well. If a soil test shows high levels of boron, or if the site has horsetail (equisetum) weeds, corrugated cardboard is not recommended. The horsetail flourishes in the corrugations, and spreads actively. The paper or cardboard must be soaked in water.
Consider what types of organic waste you have on hand — lasagna beds can be a great way to dispose of woody materials or rotting firewood.
Build the first layer of any woody materials you may have. If you don't have such materials, proceed to the next step.
Layer nitrogen rich "green" materials, such as manure, coffee grounds, vegetable food scraps or fresh grass clippings, or a combination of two or more green materials.
- Do not use dog, cat or human feces in the garden bed.
- Be aware that some nitrogen rich materials may not be green.
Add a layer of brown material such as leaves, straw, shredded paper, dryer lint, etc. on top of the green with about the same thickness.
- Sawdust may be used but has a much higher percentage of carbon, so use thinner layers.
- If using sawdust, apply plenty of water to this layer, as sawdust can repel the moisture necessary for organic matter breakdown.
Continue alternating green and brown layers. Depending on the quantity of materials you have, these may be 3" deep or less. Take care to cover the green layers thoroughly to the edge with brown material.
- The brown layer discourages egg-laying insects.
- The brown layer will reduce the odor of decomposition and help the bed retain moisture.
Continue building the bed to the desired depth. You may build it all at once or over time as materials are available.
- Always end with a brown layer.
- One final option is to cover the finished pile with moistened burlap bags. This retains moisture that supports microbial activity.
Expect the new bed to settle and decompose — likely it will reduce in height by half over the course of the first year. If you finish your sheet mulch in the fall, the new garden bed will be ready for spring planting.
To plant young seedlings in a freshly created bed, make a hole twice the size of the root mass of your plant start, fill the hole with compost and set in your seedling. Young plant roots can be damaged by the organic acids released by fresh, decaying organic material.
To plant seeds in a freshly created sheet mulch bed, plant your seeds in a 1- to 2-inch layer of screened compost. Water normally. You may continue to add material to a sheet mulched bed that has been planted, always leaving 2 to 3 inches of space around the stems of existing plants.
Sheet mulch composting is a great way to easily make new garden beds, create borders or add to existing borders. Including kitchen waste as part of the green materials is not recommended for households with dogs, or areas where opossums, raccoons or other omnivore wildlife are present.
In-situ (in-place) composting
In-situ composting simply involves burying organic material directly into garden soil.
Bury the material at least 12 inches deep to discourage dogs, cats or other small animals from digging it up. Rotate the composting site to avoid over-concentration of material in one spot.
One option is to cover the site with black plastic as the material decays. Slugs and snails will be attracted to the decaying material and will cling to the underside of the plastic. Lift the plastic and destroy or remove them. This is an effective method for reducing slug and snail populations prior to planting.
If uncooked kitchen waste is buried, expect volunteer potatoes, carrots and other vegetable volunteers.
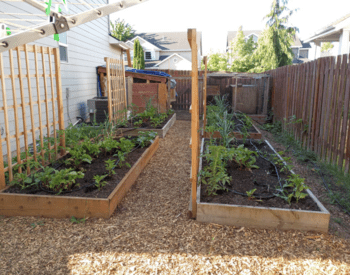
Trench composting
Trench composting makes use of the walk space in between garden beds.
How to prepare a compost trench
- Dig a trench 12 to 18 inches deep by 12 to 18 inches wide (or your path width) and pile the soil on top of a garden bed next to the trench.
- In the fall, pack the trench solidly with leaves, straw or chopped garden debris up to the surface level of the garden bed.
- In the spring, turn the decomposed material in the trench onto the top of the garden beds and use the trench as a pathway during the growing season.
- Repeat the process each year.
You may plant directly into the composted material.
To ensure better footing in the spring, spread more straw or a layer of bark mulch in the trench which has been re-filled with the original soil.