Composting is the art and science of mixing organic materials in a pile and making sure the pile has the right amount of what it needs to do its thing: air, water, nitrogen and carbon. With time, the original materials transform into stable humus.
The composting method you choose depends on:
- Where you live.
- How much material you have to compost.
- What materials you want to compost.
- How much time and energy you have.
- What you plan to do with the product.
Ingredients (plus air and water) for any type of composting can include:
- Low nitrogen "browns" such as:
- Autumn leaves.
- Straw.
- Shredded paper.
- Sawdust.
- Wood chips.
- High nitrogen "greens" such as:
- Kitchen scraps.
- Coffee grounds.
- Grass clippings.
- Aged manure.
- Plant trimmings.
Do not compost:
- Pet or human waste.
- Meat, dairy or oil.
- Diseased plants.
- Pernicious weeds.
- Wood ash.
In-place composting
In-place composting simply involves burying organic material directly into garden soil. Bury the material at least 12 inches deep and then cover it with at least 8 inches of soil to discourage dogs, cats or other animals from digging it up. Rotate the site of composting to avoid overconcentration of material in one spot.
Optionally, cover the site with black plastic while the material decays. Slugs and snails will be attracted to the decaying material and will cling to the underside of the plastic. Lift the plastic and destroy or remove them. This very effectively reduces the population prior to planting in the soil.
Trench composting
Trench composting makes use of the paths between garden beds. Dig a trench 12- to 18-inches deep by 12- to 18-inches wide (or your path width) and pile the soil on top of a garden bed next to the trench. In the fall, pack the trench solidly with leaves, straw or chopped garden debris up to the surface level of the garden bed. In the spring, turn the decomposed trench material onto the top of the garden beds and use the trench as a pathway during the growing season. Repeat the process each year.
You may plant directly into the composted material after turning it onto the bed. To avoid walking in mud in the spring, a layer of bark mulch or more straw may be laid in the trench.
Sheet mulch composting
Sheet mulch composting, sometimes known as lasagna composting, is an excellent way to convert lawns to vegetable beds, create new or enlarge perennial borders, improve soil texture and structure, and recycle organic material at home.
Sheet composting is best started several months before you want to use the planting area. Fall is an excellent time to sheet compost, as the material breaks down slowly over the winter and the area is ready for planting in the spring. However, a bed may be started any time materials are available. The basic technique involves placing alternate layers of low-nitrogen materials (browns) and higher-nitrogen materials (greens) directly on the soil. (Note: Layers should be fairly equal to allow for even decomposition. One inch is recommended although deeper layers can be used.)
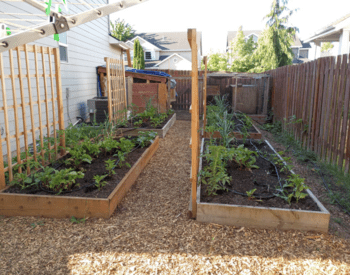
- Begin by mowing or cutting grass or other vegetation down to the soil level to the length and width you would like for the finished bed. Three feet wide is a good width as this allows the center of the bed to be reached from either side. This method may also be used directly in a constructed raised bed.
- Make sure there is good drainage by loosening the soil underneath the bed with a spading fork.
- Remove any pernicious or persistent weeds such as blackberry, bindweed, morning glory or quack grass. Sheet composting may not smother these weeds.
- Cover the ground with cardboard or four to six overlapping layers of newspaper (carbon materials that smother the grass and weeds underneath by keeping light from the plants.)
- Wet the newspaper or cardboard thoroughly, and cover with a layer of a "greens", such as manure or coffee grounds.
- Top the "greens" layer with an inch of leaves, straw, bark or other low-nitrogen material (i.e., "browns").
- Add a layer of "greens" material such as kitchen scraps, produce scraps, manure or fresh green weeds (minus the seed heads), or a combination of all.
- Cover with another layer of "browns" material using straw, shredded paper, leaves, dryer lint, etc.
- Continue to add alternating layers of "greens" and 'browns" as materials are available until the final height is reached (18 inches to 3 feet).
As the material decomposes, more layers may be added always ending with a "browns" layer. This carbon layer is the "blanket" that discourages flies from laying eggs on exposed nitrogen material such as kitchen scraps.
The height of a bed may vary depending on the amount of material available. Generally speaking, the greater the volume of material, the longer it will take for decomposition to take place. The final layer may be covered with overlapping burlap coffee sacks to keep the materials neat and in place. The burlap will gradually decompose over time but may be removed when planting the bed.
If a pile becomes too wet, cover it with a sheet of plastic loosely weighted down at the sides. This will help to warm the pile and encourage faster decomposition. This will also help prevent nutrients from leaching out during heavy rains.
Sheet composting is a slow process. There is little heat retention from the microorganisms to speed the process along. A sheet compost bed may take six months or longer to decompose sufficiently to allow for planting. A bed is "finished" and ready for planting when the layers have decomposed to the point that the original materials are no longer recognizable, and it looks and smells like fresh earth.
Alternatively, you can get plants started earlier by sifting a two- to three-inch layer of compost or garden soil on top of the newly formed bed and plant directly in the lasagna garden.
Low-fuss composting
Use only leaves and garden trimmings as they become available (no kitchen scraps if discouraging rodents). Chop material and place in a wire bin. Water and mix "browns" and "greens". After a year remove composted material and fill again.
Add-as-you-go composting
In most backyard composting, the pile is contained in a wooden or plastic bin with a ¼" hardware cloth on the bottom to deter rats, mice, and raccoons.
- Begin with sticks and coarse browns in the bottom of the bin to provide air circulation.
- Add to the bin whenever food or yard waste is available.
- Chop or shred browns and greens to increase the surface area for the compost critters to do their work. A variety of particle sizes ensure that water and air are distributed throughout the pile.
- The kitchen scraps and yard clippings are greens and need to be covered with a layer of "browns" to discourage flies from laying eggs.
- If possible, turn the pile periodically to expose all parts to air and to mix the material. If the pile seems dry, add water when turning.
During the rainy season keep the pile covered. If the pile is wetter than a wrung-out sponge, add more dry browns. This type of composting doesn’t heat up enough to kill diseases and noxious weeds. Add weeds only if the seed heads have not formed and avoid those that spread by roots and rhizomes. Dispose of diseased plants and those with thorns in the garbage or yard debris cart.
The finished humus from an add-as-you-go pile takes less work and does not require as much, if any, turning but will not be finished as quickly as a hot pile. High temperatures in a hot compost pile kill off certain fungi and bacteria that help suppress soil-borne diseases in the vegetable garden. These beneficial microbes are left intact in the humus produced by this slower type of composting.
Make-it-fast/hot composting
Most home composters do not have the space or adequate amounts of "browns" and "greens" or the time/energy to regularly turn their compost pile. However, others do! The same fundamentals apply as in add-as-you-go composting.
- Fast (hot) composting occurs when the initial volume of the pile is about 1 cubic yard (3 feet by 3 feet by 3 feet) or more and the pile contains an adequate amount of higher-nitrogen organic matter.
- Equal amounts of "greens" and "browns" are coarsely chopped or shredded and mixed together, adding adequate water.
- After a few days check the temperature in the middle of the pile either with a compost thermometer or by touch. Consistently high temperatures (135º F) in the pile may kill pathogens and weed seeds.
- If the pile doesn't heat up, add grass clippings, manure or coffee grounds.
- When the pile starts to cool (5 to 10 days), pull it apart and restack, putting materials from the outside on the inside and vice versa.
- The compost should always be wet as a wrung-out sponge. If the pile is too wet, add dry "browns" and turn more often. If too dry, add water when turning the pile.
- After about a month, when the pile reaches ambient temperatures (it no longer heats up when turned), allow the pile to cure for an additional four to six weeks if the compost is to be used with tender seedlings or in the vegetable garden. If using as mulch around established woody ornamentals, it can be applied sooner.
Your compost is now stable humus and is ready to use.
Food- or pet-waste digester
Composting without air is ordinarily not recommended because organisms that thrive in a low-oxygen environment can often cause plant diseases.
However, a backyard anaerobic digester is useful for composting pet waste as well as disposing of meat and bones. The compost is not safe for harvesting and should not be used. Do not compost pet waste near vegetable gardens or water supplies or streams. The perforated metal can is buried 18 inches deep.
Tumbler turn-turn-turn composting
Commercially available tumblers are popular for composters who want to keep animal pests, such as rodents out of the pile.
Types and amounts of materials, air and water are the same as in any compost setup. Rotate the tumbler daily or, at a minimum, several times per week. If possible have two tumblers, one for accumulating and storing debris and one for actively composting.
Troubleshooting
Symptom: Smells bad or is too wet
Problem is not enough air or too much moisture. Solution is to turn and add dry "brown" materials.
Symptom: Pile is too dry
Problem is not enough water and/or too many "browns". Solution is turn and moisten, add more "greens".
Symptom: Pests around bin (dogs and/or rodents)
Problem is unsuitable materials in pile (see Do Not Compost list). Solution is to avoid meat, dairy and fatty foods, and bury food waste in the pile.
Problem is the pile is an attractive nesting place for rodents. Solution is consider using a rodent-proof bin.
Symptom: Flies and insects
Problem is food waste on top. Solution is to bury food and keep covered with "browns".
Symptom: Pile not breaking down fast enough
Problem could be pile is too small or not enough "green" material. Solutions are to make pile at least one cubic yard or maintain equal "browns" and "greens".
Books
Let It Rot! The Gardener's Guide to Composting by Stu Campbell. Storey Publishing, 1975.
Compost, Vermicompost and Compost Tea by Grace Gershuny. Chelsea Green Publishing, 2011.
The Rodale Book of Composting Edited by Deborah L. Martin, Grace Gershuny. Rodale Press, 1992.
Publications available online
Composting with Worms – OSU Extension Catalog EM 9034
Backyard Composting – WSU Extension Catalog EB1784E